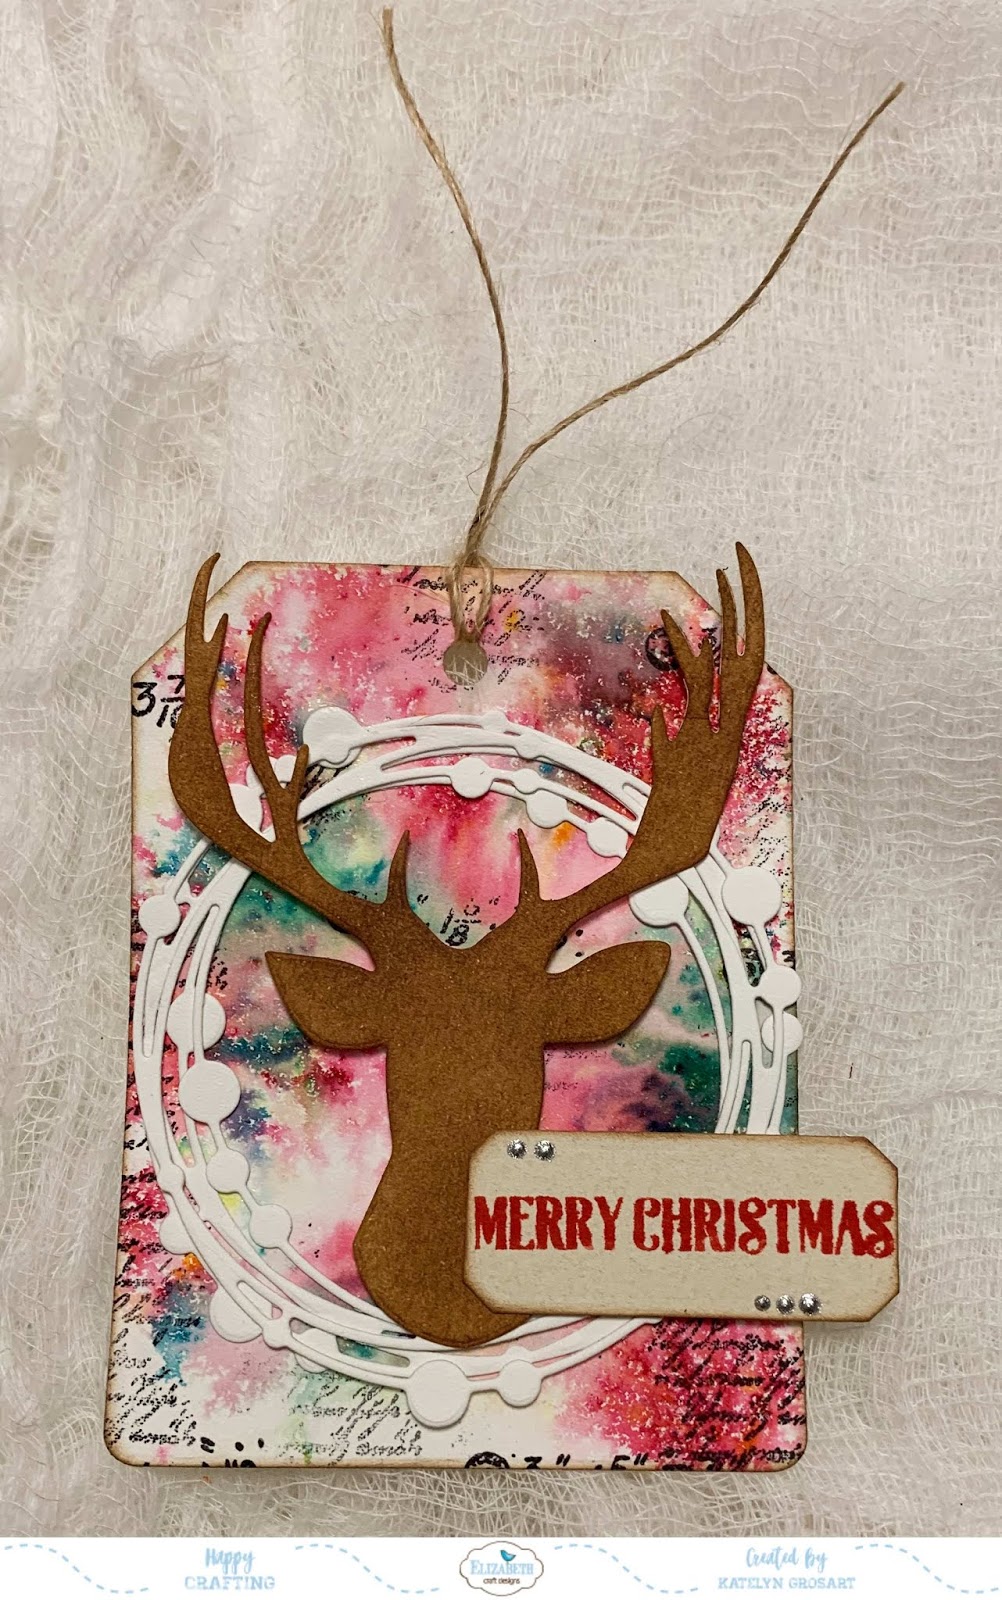
Thursday, October 31, 2019

November Title Page

Happy Thursday!
 I decided that I would get a head start in my planner and set up a new title page to mark November starting tomorrow. So, to create my page, I've used a variety of the dies from the Planner Essentials line and Joset Designs. You'll want to read below to learn how to recreate my November Title Page at home.


To start, choose a piece of patterned paper from the Autumn Sunset Collection. Die cut the Planner Page from the Planner Essentials - 12 die out of the patterned paper. Ink the edges of the page using Walnut Stain Distress Ink and a blending tool with foam.


From the Planner Essentials - 2 die, die cut the large tag out of one of the 3" x 4" cards from the Autumn Sunset Collection. Ink the edges of the tag using Walnut Stain Distress Ink and a blending tool with foam.


From the plaid pattern paper from the Autumn Sunset Collection, die cut the 2 1/2" Stitched Circle. Choose one of the Planner Labels and die cut it out of the paper. Choose one of the Celebration Flags and die cut it out of the paper. Cut the flags down to 3 1/2" long. Ink the edges of the flags, label and circle using Walnut Stain Distress Ink and a blending tool with foam.


From the Planner Pocket - 2 die, die cut the wreath twice out of a patterned paper from the Autumn Sunset Collection. 


From the Planner Months die, die cut the November word from a piece of Kraft Cardstock.


From the new Reinforcement Variety Pack, choose one of the reinforcements and die cut it out of one of the patterned papers from the Autumn Sunset Collection. Ink the edges of six of the reinforcements using Walnut Stain Distress Ink and a blending tool with foam.


Choose three pieces of patterned paper and die cut one feather out of one of the papers. Repeat the previous step for the other two feathers. Ink the edges of the feathers using Walnut Stain Distress Ink and a blending tool with foam.


From a patterned paper piece from the Autumn Sunset Collection, die cut the 2" Stitched Circle. Ink the edges of the circle using Walnut Stain Distress Ink and a blending tool with foam.


Adhere a reinforcement over top of each circle on the planner page.


Use thin 3D foam squares to adhere the tag 3" from the bottom and 1/4" from the right of the planner page. Adhere one of the wreaths to the 2 1/2" stitched circle. Adhere the other wreath slightly off centered to the other wreath.


Adhere the three feathers together. Adhere the three feathers to the left hand side of the 2 1/2" circle. Use adhesive to adhere the 2" circle to the right of the feathers.


Use foam squares to adhere the label to the middle of the 2" circle. Adhere the November word to the label. Use thin 3D foam squares to adhere the flags to the top right side of the planner page.


To finish the wreath, add dots to each of the dots on the wreath using Craft Drops - Metallic Gold.


Here are a few closeup photos of the finished page.


Here is the finished November Title Page.


Elizabeth Craft Designs Supplies Used:

- Craft Drops: Metallic Gold

Other Supplies Used:

- Prima Marketing Inc.: Autumn Sunset Collection
- Tim Holtz for Ranger Ink: Walnut Stain Distress Ink and a Blending tool with foam
- Misc: Kraft Cardstock

Thanks so much for joining me today and I hope that I have inspired you to recreate my November Title Page at home.

- Katelyn


Tuesday, October 29, 2019

Zen Card

Happy Tuesday! 
With the release of brand new dies and stamps released from Joset Designs yesterday, I figured it was no better time to share a card using the new release. My Just Breathe card features three of the brand new dies and one of the new stamp sets. This new collection will have you creating so many beautiful Japanese inspired cards. You'll want to read below to learn how to recreate my Just Breathe Card at home.


To start, you'll need the Bridge & Lotus Die.

Die cut the bridge, water and ornament out of White Soft Finish Cardstock. Using a blending tool with foam, blend Ground Espresso Distress Ink lightly over the entire surface of the bridge. Using a blending tool with foam, blend Tumbled Glass Distress Ink over the entire surface of the water.  Using a blending tool with foam, blend Black Soot Distress Ink over the entire surface of the ornament. 


Die cut the two bullrushes out of White Soft Finish Cardstock. Using a blending tool with foam, blend Ground Espresso Distress Ink lightly over the top portion of the bullrushes. Using a blending tool with foam, blend Shabby Shutters Distress Ink over the bottom portion of the bullrushes.  


Die cut all the elements for the water lily twice and the water lily pads out of White Soft Finish Cardstock. Using a blending tool with foam, blend Worn Lipstick Distress Ink over the entire surface of the flower portions of the water lilies. Using a blending tool with foam, blend Shabby Shutters Distress Ink over the entire surface of the water lily pads.  


From the Cherry Blossom Branch, die cut the branch, the cherry blossom three times and the centers three times out of White Soft Finish Cardstock. You will only need eight of the cherry blossoms and eight of the centers. Using a blending tool with foam, blend Ground Espresso Distress Ink over the entire surface of the branch. Using a blending tool with foam, blend Picked Raspberry Distress Ink lightly over the entire surface of the eight cherry blossoms.  Using a blending tool with foam, blend Squeezed Lemonade Distress Ink over the entire surface of the eight centers. 


Die cut a 4 3/4" Stitched Indented Square out of White Soft Finish Cardstock. Apply Jet Black Archival Ink to the Just Breathe sentiment from the Zen sentiments stamp and stamp in the middle of the square. Ink the edges of the square using Black Soot Distress Ink and a blending tool with foam.


Die cut the 5 1/4" Stitched Indented Square out of White Soft Finish Cardstock. Ink the edges of the square using Black Soot Distress Ink and a blending tool with foam.


Foam square the bridge 1 1/4" from the top of the 5 1/4" square. Adhere the water 1/2" from the bottom and 7/8" from the left of the square. Foam square the ornament to the right side  of the water.


Adhere the waterlilies together and then adhere the waterlilies to the water pads. Adhere one of the bullrushes to the left side of the water. Adhere the other bullrush to the right hand side of the water. Adhere the one waterlily to the left side of the water. Adhere the other waterlily to the right side of the water. The ornament will sit overtop of the waterlily on the right hand side.


Adhere the cherry blossoms to the branch as desired. Add centers to the cherry blossoms. Use foam squares to adhere the cherry blossom branch to the top right side of the 5 1/4" square. 


To finish the cherry blossoms, add a dot of Craft Drops - Transparent Crystal to the centers of each cherry blossom.


Apply Jet Black Archival Ink to the Zen sentiment and stamp onto the bottom right side of the cardfront.


Cut a cardbase that measures 5 1/4" x 10 1/2", score at 5 1/4". Adhere the cardfront to the cardbase.


To finish the card, adhere the 4 3/4" square to the inside of the cardbase.


Here is the finished Zen Card.


Elizabeth Craft Designs Supplies Used:

- Craft Drop - Transparent Crystal

Other Supplies Used:

- Tim Holtz for Ranger Ink: Distress Ink - Black Soot, Ground Espresso, Tumbled Glass, Shabby Shutters, Picked Raspberry, Worn Lipstick & Squeezed Lemonade and Blending Tool with Foam
- Ranger Ink: Jet Black Archival Ink

- Katelyn


Monday, October 28, 2019

Trick or Treat Altered Candle Holder

I have one more post to share with you today!

I'm excited to be back on Creative Scrapbooker Magazine's Blog as a monthly blogger sharing my Trick or Treat Altered Candle Holder. My project features patterned paper from Wild Whisper Designs, dies from Elizabeth Craft Designs, ink from Ranger Ink, and adhesive from Scrapbook Adhesives by 3L.


You'll want to make sure to stop by the Creative Scrapbooker Blog to learn how I created my Trick or Treat Altered Candle Holder.

Thanks for stopping by!
- Katelyn

Kindness is Like Snow Card

Happy Monday!
I'm excited to be over on Quietfire Design blog today, where I'm sharing my Kindness is Like Snow Card. My card features a variety of Quietfire stamps as well as A Way With Words Dies. 


For a full tutorial and a few more photos of my project, you'll want to head over to Quietfire Design blog for all the details. 

- Katelyn

Friday, October 25, 2019

Warmest Wishes Card

I have one more project to share with you today.

I have a new project over on Wild Whisper's blog, where I'm sharing my Warmest Wishes Card which features the Child at Heart Collection.


For all the details, more photos and a full tutorial on my card you'll want to stop by the Wild Whisper blog. You'll want to make sure to keep checking out Wild Whisper's blog as the design team will be sharing lots of inspiration using the new collections.

- Katelyn

Happy Birthday Gift Tag

Happy Friday! 
I'm thrilled to be back on Southern Ridge Trading Company's blog sharing my Happy Birthday Gift Tag. I hope that my tag inspires you to want to recreate your own version at home.


You'll want to stop by Southern Ridge Trading Company's blog so that you can learn how I created my Happy Birthday Gift Tag at home.

- Katelyn

Monday, October 21, 2019

Merry Christmas Gift Tag

Happy Monday! 
I'm up on the Elizabeth Craft Designs blog today sharing my Merry Christmas Gift Tag, which features dies from the Planner Essentials Collection and Joset Designs.


I would love for you to go and check out the full tutorial on how to create my Merry Christmas Gift Tag over on the Elizabeth Crafts Designs Blog

- Katelyn


Sunday, October 20, 2019

Elizabeth Craft Designs October Group Post - Thanksgiving Table Decor or General Thanksgiving

Happy Sunday!

We are switching things up on the Elizabeth Craft Designs blog this year and instead of having a designer challenge, we are having group posts each month. Each month the group post will have a theme and some or all of the design team members will participate. For October's theme it's all about Thanksgiving! 

 For this month's group post, I created this Happy Thanksgiving Treat box perfect to add to the Thanksgiving table. To create my treat box, I've used dies from Joset Designs, Suzanne Cannon and Charlene van der Vorst. Grab your favourite fall beverage and read below as I have a tutorial for you so that you can re-create my treat box at home. You'll also want to make sure to stop by the Elizabeth Craft Designs Blog to check out the rest of the team's projects. 


To start, die cut the Gable Box out of wood patterned paper. Ink the edges of the box using Walnut Stain Distress Ink and a blending tool with foam. Fold the pieces of the box on the score lines.


From the Mintay Paper, choose two patterned papers from the Cozy Evening Paper Pack. Die cut the 1 3/4" Stitched Indented square out of one of the patterned papers twice. Die cut the same square out of the other patterned paper twice. Distress the edges of the squares. Ink the edges of the squares using Walnut Stain Distress Ink and a blending tool with foam.


Die cut the Happy Thanksgiving sentiment from the Words 3 - Happy Holidays die out of White Soft Finish Cardstock. Cut the Thanksgiving into two pieces. 


From the Garden Flowers stamp set, you'll need the leaf. Apply Jet Black Archival Ink to the five leaf leaf and stamp onto a piece of White Soft Finish Cardstock. Reapply ink to the leaf and stamp onto the same piece of White Soft Finish Cardstock. Repeat the previous step two more times.
From the A Field of Flowers stamp set, you'll need the leaf. Apply Jet Black Archival Ink to the leaf and stamp onto a piece of White Soft Finish Cardstock. Reapply ink to the leaf and stamp onto the same piece of White Soft Finish Cardstock. Using Scribble Sticks set 1 & 2 as well as waterbrush, colour the leaves in. Fussy cut the leaves out. Ink the edges of the leaves using Walnut Stain Distress Ink and a blending tool with foam.


Adhere the Gable Box together.


Adhere and alternate the squares as desired on each side of the box.


Adhere one leaf and two five leaves together. Foam square the leaves to the left hand side of the gable box that has the heart above it. Adhere the Happy Thanksgiving sentiment to the same square as desired.


Adhere the remaining leaves together. Foam square the leaves to the middle of the opposite side of the box.


Here are a few closeups of the treat box.


Here's the finished Happy Thanksgiving Treat Box.


Elizabeth Craft Designs Products Used:


Other Products Used:

- Tim Holtz for Ranger Ink: Distress Ink - Walnut Stain and Blending Tool with foam
- Dina Wakley for Ranger Ink: Scribble Stick Sets 1 & 2
- Ranger Ink: Jet Black Archival Ink
- Mintay Paper: Cozy Evening and Life Stories
- Misc: Waterbrush

- Katelyn