Tuesday, January 10, 2017

From the Heart - Die Cut Team Design Challenge

Today we're kicking off a new design team challenge "From the Heart" on the Elizabeth Craft Designs blog.  All of the design team members on the die cut team were challenged to create a card featuring hearts. With the challenge in mind, I created a fun XOXO Valentine's Day card featuring a few of the new dies from Moda Scrap and Els van de Burgt. You'll want to read below as I have a tutorial for you so that you can re-create my card at home.


Using the Entwined Hearts, die cut the small heart with three hearts inside of it twice using pink double dot paper.


Use the Love Sentiment die and cut out the XOXO sentiment out of White Soft Finish Cardstock. Using a blending tool, blend Spun Sugar Distress Ink overtop of the XOXO sentiment. 


Using the Stitched Fishtail Banners Die, cut the 3/4" banner out of White Soft Finish Cardstock. Once the banner has been cut, flip the banner die to the non pennant side and cut out the other side to create the banner pennant on that side. Using a blending tool, blend Candied Apple Distress Ink overtop of the banner.


Use the Stitched Heart die and cut out the 2 1/4" heart using White Soft Finish Cardstock. Use a blending tool and blend Spun Sugar Distress Ink overtop of the stitched heart.


Use the Stitched Heart die and cut out the 3 1/4" heart using White Soft Finish Cardstock. Use a blending tool and blend Candied Apple Distress Ink overtop of the stitched heart.


Using the Heart Background die, cut the background out of White Soft Finish Cardstock. 


The last piece that needs to be die cut is, die cutting the 
4 1/4" Fitted Rectangle out of White Soft Finish Cardstock.


Pull one medium sized doily from your collection.


Adhere the heart background to the fitted rectangle.


Add foam squares to the back of the doily. Adhere the doily to the middle of the heart background.


Adhere the pink heart to the red heart. Adhere the red heart to the middle of the doily.


Adhere the banner to the middle of the pink heart.


Adhere the XOXO sentiment to the middle of the banner. To finish the banner, adhere a small heart to the left of the "X" and adhere a small heart to the right of the "O". 


To finish the card, adhere three small hearts to the bottom right hand side of the layered heart. Adhere the card front to the card base. Once the card front is adhered to the cardbase, apply Glossy Accents to the XOXO.


Thanks for joining me today! Make sure to head over to the Elizabeth Craft Designs blog to check out the rest of the team's wonderful creations. I hope that I've inspired you to re-create my XOXO Valentine's Day card at home.

- Katelyn

Elizabeth Craft Design Products Used:


Other Products Used:

- Tim Holtz for Ranger Ink: Distress Ink - Candied Apple and Spun Sugar. Blending Tool and Replacement Foam.
- Ranger Ink: Glossy Accents
- Doily


Sunday, January 8, 2017

Love You Note Pocket

I'm back on the Elizabeth Craft Designs blog sharing my first post as a design team member. With Valentine's day right around the corner I created this beautiful Love You Note Pocket that is perfect for that special someone in your life.  My note pocket features a variety of their dies, paper and adhesives.


You'll want to make sure to make your way over to Elizabeth Crafts Designs Blog to read all about how I created my beautiful Love You Note Pocket, so that you can recreate them at home. 

-Katelyn


Saturday, January 7, 2017

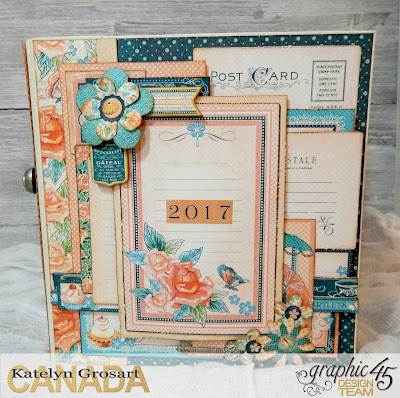
2017 Scrapbook Planner

2017 is here and that means it's time to start thinking about creating a new planner. Today I'm on the Graphic 45 blog sharing with you a 2017 Scrapbook Planner using Children’s Hour, Café Parisian as well as a variety of other collections from this year.  Having a planner that will allow me to document birthdays, important events or things and being able to scrapbook those special moments during the month is so important to me. You'll want to head over to the Graphic 45 blog to check out the rest of the photos of my project.


Tip: Add policy envelopes into your planner as a way to hold important receipts, ticket stubs or other important pieces of paper.


Tip: Add different size papers and fold outs into your planner to add some extra interest as well as give you more space to document your memories.


This is just a few of the photos of the inside of my planner. To see more pictures of my 2017 Scrapbook planner, you'll want to head over to the Graphic 45 blog. I'm warning you though, that you'll want to grab a cup of tea or coffee before reading the post as the post is top heavy with photos. 

Supplies Used:

- 12” x 12” Café Parisian: Confectionary
Café Parisian 12”x12: Patterns & Solids
- 12”x12” St. Nicholas: Sweet Tooth and Bells & Bows
- 12”x12” St. Nicholas: Patterns & Solids
- 12”x12” Off to the Races: Run for the Roses and Elegance Running
- Off to the Races 12”x12” Patterns & Solids
- Children’s Hour 12”x12” Pad
- Children’s Hour 12”x12” Calendar Pad
- Children’s Hour 8”x8” Calendar Pad
- Hallowe’en in Wonderland Deluxe Collectors Edition
- ABC Primer Deluxe Collectors Edition
- Secret Garden Deluxe Collectors Edition
- Café Parisian Chipboard 1 & 2
- Café Parisian Flowers
- Café Parisian 12”x12” Cardstock Stickers
- Café Parisian Ephemera Cards
- Children’s Hour Ephemera Cards
- Staples: Ivory Mixed Media Album, Shabby Chic Ornate Metal Keys, Square Black Policy Envelopes, Square Red Policy Envelopes & Shabby Chic Metal Door Plate & Knobs
- Vintage Photo Distress Ink & Blending Tool
- Mixed Media Cardstock
- Doilies
- Sookwang Tape
- Foam Squares
- Edge Distressor
- Scissors
- Crop a Dile
- Black Journaling Pen
- 1 3/8” Circle Punch


- Katelyn


Friday, January 6, 2017

Walking In A Winter Wonderland Scrapbook Layout

I'm up on the Southern Ridge Trading blog today to share with you some inspiration for our current monthly challenge which is all about "Winter".  With the challenge in mind I created a Winter Scrapbook Layout that's sure to inspire you.


Make sure to head over to the Southern Ridge Trading Company Blog so that you can learn all about how I created my Winter Scrapbook Layout. While you're checking out my project, make sure to participate in our monthly challenge. You can find all the details here on how to enter.

- Katelyn


Wednesday, January 4, 2017

Sneak Peek


I hope that you are having a fabulous start to your New Year. I wanted to quickly share with you a sneak peek of a new project that will be on Graphic 45's blog. You'll want to mark your calendars for Friday, January.6th. I hope that you'll take the time to stop by the Graphic 45 blog and check out all the photos of my project. I will be sharing some photos and other details about this project on Saturday on my blog.

- Katelyn 

Thursday, December 29, 2016

Life is Beautiful Scrapbook Layout

I'm back on the Creative Scrapbooker Blog today as a guest blogger sharing my Life is Beautiful Scrapbook Layout featuring Southern Ridge Trading CompanyRanger InkEmerald Creek Craft Supplies and Bo Bunny products.


I hope that you'll head over to the Creative Scrapbooker Blog to read about how I created my scrapbook layout, so that you can recreate it at home.

-Katelyn

Sunday, December 25, 2016

Season's Greetings Wall Hanging

Merry Christmas! I'm back on the Elizabeth Craft Designs blog for my last guest post today.  I've created this beautiful Season's Greetings Wall Hanging that is perfect for decorating your home with.  The wall hanging features a variety of their dies, paper, adhesives and glitter dot stickers. 


You'll want to make sure your way over to Elizabeth Crafts Designs Blog to read all about how I created my beautiful Season's Greetings Wall Hanging, so that you can recreate them at home. Thank you to Elizabeth Craft for having me guest post over the last couple of months! To all my readers, I hope you and your loved ones have a fantastic Christmas sharing it with loved ones and friends.

-Katelyn