Showing posts with label Gel Press. Show all posts

Tuesday, January 5, 2021

Bloom Tag

Happy Tuesday!

Today's post, I'm sharing this fun and bright Bloom Tag.  To create my tag, I've used stamps, stencils and dies from the Art Journal Collection. You'll want to read below as I have a full tutorial on how to recreate my tag at home.  


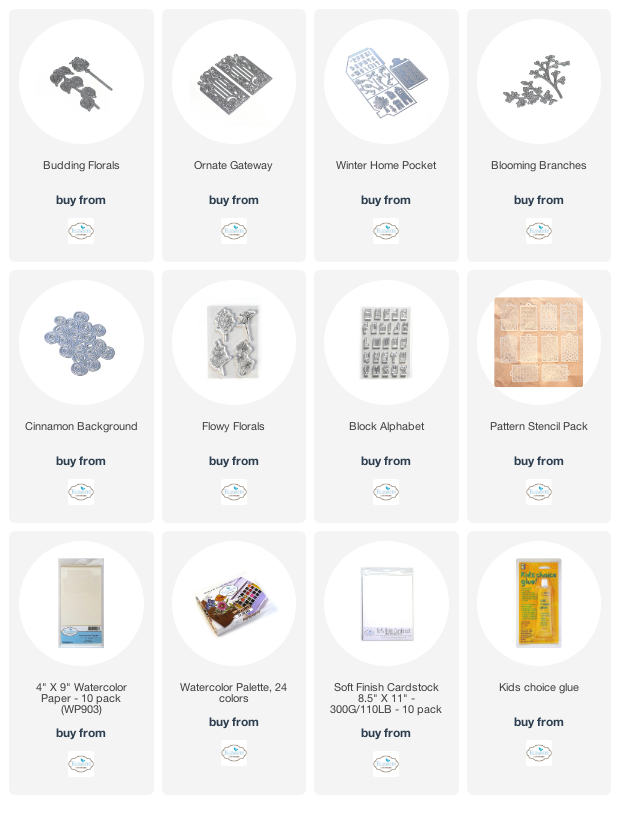
Die cut the tag from the Winter Home Journal Pocket die out of White Soft Finish Cardstock. On a 6x6 or bigger Gel Plate, put a few dots of Dina Wakley - Heavy Body Acrylic Paint in Lime, Lemon, Turquoise and White. To move the paint around on the plate to cover the plate, you'll need to use a brayer. Once the paint covers the plate, put the tag over the paint. Allow the tag to dry. To pick up the remaining paint on the plate, use a white piece of cardstock.


Choose one of the stencils from the Pattern Stencil Pack. Once the paint has dried, put the stencil randomly on the tag and trace around the stencil using a Black Posca Paint Pen. I stenciled in five areas of the tag. Ink the edges of the tag using Black Soot Distress Ink and a blending tool with foam.


Die cut the Cinnamon Background die out of White Soft Finish Cardstock.


Die cut the right hand side of the Ornate Gateway die out of kraft cardstock. Ink the edges of the gate using Black Soot Distress Ink and a blending tool with foam.


Die cut the Cotton branch from the Budding Florals die out of a piece of White Soft Finish Cardstock. Using a waterbrush and the Watercolour Palette, colour the cotton branch. Ink the edges of the cotton branch using Black Soot Distress Ink and a blending tool with foam.


From the Blooming Branches die, you'll need to die cut one branch out of book page and die cut the other branch out of black cardstock.


Apply Jet Black Archival Ink to the Bloom letters from the Block Alphabet Stamp Set and stamp onto a piece of watercolour cardstock. Colour the letters in using a waterbrush and the Watercolour Palette. Cut the Bloom word into a strip. Ink the edges of the bloom word strip using Black Soot Distress Ink and a blending tool with foam.


Apply Jet Black Archival Ink to the fluffy flower and circle flower from the Flowy Florals Stamp Set and stamp onto a piece of watercolour cardstock. Use a waterbrush and the Watercolour Palette to colour in the circle flower. Fussy cut both flowers out. Ink the edges of the flowers using Black Soot Distress Ink and a blending tool with foam.


Adhere the cinnamon background to the tag. Adhere the gate to the left hand side of the tag as desired.


Foam square the cotton branch to the middle of the gate. Adhere the two branches as desired to the cotton branch.


Adhere the fluffly flower and the circle flower over top of the branches as desired. Use adhesive and foam squares to adhere the bloom word strip to the bottom right side of the tag.


To finish the tag, tie a bow at the top of the tag using black twine.


Here are a few closeup photos of the finished tag.


Here is the finished Bloom Tag.


Elizabeth Craft Designs Supplies Used:


Other Supplies Used:

- Tim Holtz for Ranger Ink: Distress Ink - Black Soot and Blending Tool with Foam
- Ranger Ink: Jet Black Archival Ink
- Dina Wakley for Ranger Ink: Heavy Body Acrylic Paint - Lime, Lemon, Turquoise and White
- Gel Press: 6x6 Gel Plate
- Posca: Black Paint Pen
- Misc: Book Page, Kraft Cardstock, Black Cardstock, Brayer and Black Twine

I hope that my tag has inspired you to recreate your own version at home.

- Katelyn


Friday, October 9, 2020

Hi Tag

  Happy Friday!

I'm up on Wild Whisper's blog today, where I'm sharing my mixed media Hi Tag. The tag features a variety of stamps by Nicole Wright and Wild Whisper, the Circlet Stencil by Nicole Wright as well as Bronzed Anther Embossing Powder by Pam Bray. 


For all the details, more photos and a full tutorial on my tag, you'll want to stop by the Wild Whisper blog. You'll want to make sure to keep checking out Wild Whisper's blog as the design team will be sharing lots of inspiration.

- Katelyn


Wednesday, September 4, 2019

Create The Things You Wish... Tag

Happy Wednesday!
I've been creating with Charlene van der Vorst new stamp sets this past weekend. For my project today, I created this fun little Create The Things You Wish...Tag to add to my planner which features stamps from Charlene and dies from Joset Designs and the Planner Essentials Collection.  You'll want to read below as I have a full tutorial on how to recreate my tag at home. 


To start, die cut the small tag from the Planner Essentials - 7 die out of White Soft Finish Cardstock. On a 3"x4" Gel Plate, put Peacock Feathers, Cracked Pistachio and Twisted Citron Distress Oxide Ink. Spritz the ink with water. Place the tag overtop of the plate. Pull tag off. Place tag again on plate as desired to add more colour. Let the tag dry.


Apply Peacock Feather Distress Oxide Ink to the grid stamp from the Make a Wish Stamp set and stamp as desired on the tag. Reapply ink to the stamp and stamp four more times as desired on the tag. Distress the edges of the tag. Ink the edges of the tag using Black Soot Distress Oxide Ink and a blending tool with foam.


Apply Jet Black Archival Ink to the Create sentiment from the Make a Wish stamp set and stamp onto a piece of White Soft Finish Cardstock. Cut the sentiment out into five strips. Ink the edges of the strips using Black Soot Distress Oxide Ink and a blending tool with foam.


Apply Jet Black Archival to three of the feathers from the Make a Wish stamp set and stamp onto a piece of White Soft Finish Cardstock. Choose one of the feathers and reapply ink to the stamp and stamp onto the same piece of White Soft Finish Cardstock. Fussy cut the second feather out you just stamped. Using a watercolour brush, colour the feathers in using Scribble Sticks, use which ever colours you'd like from the sets. Fussy cut the other three feathers out. Ink the edges of the feathers using Black Soot Distress Oxide Ink and a blending tool with foam. 


Apply Jet Black Archival to the one of the leaves from the Garden Flowers stamp set and stamp onto a piece of White Soft Finish Cardstock. Using a watercolour brush, colour the leaf in using Scribble Sticks, use which ever colours you'd like from the sets. Fussy cut the leaf out. Ink the edges of the leaf using Black Soot Distress Oxide Ink and a blending tool with foam. 


Die cut the 1" and 1 1/2" Diagonal Stitched Fishtails out of White Soft Finish Cardstock. Cut the 1" fishtail down to 4 1/8". Die cut the 1 1/2" fishtail down to 4 1/2". Ink the edges of the fishtails using Black Soot Distress Oxide Ink and a blending tool with foam.


Adhere the 1" fishtail to the 1 1/2" fishtail. Foam square the 1 1/2" fishtail 3/4" from the left and all the way to the top of the tag.


Adhere the four feathers and leaf together. Tie a twine bow at the bottom of the feathers. Foam square the feather bunch to the middle of the fishtails.


To finish off the tag, use adhesive and foam squares to adhere the Create sentiment to the bottom right hand side of the tag.


Here are a few closeup photos of the finished tag.


Here is the finished Create The Things You Wish...Tag.


Elizabeth Craft Designs Supplies Used:

Other Supplies Used:

- Ranger Ink: Jet Black Archival Ink and Mister
- Tim Holtz for Ranger Ink: Distress Oxide Ink - Black Soot, Cracked Pistachio, Peacock Feathers & Twisted Citron and a Blending tool with Foam
- Dina Wakley for Ranger Ink: Scribble Sticks Set 1 & Set 2
- Gel Press: 3"x4" Gel Plate
- Misc: Twine, White Gel Pen and Waterbrush

- Katelyn


Tuesday, May 7, 2019

Wonderful ATC

Happy Tuesday!
I have a new post over on Quietfire Design blog today, where I'm sharing my Wonderful ATC which features a variety of Quietfire stamps and A Way With Words Dies.


For a full tutorial and a few more photos of my project, you'll want to head over to Quietfire Design blog for all the details. 

- Katelyn

Friday, April 19, 2019

Love is the Flower Tag

Happy Friday! Today, I'm excited to be on Wild Whisper's blog sharing my Love is the Flower Tag which features the brand new Floral Collection. 


For all the details, more photos and a full tutorial on my Love is the Flower Tag you'll want to stop by the Wild Whisper blog. Make sure to keep checking out Wild Whisper's blog because the rest of the design team will be sharing projects all month featuring the Floral and Fandom collections.


- Katelyn

Thursday, April 11, 2019

The Real Voyage of Discovery Wall Hanging

Happy Thursday!
I have a new post over on Quietfire Design blog today, where I'm sharing my The Real Voyage of Discovery Wall Hanging which features a variety of Quietfire stamps and A Way With Words Dies.


For a full tutorial and a few more photos of my project, you'll want to head over to Quietfire Design blog for all the details. 

- Katelyn

Saturday, March 16, 2019

March Week #1 - Planner Post

Happy Saturday! I'm excited to be sharing with you Week 1 of my planner spread. I've been playing with the different stamps and dies in the planner collection from Elizabeth Craft Designs to my pages. You'll want to grab a cup of your favourite beverage and read below as I have a tutorial for you on how to recreate my planner spread. 


To start, you'll need to die cut the left hand planner page from the Planner Essentials 4 die out of White Soft Finish Cardstock. Next, you'll need to die cut the right hand planner page from the Planner Essentials 2 die out of White Soft Finish Cardstock. On a gel press plate, you'll need to put three large dots of Jade, Butter and Spanish Mulberry PaperArtsy Fresco Finish Chalk Acrylics. Using a brayer, mix the colours together by covering the plate with all of the paint. Press in a stencil and bubble wrap randomly on the plate. Press one of the pages into the plate, peel off and set aside. Repeat the previous steps for the other page.  Apply Jet Black Archival Ink to the March month out of the Calendar stamp set and stamp onto the tab of the right hand side page.


Apply Jet Black Archival Ink to the zigzag stamp from the Schedule stamp set and stamp randomly on the left hand side of the page. Apply ink to the stamp as many times as needed and stamp as many times as desired. Repeat the previous step for the right hand side of the page. Apply Jet Black Archival Ink to the bubbles stamp from the Patterns 2 stamp set and stamp randomly on the left hand side of the page. Apply ink to the stamp as many times as needed and stamp as many times as desired. Repeat the previous step for the right hand side of the page. Ink the edges of each page using Black Soot Distress Oxide Ink and a blending tool with foam.


From the Planner Essentials 3 die, die cut five banners out of black cardstock.


From the Planner Essentials 2 die, die cut the date and two arrows die out of black cardstock. Write the week date on the date tag.


From the Planner Essentials 1 die, die cut 12 reinforcement circles out of White Soft Finish Cardstock. Ink the edges of each circle using Black Soot Distress Oxide Ink and a blending tool with foam.


From the Planner Essentials 2 die, die cut six small tags out of White Soft Finish Cardstock. Apply Jet Black Archival Ink to each of the day stamps from the Calendar stamp set and stamp on each of the tags. Note that the weekend shares one tag. Write on your tags whatever you desire.  Ink the edges of each tag using Black Soot Distress Oxide Ink and a blending tool with foam.


Adhere the reinforcement circles over each circle on each page.


Now we'll work on the left hand page. Adhere a banner to the right hand side of the Monday and Wednesday tags. Adhere the date tag 3/8" from the left and 2 1/2" from the bottom of the page. Adhere the Monday to Wednesday tags to the page as desired. Adhere one of the arrows to the top right hand side of the Monday tag.


Next we'll work on the right hand page. Adhere a banner to the right hand side of the Thursday, Friday and Weekend tags. Adhere the Thursday to Weekend tags to the page as desired. Adhere one of the arrows to the bottom left hand side of the weekend tag.


Here are a few closeup photos of the finished March Week#1 planner spread.


Here's the finished March Week #1 Planner Spread.


Elizabeth Craft Designs Supplies Used:

- Months

Other Supplies Used:

- Ranger Ink: Jet Black Archival Ink 
- Tim Holtz for Ranger Ink: Black Soot Distress Ink and Blending Tool with Foam
- PaperArtsy: Fresco Finish Chalk Acrylics - Jade, Butter and Spanish Mulberry
- Gel Press: 8x10 Gel Plate
- Misc: Black Cardstock, Black Gel Pen and White Gel Pen

Thanks for joining me! I hope that I've inspired you to recreate my planner spreads.

- Katelyn