Showing posts with label May Arts. Show all posts

Thursday, March 10, 2016

Ring in Spring Challenge on the Emerald Creek Dares Blog

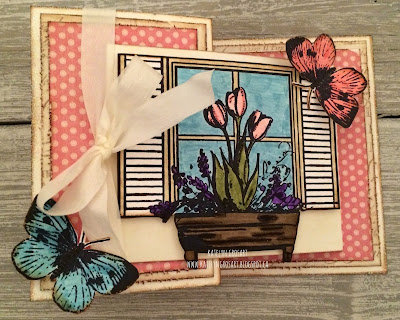
It's time for a new challenge on the Emerald Creek Dares blog, featuring "Ring in Spring". When we received this challenge I was excited to start my project as I love when Spring comes around.  For my project I decided that I would create a fun Spring card.


To start my card, I first needed to create by card and fold. To create my card base, I trimmed a 4 1/4" x 11" piece of 100lb White Cardstock and scored it at 2 3/4" and 5 1/2".  At the 2 3/4" line fold it back to create an accordion fold. For the flap that the window is on, I trimmed a piece of 100lb White Cardstock to 3 1/4" x 8" and score at 4".  Once the pieces were trimmed and scored, I inked around 1/4" of the card base with Antique Linen Distress Ink. To finish the card base and flap, I inked the edges with Vintage Photo Distress Ink.


Once the card base and flaps are done, then I cut the Graphic 45 'Botanical Tea" patterned pieces for the flaps and card base.  Once they were cut, I edge distress the edges of the patterned paper as well as ink the edges with Vintage Photo Distress Ink.


The next step was to stamp the Window Box with Black Archival Ink on the 100lb White Cardstock. Once stamped, I coloured the Window Box with Tumbled Glass, Broken China, Worn Lipstick, Spun Sugar, Peeled Paint, Forest Moss, Gathered Twigs, Wilted Violet, Vintage Photo and Antique Linen Distress Markers.


Next I stamped the Large Butterfly with Black Archival Ink on the 100lb White Cardstock. Once stamped three times, I coloured them using Broken China, Spun Sugar and Worn Lipstick Distress Markers.


After the Window Box and Large Butterfly images were coloured, I inked all of the edges using Vintage Photo Distress Ink.


To finish the card base I inked the edges and then embossed them with Iridescent Shimmer Embossing Powder. Once the card base edges were embossed, I adhered all the stamped images to the card, making sure that my Window Box Image was on the outside flap. As well I randomly placed the butterflies throughout the card. The last element was to add ribbon and a bow on the front panel on the card. 


Here is the inside of the finished card:


Products used from Emerald Creek:

Other Products Used:
- Ranger/Tim Holtz: Distress Markers - Tumbled Glass, Worn Lipstick, Spun Sugar, Forest Moss, Gathered Twigs, Peeled Paint, Wilted Violet, Broken China, Vintage Photo and Antique Linen. Distress Ink - Vintage Photo, Antique Linen & Embossing Ink
- Ranger Ink: Black Archival Ink
- Graphic 45: Botanical Tea


Make sure that you go and check out the rest of the Emerald Creek Dares Design Team as they have all created fantastic pieces for this weeks challenge:


Thanks for stopping by and checking out my Spring Card. Don't forget to enter your project into our Emerald Creek Dares Challenge for your chance to win a $25.00 gift certificate for the Emerald Creek Store!


Until Next Time!
-Katelyn


Monday, January 25, 2016

Winter Canvas on the Southern Ridge Trading Company Blog

I'am back on the Southern Ridge Trading Company blog today to feature a "Winter" inspired project . There is still six days left to enter your "winter" piece into our Monthly Challenge and we would love to see you project. For all of the details, head here. For my post today,  I created a winter canvas.

Supplies Used: Ranger/Tim Holtz - Ground Expresso Distress Ink, Distress Crackle Paint - Clear Rock Candy. Ranger/Dylusions - Dylusions Paint: White Linen. Sizzix/Tim Holtz - Holiday Words: Block. Tim Holtz Ideaology - 6x8 Burlap Panel. Emerald Creek - Iridescent Shimmer  & Soft Fallen Snow Embossing Powder. Viva Decor - Inka Gold: Old Gold & Brown Gold. Tsukineko/Imagine Crafts - VersaMark. Bo Bunny Sleigh Ride - Blizzard, Logs & Tradition. Bazzill Cardstock - Java. May Arts Twine - White.

To begin, I prepped the background of my burlap panel, using a blending tool and inking 1/2" in around all the edges of the panel. Once the edges were inked, I sprinkled Soft Fallen Snow Embossing Powder around all four edges and embossed them. 


Once the background of the panel was finished, I set it aside and started working on the Cedar Trees. I covered all three cedar trees with Brown Gold Inka Gold. Once the Inka Gold was dry, I covered each cedar tree with a layer of Clear Rock Candy Distress Crackle paint and set them aside to dry.


Once the cedar trees were drying, I moved on to the Plain Banners. I covered the three plain banners with Old Gold Inka Gold. Once all three banners were covered, I applied a layer Clear Rock Candy Distress Crackle Paint over top and set them aside to dry.


I wanted to add something to the plain banners, so I pulled out my stash of Mini Wood Snowflakes. Before embossing the snowflakes, I painted them with a layer of Dylusions Paint in White Linen. Once the paint was dry, I covered them in a layer of VersaMark and then sprinkled Soft Fallen Snow Embossing Powder overtop of them and embossed them. 


For the finishing touches on my winter canvas, I added two layers of patterned paper from Bo Bunny's Sleigh Ridge Collection. I also wanted to add the word "winter" somewhere on my canvas, so I cut it out using the Tim Holtz/Sizzix - Holiday Words: Block die, attaching it to the top of my photo. For the last of the finishing touches, I added some Iridescent Shimmer Embossing Powder to parts of the edges of the patterned paper. 

Here is the finish Winter canvas with all of the elements put together.


Thanks for stopping by and checking out my winter canvas. Stayed tuned for some more crafty goodness.

Until Next Time!
-Katelyn


Saturday, November 14, 2015

Noel Christmas Tag on the Southern Ridge Trading Company Blog

Happy Saturday! I'am back on the Southern Ridge Trading Company Blog with a fun Christmas tag. Our challenge this month is all about Christmas so make sure that you participate as it is an easy one and you have a chance to win $20.00 in product of your choosing. To find out all of the details on the Challenge and how to participate, head HERE.  Without making you wait any longer, here is my fun Christmas tag:

Supplies Used: SRTC - Snowflakes 713 & Words of Christmas 2, Ranger - Bridal Tinsel Embossing Powder, Tim Holtz Distress Stain - Brushed Pewter, Tim Holtz Distress Ink - Walnut Stain, Dylusions Paint - Postbox Red, Emerald Creek - Large Snowflake and Small Snowflake charms, KaiserCraft Holly Jolly Collection - Joyous & Hearty, KaiserCraft Home for Christmas Collection - Laurel, Graphic 45 Staples - Large Black Tag, White Cardstock,  Tsukineko/Imagine Crafts - VersaMark, Wink of Stella Pen - Silver, Sakura Gel Pen - Clear, May Arts Ribbon - White Seam Binding Ribbon & Kraft Twine.

For the snowflakes I used Snowflakes 713, which are chipboard and covered them first with a layer of VersaMark and then sprinkled the Bridal Tinsel Embossing Powder overtop of them. I then used my heat tool to set the embossing powder. Once they were embossed, I added a layer of Tim Holtz Distress Stain in Brushed Pewter. To make sure the snowflakes were dry from the stain, I ran the heat tool over top of them.  Below is a photo of how they turned out.


The "Noel" word can be found on the Christmas Words 2 set.  I painted the "Noel" word using Dylusions Paint in Postbox Red. What is cool with this word, is you don't have to cover the word in Gesso before painting it because it is made out of wood. I went overtop of the word with my heat tool to make sure that the paint was dry. Below is how the noel word turned out.


Here is my card with all of the elements together. I added some fun snowflake charms from Emerald Creek. I felt my Christmas Trees were bare, so I added some sparkle to them using my Wink of Stella pen as well as my Sakura Clear Gel Pen.


Thanks for taking the time to stop by and check out my blogpost. Make sure you stop by the Southern Ridge Trading Company blog to see the other amazing projects from the rest of the design team at: http://southernchipboard.blogspot.ca/. You can also follow me on Instagram at: a_creative_journey_1.

Until Next Time!
-Katelyn 

Sunday, November 1, 2015

Skull Card for the Trick and Treat Challenge at Emerald Creek Dares

Happy November! I know that Halloween was yesterday but I couldn't resist making one more card as Emerald Creek is having a Tricks and Treat challenge over on their blog. There are still 9 days to participate in this fun challenge. To participate and add your submission, head over here to read all of the details. For the challenge, I submitted a fun skull card featuring all things Tim Holtz. Follow below to read how I created this fun card.

Here is my card I created:

Supplies Used: May Arts Ribbon - Cream Seam Binding Ribbon. Emerald Creek - Brass Skull charms. Tim Holtz Distress Ink - Black Soot, Twisted Citron, Carved Pumpkin, Wilted Violet. Tim Holtz Distress Markers - Wilted Violet, Carved Pumpkin, Scattered Straw, Antique Linen. Tim Holtz Distress Stain - Wilted Violet, Carved Pumpkin. Tsukineko - Versamark, Clear Embossing Powder, Black Staz On . Memory Box - Delicate Web. Tim Holtz Stamp - Undertaker. Tim Holtz Stencil - Shattering. Bazzill - Black Cardstock. Pebbles "Boo" - Hocus Pocus. 

To create the background behind my skull, I first blended Twisted Citron, Carved Pumpkin and Wilted Violet on white cardstock with a blending tool. I then took my shattered stencil and laid it over top of the custom background and stamped Versamark over top. Once the versamark and stencil  had covered the entire card, I sprinkled clear embossing powder over top of the versamark, tapped off the excess and used a heat tool to set the clear embossing powder. Once the embossing powder had cooled down a little bit, I blended black soot distress ink overtop where it stayed in between the shattered embossed parts. To finish the card I added the fun skull image and labels from the Tim Holtz Undertaker stamp set. I stained my cream ribbon using Wilted Violet and Carved Pumpkin Distress stains. Once the ribbon was dry, I wanted to add some extra detail to my ribbon, the perfect embellishments was a  fabulous brass skull charm from Emerald Creek. Here is my card again with all of the elements I just talked about:


Thanks for stopping by and checking out my card. Make sure you head over to Emerald Creek's Blog and see all of the fabulous creations from their design team members.

Until Next Time!
-Katelyn