Thursday, March 30, 2023

All The Things Mini Album

  Happy Thursday!

 I'm back on Creative Scrapbooker Magazine's Blog today as a monthly blogger sharing with you how I created this All The Things Mini Album. My mini album features the Flea Market Collection from Simple Stories, dies from Elizabeth Craft Designs, and adhesive from Scrapbook Adhesives by 3L.


You'll want to make sure to stop by the Creative Scrapbooker Blog to learn all about how I created my All The Things Mini Album.

Thanks for stopping by!
- Katelyn


Tuesday, March 28, 2023

Get Well Soon Card

   Happy Tuesday!

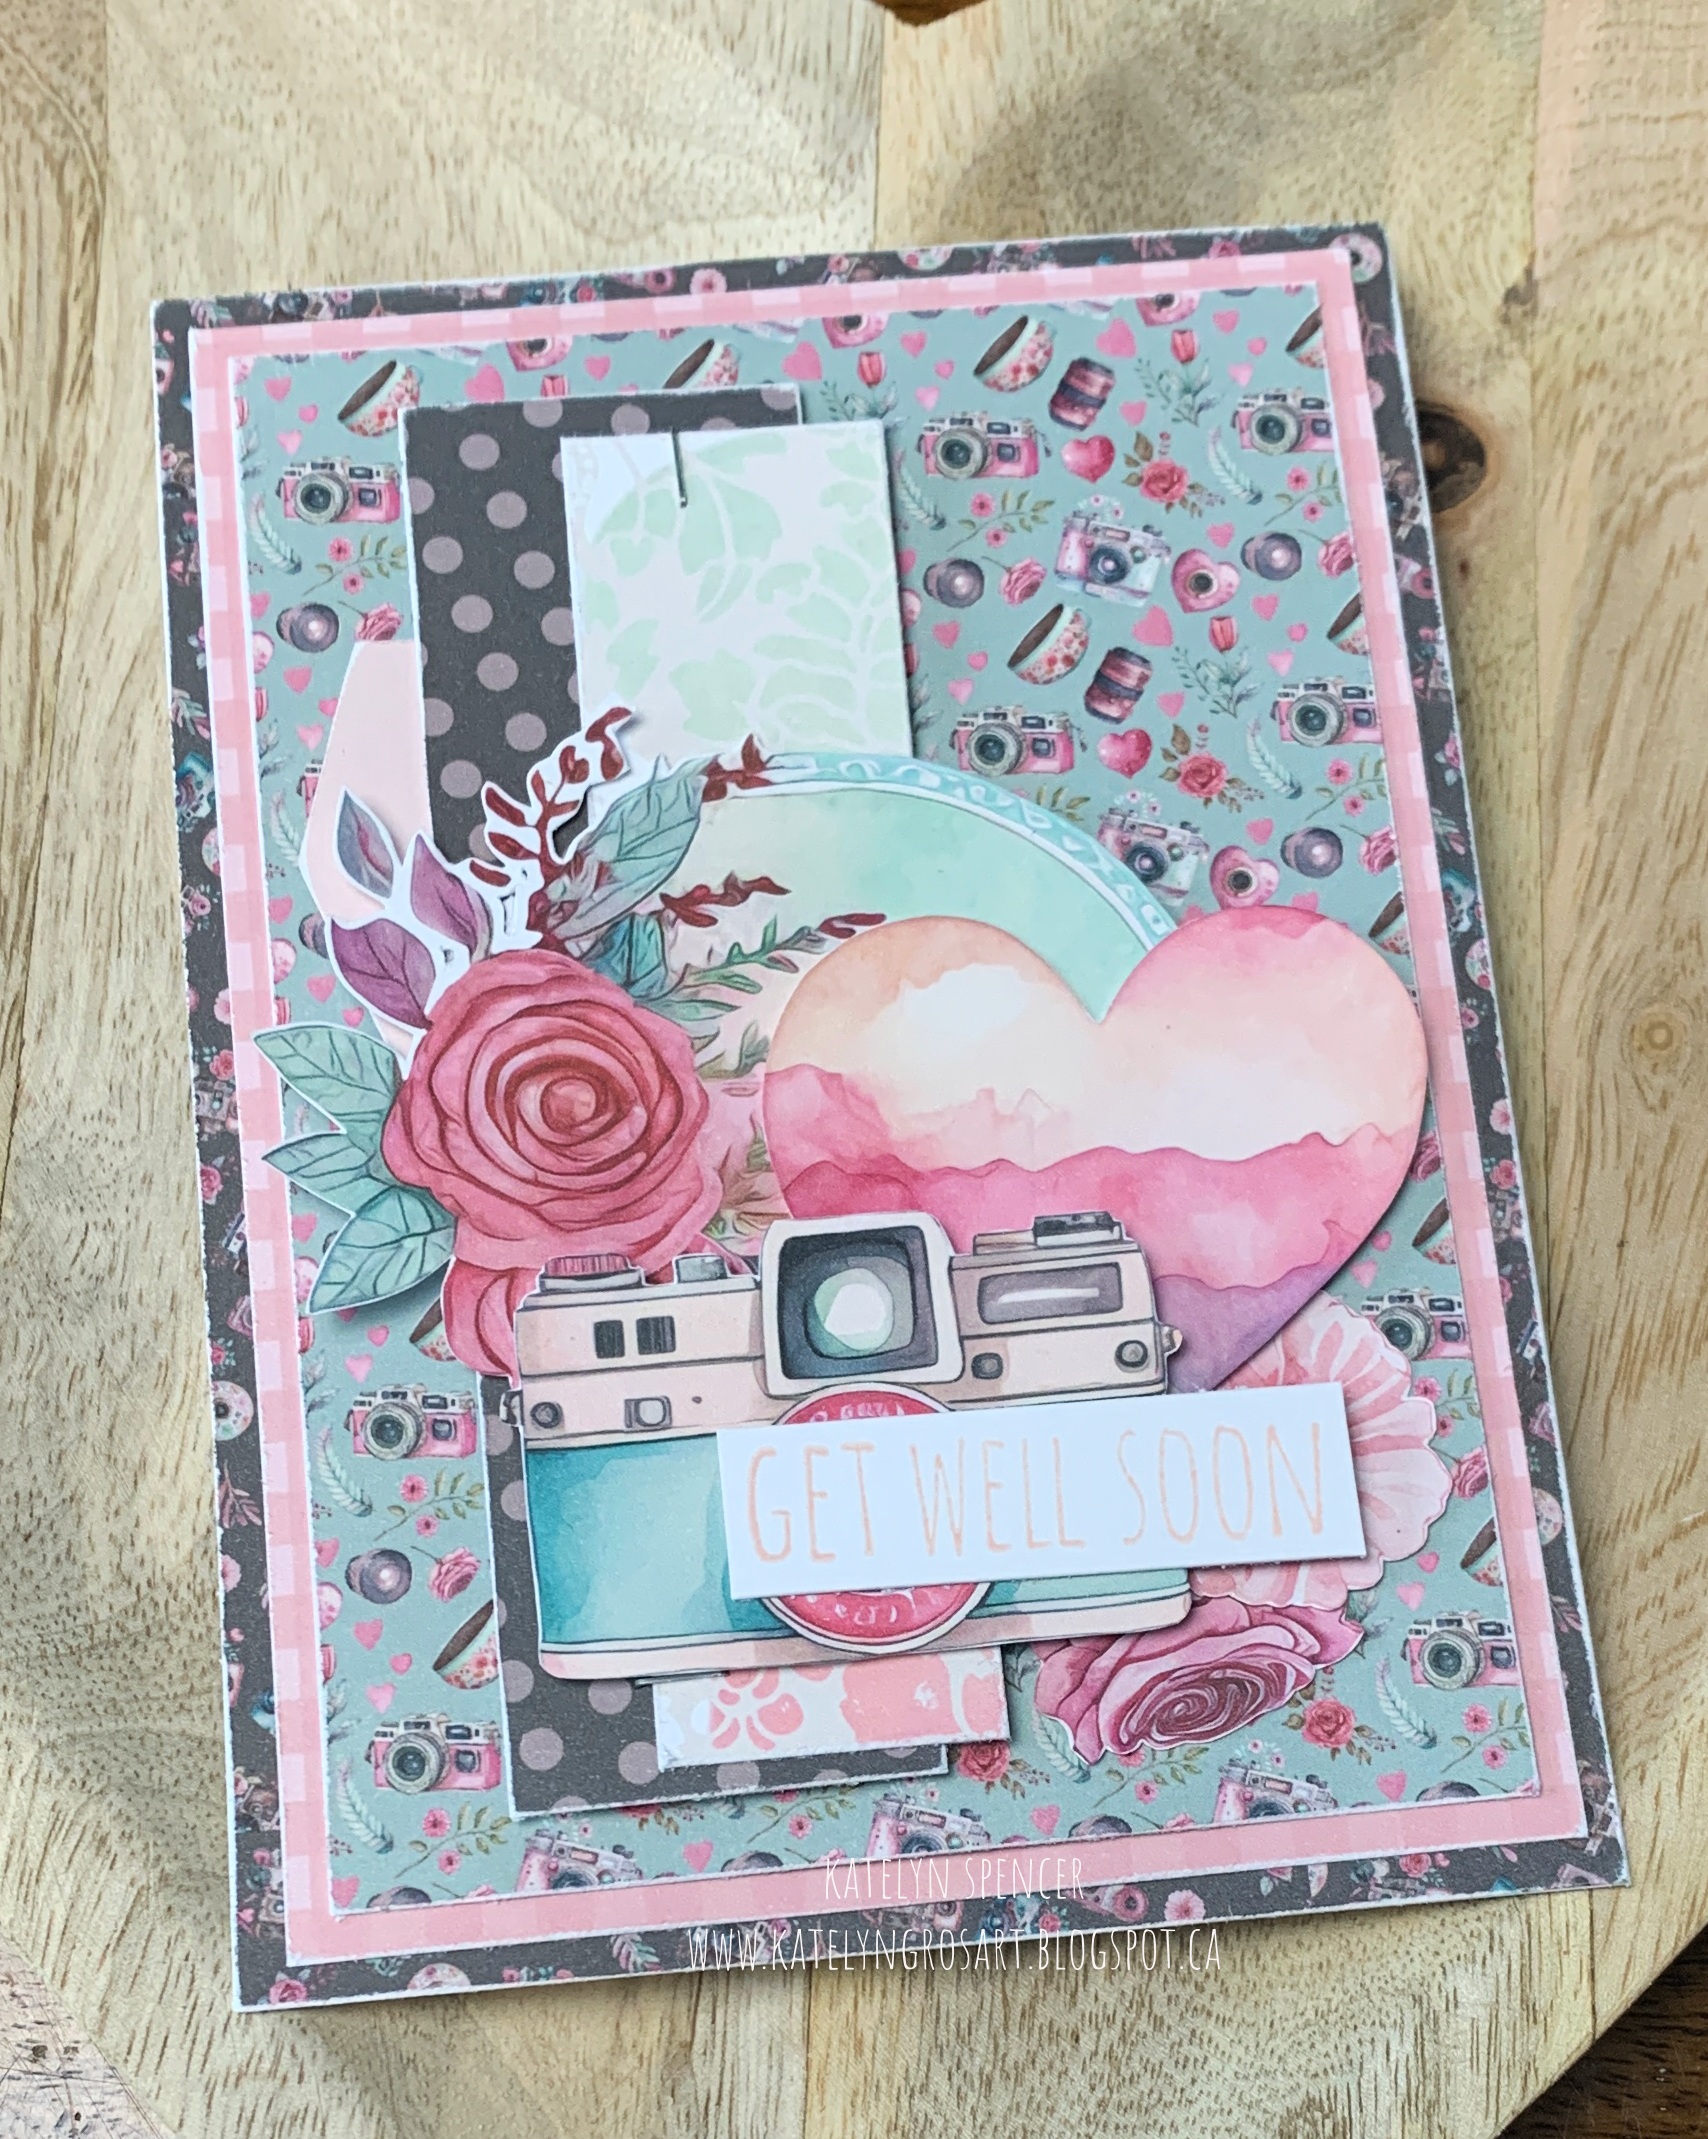
 Today, I'm sharing this Get Well Soon Card. My card features the Picture Perfect Collection from Simply Stated Design.


To start, you'll need the Picture Perfect Paper Pack. Cut the brown camera paper to 4" x 5 1/2". Cut the pink gingham paper to 3 3/4" x 5 1/4". Cut the blue camera paper to 3 1/2" x 5". Cut the brown polka dot paper to 1 1/4" x 4 1/2". Cut the damask paper to 1" x 4 1/4". Sand the edges of all the papers.


Out of the Picture Perfect Hearts Ephemera, you'll need to choose a heart and circle with florals. Fussy cut around the heart and the circle with florals.


Out of the Picture Perfect Ephemera, choose one of the cameras. Fussy cut around the camera. 


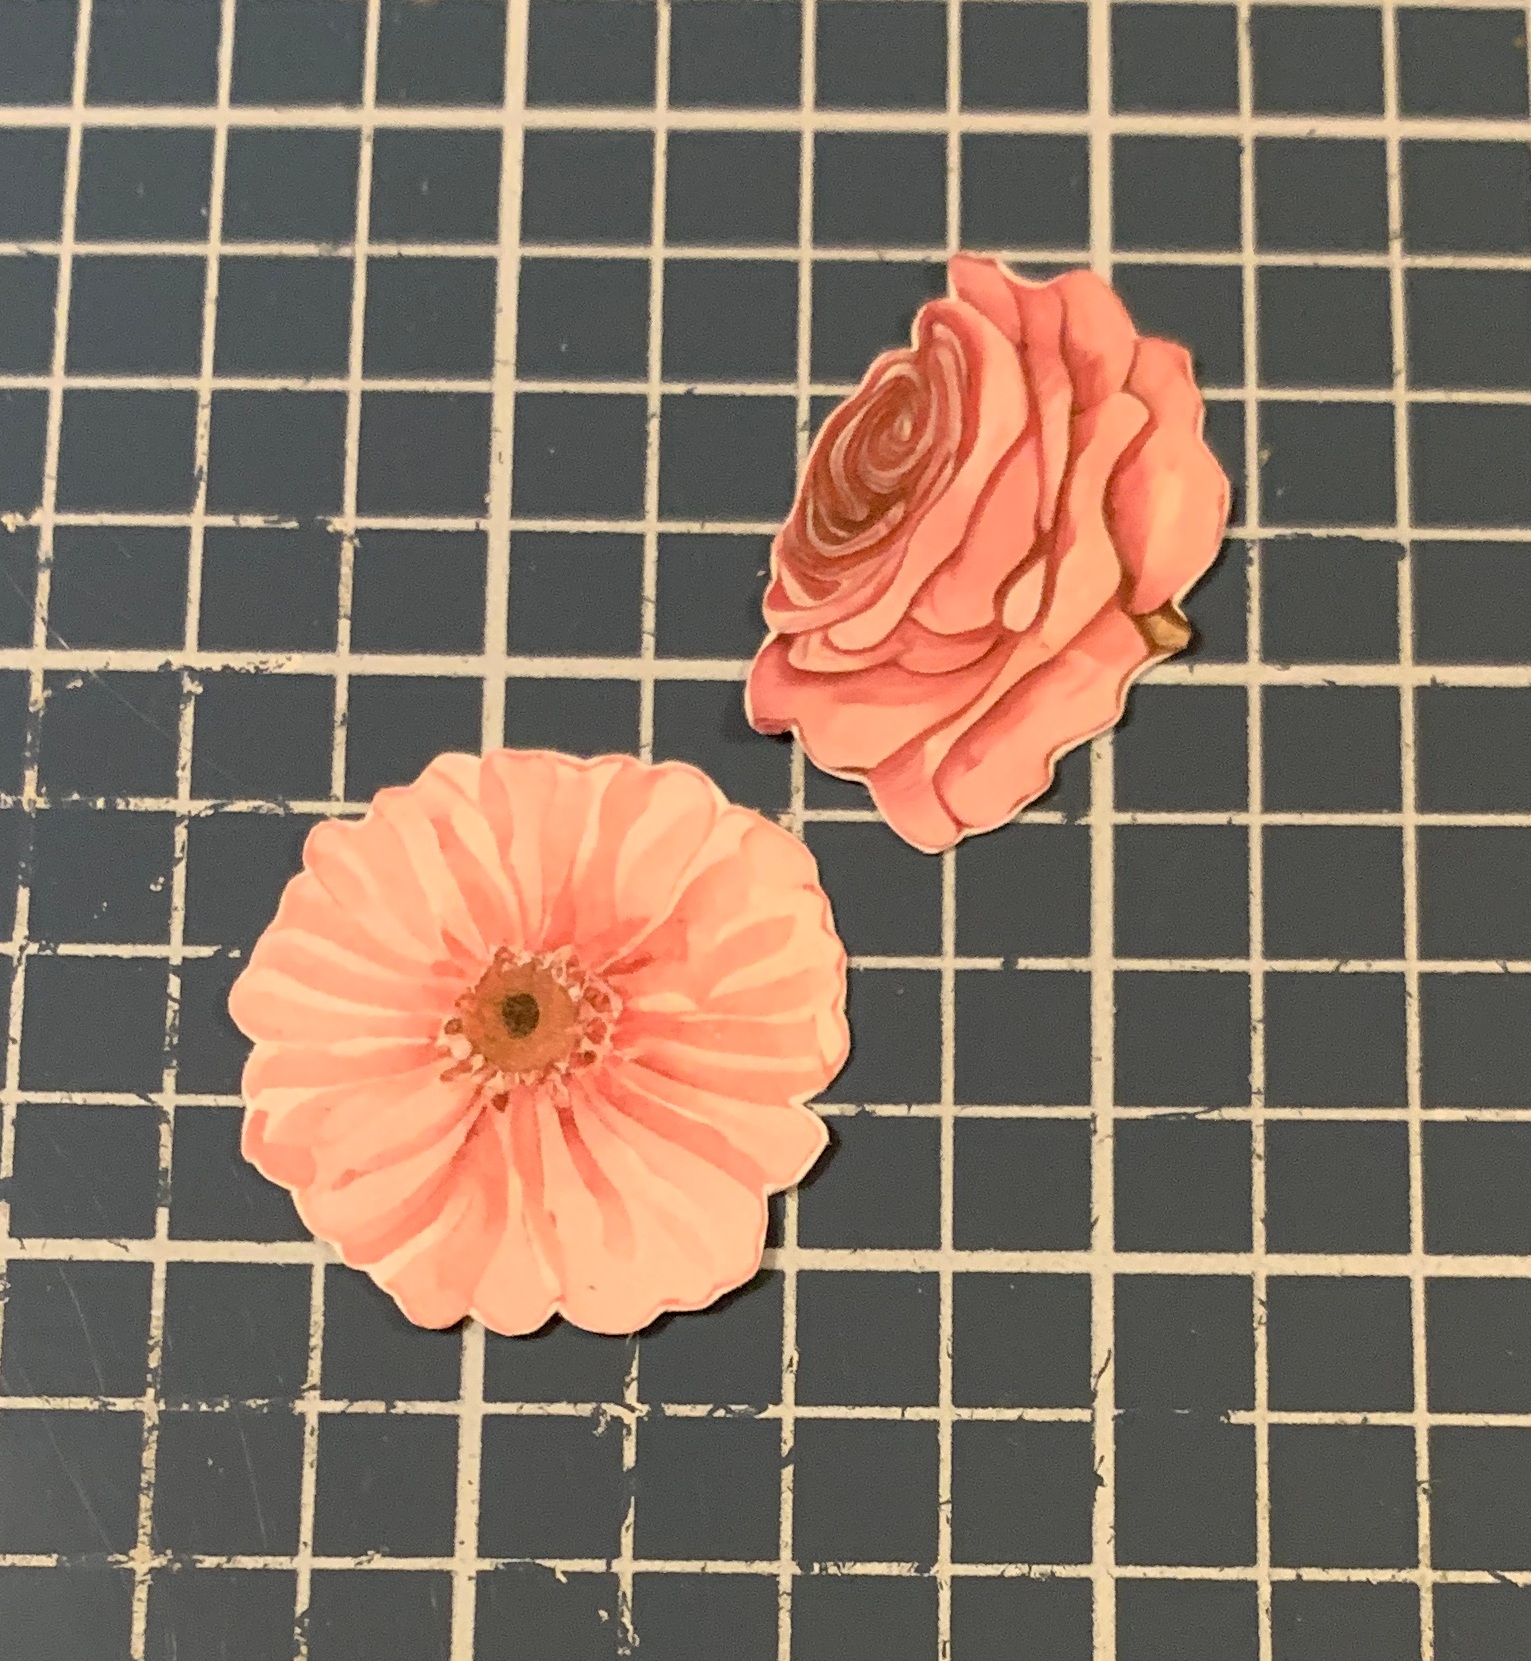
Out of the Picture Perfect Floral Ephemera, choose two flowers. Fussy cut around the flowers.


Choose one of the banners out of the Picture Perfect Essentials Ephemera. Sand the edges of the banner.


Next, you'll need the Get Well Soon stamp from the Crazy Talk Stamp Set. Apply Tattered Rose Distress Oxide Ink to the stamp and stamp onto a piece of white cardstock. Cut the stamped sentiment into a word strip.


Adhere the pink gingham paper to the brown camera paper. Adhere the blue camera paper to the pink gingham paper.


Staple the damask paper to the right side of the brown polka dot paper as desired. Adhere the banner 3/4" from the top and 3/8" from the left of the brown polka dot paper. Foam square the brown polka dot paper 1 5/8" from the right and 1/4" from the top of the blue camera paper.


Use adhesive and foam squares to adhere the circle with florals 5/8" from the right and 1 1/2" from the top of the blue camera paper. Use adhesive and foam squares to adhere the heart to the right side of the floral circle as desired. Foam square the camera to the bottom of the camera and floral circle. Adhere the two floral images to the bottom right side of the heart as desired. Adhere the Get Well Soon strip to the middle right side of the camera.


To finish the card, cut a cardbase out of white cardstock that measures 4" x 11", score at 5 1/2". Adhere the cardfront to the cardbase.


Here are some closeups of the finished card.


Here is the finished Get Well Soon Card.


Supplies Used:

- Simply Stated Design: Picture Perfect 12x12 Paper Pack, Picture Perfect Ephemera, Picture Perfect Essentials Ephemera, Picture Perfect Floral Ephemera and Picture Perfect Hearts Ephemera
- Tim Holtz for Stampers Anonymous: Crazy Talk Stamp Set
- Tim Holtz for Ranger Ink: Tattered Rose Distress Oxide Ink
Misc: White Cardstock and Sander

I hope that my Get Well Soon Card have inspired you to recreate your own at home!

- Katelyn


Friday, March 24, 2023

Love Card

Happy Friday!

I'm up on Wild Whisper's blog today, sharing my Love Card. My card features the Play In the dirt Collection.


For all the details and a tutorial for my Love Card, you'll want to stop by the Wild Whisper blog. You'll want to make sure to keep checking out Wild Whisper's blog as the design team will be sharing lots of inspiration.

Don't forget to use DTKATELYNG to receive 10% off your order on Wild Whisper's Website.

- Katelyn


Wednesday, March 22, 2023

Hello Friend

 Happy Wednesday!

 Today, I'm sharing this pretty Hello Friend Card. My card features the Watercolor Garden Collection from Simply Stated Design.


To start, you'll need the Watercolor Garden Paper Pack. Cut the light purple paper to 4" x 5 1/2". Cut the white floral paper to 3 3/4" x 5 1/4". Cut the dark purple paper to 3 1/2" x 5". Cut the dark floral paper to 3 1/4" x 4 3/4". Sand the edges of all of the patterned papers.


From the Watercolor Garden Fauna Ephemera, you'll need two small butterflies and a bird sitting on a branch. Fussy cut around the three images.


From the Watercolor Garden Essentails Ephemera, you'll need two flowers and a banner. I didn't end up using the happy word so you won't need to pull that out. Fussy cut around the two flowers. Sand the edges of the banner.


Choose one of the frames out of the Watercolor Garden Frames Ephemera.


Adhere the white floral paper to the light purple paper. Adhere the dark floral paper to the dark purple paper. Adhere the banner 5/8" from the top and 3/8" from the left of the dark purple paper. Adhere the dark purple paper to the white floral paper.


Apply Worn Lipstick Distress Oxide Ink to the Hello Friend stamp from the Crazy talk Stamp Set. Stamp onto a piece of white cardstock. Fussy cut around the word.


Foam square the frame 3/8" from the bottom of the dark floral paper and almost all the way to the right of the layered papers. Adhere the two butterflies as desired above the frame.


Adhere the bird on the branch to the bottom right side of the frame. Use adhesive and foam squares to adhere the two flowers in behind the bird on the branch. Adhere the Hello Friend sentiment to the left of the bird on the branch as desired.


To finish the card, cut a cardbase out of white cardstock that measures 4" x 11", score at 5 1/2". Adhere the cardfront to the cardbase.


Here are some closeups of the finished card.


Here is the finished Hello Friend Card.


Supplies Used:

- Simply Stated Design: Watercolor Garden 12x12 Paper Pack, Watercolor Garden Fauna Ephemera, Watercolor Garden Frames Ephemera and Watercolor Garden Essentials Ephemera
- Tim Holtz for Stampers Anonymous: Crazy Talk Stamp Set
- Tim Holtz for Ranger Ink: Distress Oxide Ink - Worn Lipstick
Misc: White Cardstock and Sander

I hope that my Hello Friend Card have inspired you to recreate your own at home!

- Katelyn


Friday, March 10, 2023

Little One Gift Tag

   Happy Friday!

I'm up on Wild Whisper's blog today, sharing my Little One Gift Tag. My gift tag features the Sweet Little One Collection as well as the Chaos and Love 4x6 Stamp Set.


For all the details and a tutorial for my Little One Gift Tag, you'll want to stop by the Wild Whisper blog. You'll want to make sure to keep checking out Wild Whisper's blog as the design team will be sharing lots of inspiration.

Don't forget to use DTKATELYNG to receive 10% off your order on Wild Whisper's Website.

- Katelyn