Thursday, November 29, 2018

Planner Post #2

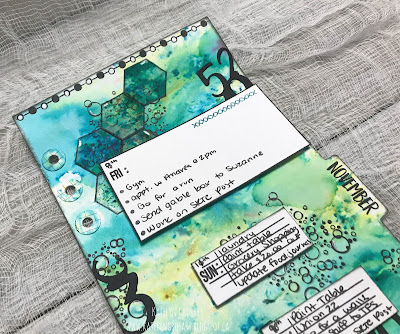
Happy Thursday! I'm excited to be sharing another planner spread with you. I've been playing with the different stamps and dies in the planner collection from Elizabeth Craft Designs to create week 2 of November. You'll want to read below as I have a tutorial for you on how to recreate week 2 of November. 


To start, die cut the left planner page from the Planner Essentials 4 die out of White Soft Finish Cardstock. Die cut the right planner page from the Planner Essentials 3 die out of White Soft Finish Cardstock. Apply some patterned washi tape onto a piece of White Soft Finish Cardstock. Die cut the reinforcement circles from the Planner Essentials 1 die twice. Adhere the reinforcement circles over the holes on each planner page.
Sprinkle Spring Green, Aquamarine and Chartreuse Magenta Nuance randomly onto each page. Spritz with water. You can either dry it with a heat tool or let the pages dry on their own.


Apply Jet Black Archival Ink to the November stamp from the Months stamp and stamp onto the tab on the right hand side planner page. Apply Jet Black Archival Ink to the bubbles stamp from the Patterns 2 stamp and start stamping randomly on the right hand side page. Repeat the previous step three more times on the right planner page and three times on the left planner page. From the schedule stamp set, you'll need the dot border. Apply Jet Black Archival Ink to the dot border and stamp at the top, part of the bottom and part of the right side of the left planner page. Apply Jet Black Archival Ink to the dot border stamp and stamp the top and part of the bottom right planner page. Add white markings to some of the bubbles. Colour in the dot border using white and black ink. Ink the edges of each planner page using Black Soot Distress Oxide Ink and a blending tool with foam.


From a piece of black cardstock, die cut the numbers from the Planner Patterns die twice. Cut the numbers into five parts.


Apply Jet Black Archival Ink to the rectangle stamp from the Schedule stamp set and stamp onto a piece of White Soft Finish Cardstock. Repeat the previous step two more times. Fussy cut all three rectangles out. From the Calendar stamp set, apply Jet Black Archival Ink to the Mon stamp and stamp onto one of the rectangles. Apply Jet Black Archival Ink to the Fri stamp and stamp onto a second rectangle. Apply Emerald City Ink to the Thu stamp and stamp onto the last rectangle. Number the days and add dots just after the weekdays. Ink the edges of all three rectangles using Black Soot Distress Oxide Ink and a blending tool with foam.


From the Reminders stamp set, you'll need the lined stamp. Apply Jet Black Archival Ink to the lined stamp and stamp onto a piece of White Soft Finish Cardstock. Repeat the previous step three more times onto a piece of White Soft Finish Cardstock. Cut the lined pieces to 3/4" x 2". From the Calendar stamp set, apply Jet Black Archival Ink to the Wed stamp and stamp onto one of the lined rectangles. Apply Jet Black Archival Ink to the Sun stamp and stamp onto the second lined rectangles. Apply Emerald City Ink to the Tue stamp and stamp onto the third lined rectangles. Apply Emerald City Ink to the Sat stamp and stamp onto the fourth lined rectangles. Number the days and add dots just after the weekdays. Ink the edges of all four of the lined rectangles using Black Soot Distress Oxide Ink and a blending tool with foam.


Tear a piece of Collage Paper - Plain off the roll. Sprinkle Aquamarine and Chartreuse Magenta Nuance over the piece of collage paper. Spritz the paper with water. Dry the paper with a heat tool. Apply Jet Black Staz On to the Hexagon stamp from the Months stamp set and stamp onto the piece of paper. Repeat the previous step seventeen more times. Fussy cut the hexagons out. Ink the edges of all of the hexagons using Black Soot Distress Oxide Ink.


Adhere two of the numbers randomly on the left planner page. Adhere the other three numbers randomly on the right planner page.


On the left planner page, adhere three hexagons together in the bottom left hand side and adhere seven hexagons together in the top right side of the page. On the right planner page, adhere three hexagons together in the bottom left hand side and adhere five hexagons together in to top left side of the page. 


On the left planner page, foam square the Monday and Thursday rectangle as well as the Tuesday and Wednesday lined rectangles. On the right planner page, foam square the Friday rectangle as well as the Saturday & Sunday lined rectangles. 


Here's some closeup photos of the left planner page.


Here are a few closeup photos of the right side of the planner page.


Here are the finished planner pages.


Elizabeth Craft Designs Supplies Used:

Months

Other Supplies Used:

- Ranger Ink: Jet Black Archival Ink, Mister and Fude Ball Pen - Black 
- Tim Holtz for Ranger Ink: Black Soot Distress Oxide Ink and Blending Tool with Foam
- Imagine Crafts: Staz On - Emerald City and Jet Black
- Magenta: Nuance - Spring Green, Aquamarine and Chartreuse
- Tim Holtz Ideaology: Collage Paper - Plain
- Jane Davenport: Journal Tape Strips
- Misc: Black Cardstock, Black Gel Pen and White Gel Pen

Stay tuned as I share some more planner pages with you over the next few weeks.

- Katelyn


Monday, November 26, 2018

Merry Christmas to all & to all a good night card

I have one more project to share with you today.

I'm up on Creative Scrapbooker Magazine's Blog as a monthly blogger sharing my Merry Christmas to all & to all a good night Card. My wall hanging features the Simple Vintage Christmas Collection from Simple Stories as well as a variety of other products from Ranger Ink and Scrapbook Adhesives by 3L.


You'll want to make sure to stop by the Creative Scrapbooker Blog to learn all about how I created my Merry Christmas to all & to all a good night card.

Thank for stopping by!
- Katelyn

Happy Holidays Card

Happy Monday!
I have a new project over on Quietfire Design blog today, where I'm sharing my Happy Holidays Card which features a variety of Quietfire stamps as well as a A Way With Words Die.


For a full tutorial and a few more photos of my project, you'll want to head over to Quietfire Design blog for all the details. 

- Katelyn

Friday, November 23, 2018

Congrats Baby Card

Happy Thursday! I took a break from making Christmas cards this weekend and created this cute Congrats Baby Card. To create my card, I used dies from Els van de Burgt Studio, ModaScrap and Joset Designs as well as patterned paper from ModaScrap. You'll want to read below as I share with you how to recreate my Congrats Baby Card at home.


To start, you'll need the 5/8" Fitted Stars die. Die cut three 5/8" stars out of light blue cardstock. Die cut two 5/8" stars out of brown cardstock. Ink the edges of all five stars using Ground Espresso Distress Ink and a blending tool with foam.


From the Words 1 - Celebration, die cut the Congrats sentiment out of brown cardstock.


Die cut a 4" Dashing Rectangle out of light blue cardstock. Place the piece of cardstock into the Lots of Dots Embossing Folder and run through your die cutting machine. Ink the edges of the rectangle using Ground Espresso Distress Ink and a blending tool with foam.


Choose a piece of patterned paper from the ModaScrap - My Little Boy Paper Pack. Die cut the 3 1/2" Dashing Rectangle die out of the patterned paper piece. Ink the edges of the rectangle using Ground Espresso Distress Ink and a blending tool with foam.


Die cut the 1 1/8" Stitched Fishtail Banner out of White Soft Finish Cardstock. Trim the banner down to 3 1/2". Die cut the 3/4" Stitched Fishtail Banner out of Light Blue Cardstock. Trim the banner down to 3". Ink the edges of the banners using Ground Espresso Distress Ink and a blending tool with foam.


From the Valentines Edges die, die cut the scallop die out of brown cardstock. Trim the edge down to 3 1/2". Cut a bit out of the top right corner if needed. Ink the edges of the scallop border using Ground Espresso Distress Ink and a blending tool with foam.


Adhere the 4" dashing rectangle to the 4 1/2" dashing rectangle.


Adhere the scallop edge to the bottom of the white banner. Foam square the white banner 1" from the bottom of the light blue cardstock and all the way to the left side of the 4" patterned paper. Adhere the light blue banner 3/8" from the top of the white banner.


Adhere the congrats sentiment at the top of the light blue banner. Adhere a brown and light blue star to the bottom left side of the sentiment. Adhere the remaining three stars in the top left corner of the white banner.


Cut a card base out of light blue cardstock that measures 5 1/2" a 8 1/2", score at 4 1/4". Adhere the card front to the card base.


Here are a couple of closeup photos of the finished card.


And here's the finished Congrats Baby Card.


Elizabeth Craft Designs Supplies Used:


Other Supplies Used:

- Tim Holtz for Ranger Ink: Distress Ink- Ground Espresso and Blending tool with Foam
- Misc: Light Blue & Brown Cardstock

Thanks for stopping by and checking out my card. I hope that I've inspired you to recreate my Congrats Baby Card at home.

- Katelyn 


Thursday, November 22, 2018

Gable Box Spectacular Event

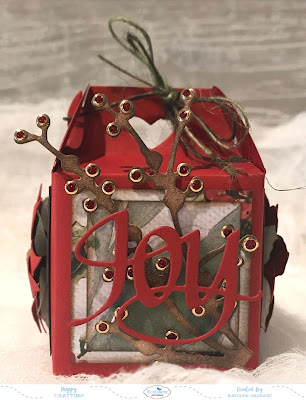
Happy Thursday! Over on the Quietfire Design Blog we are having a Gable Box Spectacular event. For my Joy Gable Box, I featured the Gable Box, the Love, Joy & Peace Ornament as well as the Berry Spray die from Susan Garden Notes, the Christmas Flower from ModaScrap and the Holiday Garlands 1 die by Els van de Burgt Studio. You'll want to read below as I share with you how to recreate my box.


To start, die cut the Gable Box out of red cardstock. Fold the tabs.


From the Kaisercraft Peace & Joy Paper Pad, choose two patterned papers. From the first piece of patterned paper, cut four pieces that measure 1 3/4" x 1 3/4". From the second piece of patterned paper, cut four pieces that measure 1 1/2" x 1 1/2". Ink the edges of all four pieces of patterned paper using Ground Espresso Distress Ink and a blending tool with foam.


From the Love, Peace, Joy Ornament die, die cut the Joy sentiment out of red cardstock.


Die cut one berry spray out of White Soft Finish Cardstock. Using a blending tool with foam, blend Ground Espresso Distress Ink over the entire surface of the berry spray. Cut the berry spray down to fit the 2" square. Adhere Glitter.Red/Gold Dots to each circle of the berry spray.


From the Holiday Garlands 1 die, die cut two of the berry garlands out of White Soft Finish Cardstock. Shape one garland to make a wreath. Adhere the second garland slightly offset on top of the first garland. Adhere Glitter.Red/Gold Dots to each circle on the wreath. Tie a piece of green twine into a bow and adhere at the top of the wreath.


From the Christmas Flower die, die cut four of the small flowers out of red cardstock and two of the small flowers out of White Soft Finish Cardstock. Using a blending tool with foam, blend Forest Moss Distress Ink over top of each of the small white soft finish cardstock flowers. Shape the red flowers using the shaping tool and the molding pad. Shape the green flowers into leaves using the molding pad and shaping tool. Adhere two of the red flowers together and adhere the two red flowers to the green leaves. Repeat the previous step for the second flower. Adhere five gold rhinestones into the centres of each flower.


Adhere the 1 1/2" patterned paper to the 1 3/4" patterned paper and then adhere the 1 3/4" patterned paper piece to one of the panel on the gable box. Repeat the previous three more times to decorate each panel on the gable box.


Foam square one flower to the panel that's underneath the tear drop circle. Foam square the other flower to the panel that's underneath the other tear drop circle.


Foam square the wreath to panel on the far left side panel of the box. Foam square the berry spray to the remaining panel. Foam square the Joy sentiment overtop of the berry spray.


Adhere your box together. To finish off your box, create a twine bow at the top of the gable box handle.


Here are a few shots of the sides of the box.


A Way With Words Dies Used:


Other Supplies Used:

- Elizabeth Craft Designs: Susan Garden Notes - Berry Spray, Holiday Garlands 1, Christmas Flower, White Soft Finish Cardstock, Glitter.Red/Gold Dots, Susan's Garden 4 pcs. All Metal Tool Set and Molding Pad
- Tim Holtz for Ranger Ink: Distress Ink - Ground Espresso & Forest Moss and Blending Tool with Foam
- Misc: Red Cardstock, Light Green Twine and Dark Green Twine

To see the rest of the Gable boxes, you'll want to head over to the Quietfire Design Blog
  
- Katelyn


Tuesday, November 20, 2018

A Floral Christmas - November Designer Challenge

It's time for a brand new Designer Challenge on the Elizabeth Craft Designs Blog today.  For November's challenge it's all about A Floral Christmas. The inspiration for my project came from Krista's new Poinsettia Stamp and Dies. With that stamp in my hand, I also added a few other dies from Els van de Burgt Studio and Joset Designs to create my Happy Holidays tag. Grab your favourite holiday beverage and read below as I have a tutorial for you so that you can re-create my tag at home. You'll want to make sure to read all the way down to the bottom of this post as there's some details on how to get in on an awesome giveaway from Elizabeth Craft Designs.


From the poinsettia stamp set, stamp the poinsettia using Jet Black Archival Ink onto a piece of watercolour cardstock. Die cut the poinsettia out using the coordinating die. Watercolour the poinsettia using Tombow markers - 177, 847 and 026. I didn't want the white edge around the poinsettia, so I fussy cut it off.


Out of the same stamp set, apply Jet Black Archival Ink to the berry/leaf branch and stamp onto a piece of watercolour cardstock. Repeat the previous step two more times. Die cut the berry/leaf branches out using the coordinating die. Colour in the berries using Tombow Marker - 847. Watercolour the leaves using Tombow Marker 177. 


From the same stamp set, apply Jet Black Archival Ink to the pine branch stamp and stamp onto a piece of watercolour cardstock. Repeat the previous step three more times. Die cut the pine branch out using the coordinating die. Colour the pine branches using a green watercolour pencil crayon and a water brush.


From the Words 5 - Winter Wishes die, die cut the Happy Holidays out of White Soft Finish Cardstock. Using a blending tool with foam, blend Forest Moss Distress Ink over the entire surface of each word.


Cut a piece of White Soft Finish Cardstock that measures 3 1/8" x 6 1/4". Place the round top die as well as the hole die, from the Tags & More 9 - Sparkle die, on the top portion of the piece of White Soft Finish Cardstock. From a second piece of White Soft Finish Cardstock, die cut a reinforcement. Adhere the reinforcement circle overtop of the circle at the top of the tag. 


Place a star stencil overtop of the tag. Sprinkle Red and Olive Magenta Nuance powder overtop of the stencil.  Spritz the stencil with water. Remove the stencil and dry the tag with a heat tool. Distress the edges of the tag. Ink the edges of the tag using Black Soot Distress Oxide Ink and a blending tool with foam.


Adhere two of the pine branches in the top right section of the tag. Adhere the other two pine branches in the bottom left side of the tag.


Foam square one berry/leaf branch in the top left corner slightly overtop of the pine branches. Foam square a second berry/leaf branch on the top left side of the tag. Foam square the third berry/leaf branch in the bottom right corner slightly over top of the pine branches.


Use adhesive and foam squares to adhere the poinsettia overtop of the berry/leaf branches and pine branches.


Adhere the Happy on the top left side of the poinsettia. Adhere the Holidays on the bottom right hand side of the tag.


To finish off your tag, tie a piece of red crinkle ribbon to the top of the tag.


Here are a few closeup shots of the tag.


And here's the finished Happy Holidays Tag.


*******************

For today's challenge Elizabeth Craft Designs are giving away a $20 Gift Card to use on our website to 3 winners

To enter simply leave a comment on the Elizabeth Craft Designs Facebook Giveaway Blog Post or the Elizabeth Craft Designs Challenge post and tell us Which Elizabeth Craft Designs flower or foliage die or stamp set would you chose to create a Christmas card or decoration.


We will select 3 lucky winners in a random drawing 

The winners will be announced on Friday, November.23rd on the Elizabeth Craft Designs Blog and our Facebook page.


*****************

Elizabeth Craft Designs Products Used:


Other Products Used:

- Tim Holtz for Ranger Ink: Distress Ink - Forest Moss, Distress Oxide Ink - Black Soot and Blending Tool with Foam
- Ranger Ink: Jet Black Archival Ink
- Tombow Markers: 847, 026 and 177
- Magenta Nuance: Red and Olive
- Misc: Watercolour Cardstock, Star Stencil, Mister, Green Watercolour Pencil Crayon and Red Crinkle Ribbon

- Katelyn