Monday, July 31, 2023

Happy Little Moment Mini Album

  Happy Monday!

 I'm back on Creative Scrapbooker Magazine's Blog today as a monthly blogger sharing with you  this vintage Happy Little Moment Mini Album. My mini album features the Simple Vintage Essentials Collection from Simple Stories,  Dies from Elizabeth Craft Designs and adhesive from Scrapbook Adhesives by 3L.


You'll want to make sure to stop by the Creative Scrapbooker Blog to learn all the details about my Happy Little Moment Mini Album.

Thanks for stopping by!
- Katelyn


Friday, July 21, 2023

Gelli Print Card Set

Happy Friday!

 I'm up on Wild Whisper's blog today, sharing this Gelli Print Card which features a variety of collections and a variety of stamps from Wild Whisper Designs.


For all the details and a tutorial on my Gelli Print Card Set, you'll want to stop by the Wild Whisper blog. You'll want to make sure to keep checking out Wild Whisper's blog as the design team will be sharing lots of inspiration.

Don't forget to use DTKATELYNG to receive 10% off your order on Wild Whisper's Website.

- Katelyn


Wednesday, July 12, 2023

Inspirational Tags

  Happy Wednesday!

I'm sharing these pretty Inspirational Tags over on Jennifer Edwardson Creative Inc. Blog. My tags feature the BRAND NEW Shapes Cut File Bundle and Simple Title Cut File Bundle, as well as the Boho Sunshine Creative Kit from Jennifer Edwardson Creative Inc. Shop. 


For all of the details on my Inspirational Tags, you'll want to head over to Jennifer Edwardson Creative Inc. blog.


- Katelyn


Monday, July 10, 2023

Oh Happy Day! Card

 Happy Monday!

Today, I'm sharing this beautiful Oh Happy Day! Card that feature the Spring Meadow Collection from Nadine Karen Design. Grab a cup of your favourite beverage and learn how to create this Oh Happy Day! Card at home.


To start, you'll need to choose an abstract paper out of the 6x6 Abstract Paper Pack. Cut the paper down to 4 1/4" x 5 1/2". Sand the edges of the paper.


Cut a piece of white cardstock to 4" x 5 1/4". 


Choose a floral paper out of the 6x6 Floral Paper Pack. Cut a piece down to 3 3/4" x 5". Sand the edges of the paper.


From the Spring Meadow Scalloped Circles, choose one of the circles and sand the edges.


Next, you'll need the Spring Meadow Floral Vase Ephemera. Trim most of the vase off. Fussy cut as close as possible to the floral images.


From the Spring Meadow Animal Ephemera, choose one of the animals and fussy cut around the animal.


Choose three butterflies out of the Spring Meadow Butterfly Ephemera. Fussy cut around all three butterflies. 


Next, you'll need the Downtown Stacks Stamp Set from Concord & 9th. Apply Sparkling Rose Ink to the Oh Happy Day sentiment and stamp onto a piece of white cardstock. Fussy cut around the sentiment.


Adhere the white cardstock paper to the abstract paper. Adhere the floral paper to the white cardstock paper.


Foam square the circle 7/8" from the left and 1 1/4" from the top of the floral paper. Add a metal paperclip to the top of the circle as desired. 


Adhere the floral vase to the middle right of the circle. Foam square the animal to the bottom left portion of the circle as desired. 


Adhere the three butterflies as desired around the circle. Adhere the Oh Happy Day sentiment to the bottom left side of the animal. 


To finish the card, cut a cardbase out of white cardstock that measures 4 1/4" x 11", score at 5 1/2". Adhere the cardfront to the cardbase.


Here are a few closeup photos of the finished card.


Here is the finished Oh Happy Day! Card.


Supplies Used:


- Nadine Karen Design: 6x6 Floral Paper Pack, 6x6 Abstract Paper Pack, Spring Meadow Animal Ephemera, Spring Meadow Butterfly Ephemera, Spring Meadow Floral Vase Ephemera and Spring Meadow Scalloped Circles
- Pinkfresh Studio: Sparkling Rose Ink
- Concord & 9th: Downtown Stacks Stamp Set
- Tim Holtz/Ideaology: Metal Paperclips
Misc: White Cardstock 

I hope that my Oh Happy Day! Card has inspired you to recreate your own at home! 

- Katelyn


Friday, July 7, 2023

Noted, Record, Documented Tag

 I have one more post to share with you today.

I'm up on Wild Whisper's blog today, sharing this Noted, Record, Documented Tag which features the Floral Collection and a variety of stamps from Wild Whisper Designs.


For all the details and a tutorial on my Noted, Record, Documented Tag, you'll want to stop by the Wild Whisper blog. You'll want to make sure to keep checking out Wild Whisper's blog as the design team will be sharing lots of inspiration.

Don't forget to use DTKATELYNG to receive 10% off your order on Wild Whisper's Website.

- Katelyn


Good Vibes Wall Hanging

 Happy Friday!

I'm sharing this awesome Good Vibes Wall Hanging over on Jennifer Edwardson Creative Inc. Blog. My wall hanging features the BRAND NEW Peace Sign Background Cut File and Simple Title Cut File Bundle, as well as the Boho Sunshine Creative Kit from Jennifer Edwardson Creative Inc. Shop. 


For all of the details on my Good Vibes Wall Hanging, you'll want to head over to Jennifer Edwardson Creative Inc. blog.


- Katelyn


Sunday, July 2, 2023

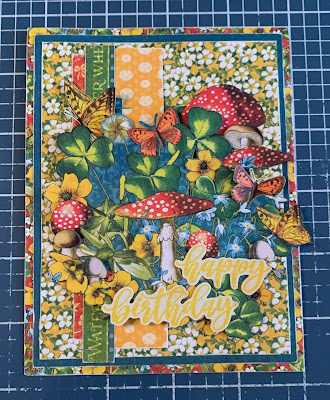
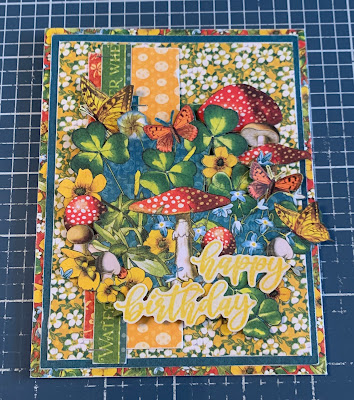
Happy Birthday Card

 Happy Sunday!

A couple of weeks ago I shared some beautiful Just For You Tags over on Graphic 45's Blog. For today's post I'm sharing a card version of the tags. 


The first six steps use patterned paper out of the Little Things 12x12 Collection Pack.

From the What's Up Buttercup paper, cut a piece from the floral side that measures 4 1/4" x 5 1/2". Flip the paper over and cut a piece that measures 1" x 2 7/8". Sand the edges of both papers.


Next, you'll need the Hello Ladybug patterned paper. Cut a piece that measures 3 3/4" x 5". Sand the edges of the paper.


From the Bloom & Grow paper, choose two border strips. Cut one border down to 5". Cut the second border to 3 1/2". Sand the edges of both borders.


From the Lazy Daisy patterned paper, fussy cut one of the mushroom focal images out.


Next, you'll need the Forget Me Not patterned paper. Fussy cut two butterflies and three yellow flowers.


Next, you'll need to fussy cut five single mushrooms and one mushroom bunch out of the Sprinkle Kindness patterned paper.


Next, you'll need the Little Things Patterns & Solids Paper Pack. Cut a piece from the plain blue paper that measures 4" x 5 1/4". Cut the red word paper to 1 1/4" x 4 1/2". Cut the yellow dot paper that measures 1" x 4 3/4". Sand the edges of all the papers.


Apply Sweet Mustard Ink to the Happy Birthday sentiment from the Sentiment Stamps and stamp onto a piece of light kraft cardstock. Fussy cut around the sentiments.


Adhere the blue paper to the yellow floral paper. Adhere the white floral paper to the blue paper.


Adhere the red word paper 1/2" from the left and 1/4" from the bottom of the white flower paper. Adhere the green dot paper 1/2" from the right and 1" from the top of the white flower paper. Adhere the yellow dot paper 1 7/8" from the right and 1/8" from the top of the white flower paper. Staple the 5" border 5/8" from the left and 1/16" from the top of the white flower paper. Staple the 3 1/2" border strip 2 1/2" from the right and 7/8" from the bottom of the white flower paper. 


Foam square the focal image to the middle of the card. Foam square the two bunch mushrooms to the top right corner of the focal image. Adhere on butterfly to the bottom of the mushroom bunch. Adhere a single flower in between the clovers by the mushroom bunch.


Adhere a mushroom and two yellow flowers as desired in the bottom right corner of the focal image.


In the bottom left corner of the focal image, adhere a single yellow flower and three mushrooms as desired. In the top left corner of the focal image, adhere the other butterfly as desired. 


Use adhesive and foam squares to adhere the Happy Birthday sentiment to the bottom right of the focal image as desired. 


To finish the card, cut a cardbase out of light kraft cardstock that measures 4 1/4" x 11", score at 5 1/2". Adhere the cardfront to the cardbase . 


Here are a few closeups of the finished card.


Here is the finished Happy Birthday Card.


Supplies Used:

- Graphic 45: Little Things 12x12 Collection Pack, Little Things 12x12 Patterns & Solids Pack and Sentiment Stamps
- PinkFresh Studio: Sweet Mustard Ink
- Misc: Kraft Cardstock

I hope that my Happy Birthday Card has inspired you to recreate your own at home!

- Katelyn