Tuesday, May 30, 2023

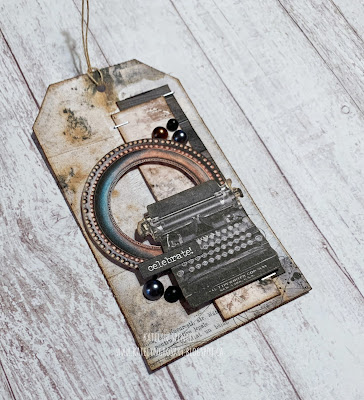
Joyful Moments Tag

 Happy Tuesday!

 I'm back on Creative Scrapbooker Magazine's Blog today as a monthly blogger sharing with you how to create this Joyful Moments Tag. My tag features the Everyday Elements by Annette Green Collection from Elizabeth Craft Designs, a variety of ink from Ranger Ink and adhesive from Scrapbook Adhesives by 3L.


You'll want to make sure to stop by the Creative Scrapbooker Blog to learn how to create my Joyful Moments Tag.

Thanks for stopping by!
- Katelyn


Tuesday, May 23, 2023

You Grow Girl Wall Hanging

       Happy Tuesday!

I'm sharing this beautiful You Grow Girl Wall Hanging over on Jennifer Edwardson Creative Inc. Blog. My wall hanging features the BRAND NEW Green Thumb Cut File Bundle, Floral 4x6 Frame Cut File, Life In Bloom Creative Kit and a variety of Colour Vibe Textured Cardstock from Jennifer Edwardson Creative Inc. Shop. 


For all of the details on my You Grow Girl Wall Hanging, you'll want to head over to Jennifer Edwardson Creative Inc. blog.


- Katelyn


Friday, May 19, 2023

For You Card

  Happy Friday!

I'm up on Wild Whisper's blog today, sharing this For You Card. My card features the Play In The Dirt Collection as well as the Ledger stamp set from Nicole Wright Designs.


For all the details and a tutorial for my For You Card, you'll want to stop by the Wild Whisper blog. You'll want to make sure to keep checking out Wild Whisper's blog as the design team will be sharing lots of inspiration.

Don't forget to use DTKATELYNG to receive 10% off your order on Wild Whisper's Website.

- Katelyn


Wednesday, May 17, 2023

Mom Gift Boxes

 Happy Wednesday!

Now that Mother's Day has passed, I'm sharing this beautiful Mom Gift Boxes that I made to the gifts for my Mom and Mother In Law. The gift boxes feature the Flowers For Mom Collection from Simply Stated Design.


To start, we will create the blue Mom gift box.


Out of the Flowers For Mom 12x12 Paper Pack, you'll need the wood paper, blue paper and creamy grey paper. Cut the creamy grey paper to 3 3/4" x 8". Cut the wood paper to 3 1/2" x 8". Cut the blue paper to 3 1/4" x 8". Sand the edges of all the papers.


Next, you'll need to get a gift box, I'm using the Concord & 9th Kraft Pillow Box.


Out of the Flowers For Mom Floral Arrangement Ephemera, you'll need the vase with the blue mom word. Fussy cut around the vase.


Out of the Flowers For Mom Single Ephemera, you'll need to choose two single flowers and two flowers with leaves. Fussy cut around all four flowers.


Choose a Flowers For Mom Medallions Ephemera. Fussy cut around the medallion. Sand the edge of the medallion.


*Note - Fold your box before adhering the papers. Use glue to adhere the creamy grey paper to the middle of the box. Adhere the wood paper to the middle of the creamy grey paper. Adhere the blue paper to the middle of the wood paper.


Foam square the medallion to the middle of the blue paper. Adhere three flowers to the right side of the medallion. Adhere a flower with leaves to the bottom left side of the medallion.


Foam square the vase in amongst the flowers as desired.


Now we'll move on to the pink mom gift box.


To start, you'll need to get a gift box, I'm using the Concord & 9th Kraft Pillow Box. Fold the gift box.


Out of the Flowers For Mom 12x12 Paper Pack, you'll need the wood paper, mauve paper and purple paper. Cut the mauve paper to 3 3/4" x 8". Cut the wood paper to 3 1/2" x 8". Cut the purple wood paper to 3 1/4" x 8". Sand the edges of all the papers.


Choose a Flowers For Mom Medallions Ephemera. Fussy cut around the medallion. Sand the edge of the medallion.


Choose a Flowers For Mom Floral Ephemera. Fussy cut around the flower. 


Out of the Flowers For Mom Single Ephemera, you'll need to choose two single flowers and one flower with leaves. Fussy cut around all three flowers.


Out of the Flowers For Mom Floral Arrangement Ephemera, you'll need the vase with the pink mom word. Fussy cut around the vase.


Use glue to adhere the mauve paper to the middle of the box. Adhere the wood paper to the middle of the mauve paper. Adhere the purple word paper to the middle of the wood paper.


Foam square the medallion to the middle of the blue paper. Adhere three flowers to the right side of the medallion. Adhere the flower bunch to the bottom left side of the medallion.


Foam square the vase in amongst the flowers as desired.


Here are a few closeup photos of the finished gift boxes.


Here are the finished Mom Gift Boxes.


Supplies Used:

- Simply Stated Design: Flowers For Mom 12x12 Paper Pack, Flowers For Mom Floral Ephemera, Flowers For Mom Floral Arrangement, Flowers For Mom Single Ephemera and Flowers For Mom Medallions Ephemera
- Concord & 9th: Kraft Pillow Boxes

I hope that my Mom Gift Boxes have inspired you to recreate your own at home!

- Katelyn


Thursday, May 11, 2023

Mother's Day Cards

      Happy Thursday!

I'm sharing these beautiful Mother's Day Cards over on Jennifer Edwardson Creative Inc. Blog. My cards feature the BRAND NEW Amazing Moms Cut File, Best Mom Cut File and Wildflower  Creative Kit from Jennifer Edwardson Creative Inc. Shop. 


For all of the details on my Mother's Day Cards, you'll want to head over to Jennifer Edwardson Creative Inc. blog.


- Katelyn


Monday, May 8, 2023

Steampunk Birthday Tags

  Happy Monday!

Today, I'm sharing these Steampunk Birthday Tags that feature the Steampunk Dreams Collection from Nadine Karen Design. Grab a cup of your favourite beverage and learn how to create these Steampunk Birthday Tags at home.


To start, we will create the Make a Wish Tag.


To start, you'll need to choose one of the Steampunk Dreams Tags Large. From the Dark Wood 6x6 Pattern Paper Pack, cut a piece of paper that measures 3/4" x 4". Distress the edges of the tag and paper. Ink the edges of the tag and paper using Walnut Stain Distress Ink and a blending tool with foam.


From the Steampunk Dreams Ephemera Pack 2, you'll need the balloon. Choose a circle frame out of the Steampunk Dreams Frame Collection. Take two single flowers and a flower bunch out of the Steampunk Dreams Flower Ephemera. Fussy cut around the images. Ink the edges of the ephemera using Walnut Stain Distress Ink and a blending tool with foam.


Staple the wood paper 1/2" from the right and 1/2" from the top of the tag. Foam square the frame 3/8" from the left and 1 1/2" from the top of the tag.


Use adhesive and foam squares to adhere the balloon to the left side of the frame as desired. Adhere the flower bunch to the right of the balloon. Adhere the two single flowers to the left of the balloon.


Choose a sentiment from the Tim Holtz Ideaology Small Talk - Occasions and stick to the bottom right of the balloon. To finish the tag, tie twine through the hole at the top of the tag.


Here are a few closeups of the finished tag.


Now we'll create the Celebrate! Tag.


Choose one of the Steampunk Dreams Tags Large. Choose a piece of paper from the Dark Wood 6x6 Pattern Paper Pack, cut a piece of paper that measures 1" x 3 3/4". Choose a piece of paper from the Steampunk Dreams 6x6 Pattern Paper Pack, cut a piece that measures 7/8" x 3 3/4". Distress the edges of the tag and papers. Ink the edges of the tag and papers using Walnut Stain Distress Ink and a blending tool with foam.


From the Steampunk Dreams Ephemera Pack 2, you'll need the typewriter. Choose a circle frame out of the Steampunk Dreams Frame Collection. Fussy cut around the images. Ink the edges of the ephemera using Walnut Stain Distress Ink and a blending tool with foam.


Staple the wood paper 1/4" from the right and 5/8" from the top of the tag. Staple the pattern paper 3/8" from the right and 7/8" from the top of the tag.


Foam square the circle frame 1/4" from the right and 1 3/8" from the top of the tag. Use adhesive and foam squares to adhere the typewriter 1/4" from the right and 1/2" from the bottom of the tag.


Choose a sentiment from the Tim Holtz Ideaology Small Talk - Occasions and stick to the middle left of the typewriter. Adhere five Droplets - Halloween to the tag as desired. To finish the tag, tie twine through the hole at the top of the tag.


Here are a few closeup photos of the finished tag.


Now we'll create the Wishing you Happiness Tag.


Choose one of the Steampunk Dreams Tags Large. Choose a square frame out of the Steampunk Dreams Frame Collection. Fussy cut around the frame. Distress the edges of the tag and frame. Ink the edges of the tag and frame using Walnut Stain Distress Ink and a blending tool with foam.


From the Steampunk Dreams Ephemera 1, you'll need the horse image. Choose three single flowers out of the Steampunk Dreams Flower Ephemera. Fussy cut around the images. Ink the edges of the ephemera using Walnut Stain Distress Ink and a blending tool with foam.


Foam square the frame 3/4" from the left and 1" from the bottom of the tag. Adhere two single flowers to the top left corner of the frame. Adhere the remaining single flower to the middle bottom of the frame.


Use adhesive and foam squares to adhere the horse image to the left side of the frame. Choose a sentiment from the Tim Holtz Ideaology Small Talk - Occasions and stick to the right of the horse image as desired. To finish the tag, tie twine through the hole at the top of the tag.


Here are a few closeup photos of the finished tag.


Here are the finished Steampunk Birthday Tags and some closeups.


Supplies Used:


- Nadine Karen Design: Steampunk Dreams 6x6 Pattern Paper Collection, Dark Wood 6x6 Pattern Paper Pack, Steampunk Dreams Ephemera 1, Steampunk Dreams Ephemera Pack 2, Steampunk Dreams Flower Ephemera, Steampunk Dreams Frame Collection and Steampunk Dreams Tags Small 
- Tim Holtz/Ideaology: Droplets - Halloween and Small Talk - Occasions
- Tim Holtz for Ranger Ink: Distress Ink - Walnut Stain and Blending Tool with Foam
Misc: Twine

I hope that my Steampunk Birthday Tags have inspired you to recreate your own at home! 

- Katelyn