Saturday, August 31, 2019

Just For You - Birthday Notecard

Happy Saturday! I'm up on the Elizabeth Craft Designs blog today sharing my Just For You Birthday Notecard, which features stamps and dies from Krista Schneider as well as a variety of dies Els van de Burgt Studio, Joset Designs. To finish the card, I used a couple of patterned papers from ModaScrap.


I would love for you to go and check out the full tutorial on how to create my Just For You Birthday Notecard over on the Elizabeth Crafts Designs Blog

- Katelyn

Thursday, August 29, 2019

Happy Halloween Tag

Happy Thursday!! 
I'm excited to be sharing with you today a fun Happy Halloween Tag which features dies from Joset Designs and the Planner Essentials line. This tag is perfect to add to a Halloween treat bag. You'll want to read below to learn how to recreate my Happy Halloween Tag at home.


To start, die cut the large tag from the Planner Essentials - 2 die out of White Soft Finish Cardstock. Using a blending tool with foam, blend Black Soot Distress Oxide Ink over the entire surface of the tag. Spritz the tag with water. Dry the tag with a heat tool. Place the bat stencil overtop of the tag and use the Emboss It Ink dabber to put the ink through the stencil. Remove the stencil. Sprinkle Onyx Frost Embossing Powder overtop of the stencil image. Tap off the excess powder and emboss with a heat tool. Ink the edges of the tag using Black Soot Distress Ink and a blending tool with foam.


Die cut the Happy Halloween sentiment from the Holidays 3 - Happy Holidays die out of White Soft Finish Cardstock. Using a blending tool with foam, blend Wilted Violet Distress Ink over the entire surface of the words.


From the Scarecrow die, die cut the small pumpkin out of White Soft Finish Cardstock. From the Pumpkins die, die cut the two pumpkins out of White Soft Finish Cardstock. Using a blending tool with foam, blend Carved Pumpkin Distress Ink over the entire surface of each pumpkin.


From the Pumpkins die, you'll need to die cut the two stems out of White Soft Finish Cardstock. From the Pumpkin die, die cut the stem, two large leaves, two small leaves and two of each of the vines. Using a blending tool with foam, blend Peeled Paint Distress Ink over the entire surface of the stems, leaves and vines.


From the Spider Web die, die cut the web out of Rich Black Soft Finish Cardstock. Cut the web to desired width. From the Halloween Accessories die, die cut two bats out of Rich Black Soft Finish Cardstock. Die cut the spider from the Haunted House Set out of Rich Black Soft Finish Cardstock.


Adhere the spider web to the bottom left corner of the tag. Adhere the stems to each of the corresponding pumpkins. Use foam squares and adhesives to the pumpkins in the bottom left side of the tag. 


Adhere the vines and leaves as desired around the pumpkins. Use foam squares to adhere the bats to the top portion of the tag.


Adhere the spider to the bottom pumpkin. Adhere the Happy Halloween sentiment over top of the pumpkins.


To finish the tag, tie a piece of black seam binding ribbon through the top of the tag.


Here's a few closeup photos of the the finished Happy Halloween Tag.


Here is the finished Tag.


Elizabeth Craft Designs Supplies Used:

- Rich Black Soft Finish Cardstock

Other Supplies Used:

- Tim Holtz for Ranger Ink: Distress Ink - Black Soot, Carved Pumpkin, Peeled Paint & Wilted Violet, Distress Oxide Ink - Black Soot and a Blending tool with foam
- Tim Holt for Stampers Anonymous: Layering Stencil - Batground
- Ranger Ink: Emboss It Dabber
- Emerald Creek Craft Supplies: Onyx Frost Embossing Powder
- Misc: Black Seam Binding Ribbon

- Katelyn


Monday, August 26, 2019

Have a Super Birthday

Happy Monday!
I'm excited to be back on Creative Scrapbooker Magazine's Blog as a monthly blogger sharing my Have a Super Birthday Card. My card features a variety of products from Ranger Ink, Stamps from Stampers Anonymous, dies from Elizabeth Craft Designs, cardstock from Creative Scrapbooker Magazine, Nuance powder from Magenta and adhesive from Scrapbook Adhesives by 3L.


You'll want to make sure to stop by the Creative Scrapbooker Blog to learn how I created my Have a Super Birthday Card.

Thanks for stopping by!
- Katelyn

Friday, August 23, 2019

Take the Road Less Traveled Altered Frame

Happy Friday! 
I have a new project over on Wild Whisper's blog, where I'm sharing my Take the Road Less Traveled Altered Frame which features one of the brand new collections Road Trip!


For all the details, more photos and a full tutorial on my altered frame you'll want to stop by the Wild Whisper blog. You'll want to make sure to keep checking out Wild Whisper's blog as the design team will be sharing lots of inspiration using the new collections.

- Katelyn

Thursday, August 22, 2019

August Planner Post #3 - Week 2

Happy Thursday! I'm excited to be sharing Week #2 in my planner today. To create my week planner spread, I've used a variety of the dies from the Planner Essentials line. You'll want to read below to learn how to recreate my Week #2 planner spread at home.


Die cut the page from the Planner Essentials - 4 die out of White Soft Finish Cardstock. Die cut the page from the Planner Essentials - 3 die out of White Soft Finish Cardstock. Place the two pages together. Sprinkle Chartreuse, Raspberry and Rosebud Magenta Nuance randomly on the pages. Spritz the pages with water. Dry the pages using a heat tool. Apply Dusty Concord Distress Oxide Ink to the chicken wire stamp from the Background Stamps 1 and start by stamping randomly on the right page. Reapply the ink to the stamp and stamp again seven more times total on the left and right pages.  Dry the stamped images with a heat tool. Apply Emboss It Ink to the script stamp from the Background Stamps 2 and start by stamping randomly on the right page. Reapply the ink to the stamp and stamp again eight more times total on the left and right pages. Sprinkle Molten Dimension: Black Magic Embossing Powder to each page. Tap off the excess powder and emboss with a heat tool. 


Apply Jet Black Archival Ink to the August Month from the Months stamp set and stamp onto the tab of the right page. Distress the edges of each page. Ink the edges of each page using Black Soot Distress Oxide Ink and a blending tool with foam.


From the Planner Elements die, die cut two of the square strips out of black cardstock.


On a piece of White Soft Finish Cardstock, sprinkle Chartreuse, Raspberry and Rosebud Magenta Nuance. Spritz the paper with water. Dry with a heat tool. From the Planner Essentials - 1 die, die cut the reinforcement circles out of the now coloured White Soft Finish Cardstock. Die cut the reinforcement circles again out of the same piece of cardstock. Ink the edges of each reinforcement circles using Black Soot Distress Oxide Ink and a Blending Tool with Foam.


Apply Dusty Concord Distress Oxide Ink to the rectangle from the Schedule stamp set and stamp onto a piece of White Soft Finish Cardstock. Reapply Dusty Concord Distress Oxide Ink to the stamp and stamp six more times onto the piece of White Finish Cardstock. Apply Jet Black Archival Ink to the stitching stamp from the Schedule stamp set and stamp onto each rectangle. Apply Jet Black Archival Ink to the days of the week stamps from the Calendar stamp set and stamp onto each rectangle. Cut out each rectangle. Distress the edges of the rectangles. Ink the edges of the rectangles using Black Soot Distress Oxide Ink and a Blending Tool with Foam.


Adhere the reinforcement circles over top of each circle on the pages. Adhere one of the square strips to the middle of the left hand page. Adhere the other square strip to the middle of the right hand page. 


To finish your spread, use foam squares to adhere Monday to Thursday boxes on the left hand page as desired. Use foam squares to adhere the Friday to Sunday boxes on the right hand page as desired. 


Here are the finished pages.


Here are some closeup photos of the finished pages.


Here is the finished Week 2 Planner Spread.


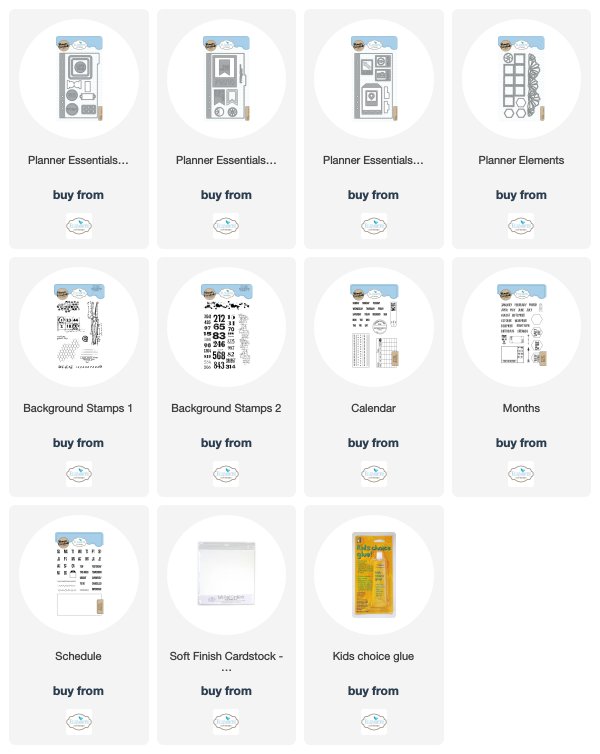
Elizabeth Craft Designs Product Used:


Other Supplies Used:

- Tim Holtz for Ranger Ink: Distress Oxide Ink - Black Soot & Dusty Concord and a Blending tool with foam
- Ranger Ink: Jet Black Archival Ink, Emboss It Ink and a Mister
- Emerald Creek Craft Supplies: Molten Dimensions - Black Magic
- Magenta Nuance: Chartreuse, Raspberry and Rosebud
- Misc: Black Cardstock

- Katelyn


Wednesday, August 21, 2019

Bloom Tag

Happy Wednesday!
Have you heard the news?! Charlene van der Vorst is releasing eight stamp sets with Elizabeth Craft Designs today. You'll want to head over to their website to check out all of her awesome stamp sets. To kick off her release, I created this beautiful Bloom Tag which features two of her new stamp sets. You'll want to read below as I have a full tutorial on how to recreate my tag at home. 


To start, die cut the large tag from the Planner Essentials - 2 die out of White Soft Finish Cardstock. Apply Emboss It Ink to the "x" stamp from the Journaling Elements stamp set and stamp randomly onto the tag. Reapply ink to the stamp and stamp again three more times randomly on the tag. Sprinkle Razzleberry Embossing Powder over top of the entire tag. Tap off the excess powder and emboss with a heat tool. Distress the edges of the tag. Ink the edges of the tag using Black Soot Distress Oxide Ink and a blending tool with foam.


Die cut the 3/4" Stitched Fishtail Banner out of White Soft Finish Cardstock. Cut the banner down to 2 3/4". Apply Jet Black Archival Ink to the Bloom stamp from the A Field of Flowers stamp set and stamp onto the banner. Distress the edges of the banner. Ink the edges of the banner using Black Soot Distress Oxide Ink and a blending tool with foam.


Die cut the 2" Stitched Indented Rectangle out of a piece of black cardstock. Place the 1 1/2" Stitched Indented Rectangle in the middle of the 2" stitched indented rectangle and run through your die cutting machine. Distress the edges of both pieces.


Choose three flowers from the A Field of Flowers stamp set. Apply Jet Black Archival Ink to each of the flowers and stamp each flower onto a piece of watercolour cardstock. Water colour one flower using Tombow Markers 177, 055 & 815. Water colour the second flower using Tombow Markers 177, 055 & 847. Water colour the third flower using Tombow Markers 177, 055 & 933. Fussy cut each flower out. Ink the edges of each flower using Black Soot Distress Oxide Ink and a blending tool with foam. 


Next, you'll need a piece of cheesecloth, cut to length as desired. Create a bow out of a piece of twine. 


Adhere the 2" stitched indented rectangle to the left hand side of the tag on an angle. Foam square the 1 1/2" stitched indented rectangle over top of the 2" stitched indented rectangle.


Adhere the cheesecloth over top of the stitched indented rectangles. Use adhesive and foam squares to adhere the bloom banner 1/2" from the bottom and 1" from the left of the tag. Adhere the flowers as desired in a bunch over top of the cheesecloth and the banner.


Adhere the twine bow to the bottom of the flower bunch. To finish off the tag, tie a piece of twine at the top of the tag.


Here are a few closeup photos of the finished tag.


Here is the finished Bloom Tag.


Elizabeth Craft Designs Supplies Used:


Other Supplies Used:

- Emerald Creek Craft Supplies: Razzleberry Embossing Powder
- Ranger Ink: Jet Black Archival Ink and Emboss It Ink
- Tim Holtz for Ranger Ink: Black Soot Distress Oxide Ink and a Blending tool with Foam
- Tombow Markers: 815, 055, 847, 177 and 933
- Misc: Twine, Black Cardstock, Watercolour Cardstock and Cheesecloth

- Katelyn

Tuesday, August 20, 2019

You are Amazing Tag

Happy Tuesday!
I'm excited to have a new post over on Quietfire Design blog today, where I'm sharing my You are Amazing Tag. My tag features a variety of Quietfire stamps as well as A Way With Words Dies.


For a full tutorial and a few more photos of my project, you'll want to head over to Quietfire Design blog for all the details. 

- Katelyn