Sunday, June 30, 2019

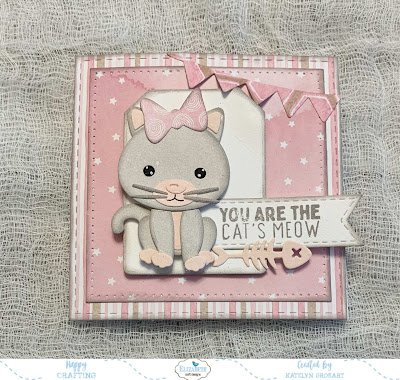
You Are The Cat's Meow Card

Happy Sunday!
This past week, I was busy playing with Joset Designs newest collection of dies and created this cute You Are The Cat's Meow Card, perfect to give to that cat lover in your life. To create my card, I've used dies from Joset Designs, the Planner Essentials collection and Els van de Burgt Studio, as well as patterned paper from ModaScrap. You'll want to read below as I share with you how to recreate my card at home.


Using a blending tool with foam, blend Tattered Rose Distress Oxide Ink over a piece of White Soft Finish Cardstock. From the coloured cardstock piece, die cut the fish, paws, mouth, inside ears and tummy from the Cat die.


Die cut the eyes out of black cardstock.


Using a blending tool with foam, blend Pumice Stone Distress Oxide Ink over a piece of White Soft Finish Cardstock. From the coloured cardstock piece, die cut the head, body, legs, outside ears and tail from the Cat die. Ink the edges of the die cut images using Hickory Smoke Distress Ink and a blending tool with foam.


Using a blending tool with foam, blend Hickory Smoke Distress Oxide Ink over a piece of White Soft Finish Cardstock. From the coloured cardstock piece, die cut the whiskers from the Cat die.


Choose a piece of patterned paper from the Pink Cotton Candy Paper Pack. Die cut the bow from the cat die out of the patterned paper. Ink the edges of the bow using Hickory Smoke Distress Oxide Ink and a blending tool with foam.


Die cut a 3/4" Stitched Fishtail Banner out of White Soft Finish Cardstock. Apply Hickory Smoke Distress Oxide Ink to the You Are The Cat's Meow stamp and stamp onto the banner. Trim the banner down to 2 3/4". Ink the edges of the banner using Hickory Smoke Distress Oxide Ink and a blending tool with foam.


Die cut the small tag out of White Soft Finish Cardstock from the Planner Essentials - 2 die. Ink the edges of the tag using Hickory Smoke Distress Oxide Ink and a blending tool with foam.


From the Pink Cotton Candy Paper Pack, choose two patterned paper pieces. Die cut the 4 1/4" Stitched Square out of one of the patterned papers. Die cut the 3 3/4" Stitched Square out of the other patterned paper piece. Ink the edges of the squares using Hickory Smoke Distress Oxide Ink and a blending tool with foam.


From the Celebration Flags dies, choose one of the flags. Choose another piece of patterned paper from the Pink Cotton Candy Paper Pack. Die cut the flags out of the patterned paper.


Adhere the 3 3/4" stitched square to the 4 1/4" stitched square.


Adhere your cat together. Add the white dots to the eyes using a white gel pen. Add the mouth for the cat using a black gel pen.


Adhere the sentiment banner 3/8" from the bottom of the tag and 1 3/8" from the right of the tag. Foam square the cat to the left hand side of the tag, making sure it sits slightly over top of the sentiment banner. Adhere the fish bone underneath the sentiment banner.


Adhere the flags to the top right hand corner of the stitched squares. To finish the card, cut a cardbase out of White Soft Finish Cardstock that measures 4 1/4" x 8 1/2", score at 4 1/4". Adhere the cardfront to the cardbase.


Here are a few closeups photos of the finished card.


Here is the finished You Are The Cat's Meow Card.


Elizabeth Craft Designs Supplies Used:

Cat


Other Supplies Used:

- Tim Holtz for Ranger Ink: Distress Oxide Ink- Hickory Smoke, Pumice Stone & Tattered Rose and Blending tool with Foam
- Misc: Black Cardstock, Black Gel Pen and White Gel Pen

Thanks for stopping by and checking out my card. I hope that I've inspired you to recreate my You Are The Cat's Meow Card at home.

- Katelyn 


Friday, June 28, 2019

Yum Scrapbook Layout

Happy Friday! Today, I have a new project over on Wild Whisper's blog, where I'm sharing my Yum Scrapbook Layout which features the Talk Foodie To Me Collection.


For all the details, more photos and a full tutorial on my layout you'll want to stop by the Wild Whisper blog. You'll want to make sure to keep checking out Wild Whisper's blog as the design team will be sharing lots of inspiration.

- Katelyn

Thursday, June 27, 2019

Here For You Card

Happy Thursday!! 

I'm excited to be sharing with you today a quick card which features the Planner Essentials line. The Planner Essentials line can be used for cards and layouts, not just creating beautiful pages for your planner.  To create my card, I've used a variety of the dies and stamps from the Planner Essentials line as well as dies from Els van de Burgt Studio and stamps from Joset Designs. You'll want to read below to learn how to recreate my Here For You Card at home.


To start, die cut the 4" Stitched Rectangle out of White Soft Finish Cardstock. Sprinkle Raspberry and Coral Magenta Nuance powder randomly over the rectangle. Spritz the powder with water. Allow the rectangle to dry.


Apply Emboss It Ink to the letter stamp from the Patterns 2 stamp set and stamp randomly on the rectangle. Reapply ink to the stamp and continue stamping four more times on the rectangle. Sprinkle Midnight Black Embossing Powder overtop of the stamped areas. Tap off the excess powder and emboss with a heat tool. Distress the edges of the rectangle. Ink the edges of the rectangle using Black Soot Distress Ink and a blending tool with foam.


From the Planner Essentials - 6 die, die cut the flower out of White Soft Finish Cardstock.


Apply Wilted Violet Distress Ink to one of the retro labels stamp and stamp onto a piece of kraft cardstock. Apply Abandoned Coral Distress Ink to the Here for You sentiment out of the Build Your Own Sentiments 1 stamp set and stamp in the middle of the label. Fussy cut the label out. Distress the edges of the label. Ink the edges of the label using Black Soot Distress Ink and a blending tool with foam.


Now it's time to assemble your card.

Adhere the flower in the bottom right hand corner of the stitched rectangle. Foam square the Here for You label slightly overtop of the flower to the left. 


Cut a cardbase that measures 5 1/2" x 8 1/2", score at 4 1/4". Adhere the cardfront to the cardbase.


Here's a few closeup photos of the the finished Here For You Card.


Here is the finished Card.


Elizabeth Craft Designs Supplies Used:


Other Supplies Used:

- Tim Holtz for Ranger Ink: Distress Ink - Black Soot, Abandoned Coral & Wilted Violet and a Blending tool with foam
- Ranger Ink: Emboss It Dabber
- Magenta Nuance: Coral and Raspberry
- Emerald Creek Craft Supplies: Midnight Black Embossing Powder
- Misc: Kraft Cardstock

- Katelyn


Tuesday, June 25, 2019

Rosemary Notecard

Happy Tuesday!
I have a new post over on Quietfire Design blog today, where I'm sharing my Rosemary Notecard which features a variety of Quietfire stamps and A Way With Words Dies.


For a full tutorial and a few more photos of my project, you'll want to head over to Quietfire Design blog for all the details. 

- Katelyn


Monday, June 24, 2019

Hello Summer Tag

I have one more post to share with you today!

With summer officially arriving this past week, I thought it would be the perfect time to create a fun summer themed tag. I used dies from Joset Designs as well as the Planner Essentials collection and Els van de Burgt Studio, to create this fun Hello Summer Tag. You'll want to read below as I share with you how to recreate my tag at home.


To start, die cut the both sized florals, centers twice out of White Soft Finish Cardstock. Die cut the palm leaves three times out of White Soft Finish Cardstock. Using a blending tool with foam, blend Picked Raspberry Distress Ink over the entire surface of the large floral and centers. Using a blending tool with foam, blend Squeezed Lemonade Distress Ink over the entire surface of the stems. Using a blending tool with foam, blend Forest Moss Distress Ink over the entire surface of the palm leaves. Shape the flowers as desired and adhere each flowers together. Shape the palm leaves as desired.


Die cut a 3 1/4" Stitched Hexagon out of White Soft Finish Cardstock. Cut the stitched hexagon down to 2 1/4". Ink the edges of the hexagon using Black Soot Distress Ink and a blending tool with foam.


Die cut a 3/4" Stitched Fishtail Banner out of White Soft Finish Cardstock. Cut the banner down to 2 1/4". Apply Jet Black Archival Ink to the Happy Summer sentiment and stamp onto the banner. Ink the edges of the banner using Black Soot Distress Ink and a blending tool with foam.


Die cut the large tag from the Planner Essentials -2 die set out of a tropical patterned paper piece. Ink the edges of the tag using Black Soot Distress Ink and a blending tool with foam.


Adhere the stitched hexagon 3/8" from the bottom of the tag and right against the left hand side of the tag. Adhere the flowers and leaves overtop of the stitched hexagon. Adhere the Happy Summer Banner 5/8" from the bottom and underneath where the flowers sit.


To finish off the tag, tie a piece of twine through the top of the tag.


Here are a few closeups photos of the finished tag.


Here is the finished Hello Summer Tag.


Elizabeth Craft Designs Supplies Used:


Other Supplies Used:

- Tim Holtz for Ranger Ink: Distress Ink- Black Soot, Picked Raspberry, Squeezed Lemonade & Forest Moss and Blending tool with Foam
- Ranger Ink: Jet Black Archival Ink 
- Wild Whisper: Palm Paradise Paper Pack
- Misc: Twine

Thanks for stopping by and checking out my tag. I hope that I've inspired you to recreate my Hello Summer Tag at home.

- Katelyn 


Love Card

Happy Monday! I'm thrilled to be back on Creative Scrapbooker Magazine's Blog as a monthly blogger sharing my Love Card. My card features a variety of products from Wild Whisper, dies from Elizabeth Craft Designs, superstock from Creative Scrapbooker Magazine, embossing powder from Emerald Creek Craft Supplies, chipboard from Southern Ridge Trading Company, ink from Ranger Ink and adhesive from Scrapbook Adhesives by 3L.


You'll want to make sure to stop by the Creative Scrapbooker Blog to learn how I created my Love Card.

Thanks for stopping by!
- Katelyn

Saturday, June 22, 2019

Planner Post - Planner Spread Week #3

Happy Saturday! I'm excited to be sharing with you today my June Week #3 Planner Spread. To create my spread, I've used a variety of the dies from the Planner Essentials line and patterned paper from ModaScrap. You'll want to read below to learn how to recreate my Week #3 Planner Spread at home.


To start, choose two patterned paper pieces from the ModaScrap - Under The Sea Paper Pack. Die cut the Planner Page from Planner Essentials 4 out of one of the patterned papers. Die cut the other planner page from Planner Essentials 2 out of the other patterned paper. Apply Jet Black Archival Ink to the June word from the Month stamp set and stamp onto the tab of the die cut planner page. Ink the edges of the planner pages using Black Soot Distress Oxide Ink and a blending tool with foam. 


From the Planner Patterns, you'll need the geometric die. Die cut the geometric pattern twice out of the patterned paper. Die cut the geometric pattern twice out of White Soft Finish Cardstock. Cut the patterned geometric pieces into five pieces. Cut the White Soft Finish Cardstock geometric pieces into three pieces.


From the cut aparts paper from the Under the Sea paper pack, cut out the anchor rectangle and the Sun, Sea & Love rectangle. Ink the edges of the rectangles using Black Soot Distress Oxide Ink and a blending tool with foam.


Apply Jet Black Archival Ink to the To Do stamp from the Reminders stamp set and stamp onto on of the patterned papers. Reapply Jet Black Archival Ink to the To Do stamp and stamp onto a piece of White Soft Finish Cardstock. Cut out the To Do lists. Ink the edges of the rectangles using Black Soot Distress Ink and a blending tool with foam. Fill in the To Do lists.


Apply Cracked Pistachio Distress Oxide Ink to one of the Retro Labels stamp and stamp onto a piece of White Soft Finish Cardstock. Reapply the ink to the stamp and stamp three more times on the same piece of White Soft Finish Cardstock. Apply Peacock Feathers Distress Oxide Ink to the same Retro Labels stamp and stamp onto the same piece of White Soft Finish Cardstock. Reapply the ink to the stamp and stamp two more times on the same piece of White Soft Finish Cardstock. Cut out each label. Apply Peacock Feathers Distress Oxide Ink to the Monday, Tuesday, Wednesday and Thursday words and stamp onto each of the Cracked Pistachio labels. Apply Cracked Pistachio Distress Oxide Ink to the Friday, Saturday and Sunday words and stamp onto each of the Peacock Feathers labels. Ink the edges of the labels using Black Soot Distress Oxide Ink. Fill in each day with a black pen.


Now we will start by assembling the left hand page of the Week #3 Planner Spread.

Adhere the patterned geometric pattern pieces as desired on the patterned paper page without a tab.


Use adhesive and foam squares to adhere the patterned paper To Do, the anchor rectangle piece and the Monday to Thursday Labels as desired on the page.


Now we will assemble the right hand page of the Week #3 Planner Spread.

Adhere the White Soft Finish Cardstock geometric pattern pieces as desired on the patterned paper page with the tab.


Use adhesive and foam squares to adhere the patterned paper To Do, the Sea, Sun & Love rectangle piece and the Friday to Sunday Labels as desired on the page.


Here's a few closeup photos of the the finished Week #3 Planner Spread.


Here is the finished Week #3 Planner Spread.


Elizabeth Craft Designs Supplies Used:


Other Supplies Used:

- Tim Holtz for Ranger Ink: Distress Oxide Ink - Black Soot, Cracked Pistachio & Peacock Feathers and a Blending tool with foam
- Ranger Ink: Jet Black Archival Ink
- Misc: Black Gel Pen

- Katelyn