Happy Wednesday!
Today, I'm sharing these Steampunk Happy Birthday Cards that feature the Steampunk Dreams Collection from Nadine Karen Design. Grab a cup of your favourite beverage and learn how to create these Steampunk Happy Birthday Cards at home.
To start, we will create the Clock/Camera Happy Birthday Card.
You'll need to choose one of the wood papers out of the Dark Wood 6x6 Pattern Paper Pack. Cut a piece that measures 4" x 5 1/4". Next, you'll need to choose one of the patterned papers out of the Steampunk Dreams 6x6 Pattern Paper Collection. Cut a piece that measures 3 3/4" x 5". Distress the edges of both papers. Ink the edges of both patterned papers using Walnut Stain Distress Ink and a blending tool with foam.
From the Steampunk Dreams Ephemera Pack 2, you'll need the camera, clock, owl and door. Fussy cut around each image. Ink the edges of all the pieces using Walnut Stain Distress Ink and a blending tool with foam.
Out of the Steampunk Dreams Flower Ephemera, you'll need a flower bunch and three single flowers. Fussy cut around the edges of all of the images. Ink the edges of the images using Walnut Stain Distress Ink and a blending tool with foam.
From the Crazy Talk Stamp Set, you'll need the Happy Birthday sentiment. Apply Jet Black Archival Ink to the sentiment and stamp onto a piece of white cardstock. Cut the sentiment into a word strip. Distress the edges of the sentiment. Ink the edges of the sentiment using Walnut Stain Distress Ink and a blending tool with foam.
Adhere the 3 3/4" patterned paper to the 4" patterned paper piece. Foam square the door to the middle of the 3 3/4" patterned paper piece.
Adhere the bunch of flowers to the top left side of the door. Adhere the three single flowers to the bottom right corner of the door.
Adhere the clock, owl and camera together. Foam square the embellishment cluster to the bottom left side of the door as desired. Adhere the Happy Birthday word strip to the middle of the camera.
Cut a cardbase out of kraft cardstock that measures 4 1/4" x 5 1/2", score at 11". Adhere the cardfront to the cardbase.
Here are a few closeups of the finished card.
Now we will create the Happy Birthday Card with clocks and owl.
You'll need to choose one of the wood papers out of the Dark Wood 6x6 Pattern Paper Pack. Cut a piece that measures 4" x 5 1/4". You will also need to cut a piece that measures 3/4" x 3 1/2". Next, you'll need to choose one of the patterned papers out of the Steampunk Dreams 6x6 Pattern Paper Collection. Cut a piece that measures 3 3/4" x 5". Distress the edges of both papers. Ink the edges of both patterned papers using Walnut Stain Distress Ink and a blending tool with foam.
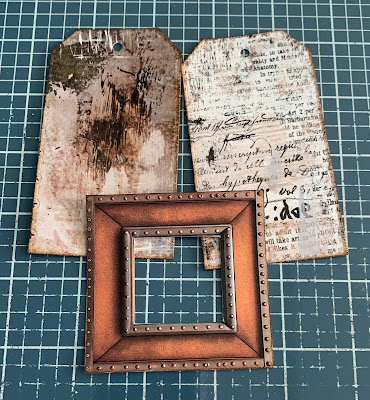
Choose two tags from the Steampunk Dreams Tags Small. Choose a the square frame out of the Steampunk Dreams Frame Collection. Fussy cut around the frame. Distress the edges of all of the pieces. Ink the edges of all of the pieces using Walnut Stain Distress Ink and a blending tool with foam.
From the Steampunk Dreams Ephemera Pack 2, you'll need the owl and clock with gears. Fussy cut around each image. Ink the edges of all the pieces using Walnut Stain Distress Ink and a blending tool with foam.
From the Crazy Talk Stamp Set, you'll need the Happy Birthday sentiment. Apply Jet Black Archival Ink to the sentiment and stamp onto a piece of white cardstock. Cut the sentiment into a word strip. Distress the edges of the sentiment. Ink the edges of the sentiment using Walnut Stain Distress Ink and a blending tool with foam.
Adhere the 3 3/4" patterned paper to the 4" patterned paper piece. Staple the 3/4" wood paper piece 3/4" from the left and 1/4" from the top of the 3 3/4" patterned paper piece.
Foam square the first tag 3/8" from the left and 5/8" from the top of the 3 3/4" patterned paper piece. Use adhesive and foam squares to adhere the other tag 1/2" from the right and 3/4" from the top of the 3 3/4" patterned paper piece. Adhere the frame 1/8" from the right and 1 1/2" from the top of the 3 3/4" patterned paper piece.
Adhere the owl to the clock with gears. Foam square the clock with gears and owl 5/8" from the right and 1/4" from the bottom of the 3 3/4" patterned paper piece. Adhere the Happy Birthday word strip to the bottom portion of the owl as desired. To finish the cardfront, adhere three Droplets - Halloween as desired.
Cut a cardbase out of kraft cardstock that measures 4 1/4" x 11", score at 5 1/2". Adhere the cardfront to the cardbase.
Here are a few closeups of the finished card.
Now we will create the last Steampunk Happy Birthday Card.
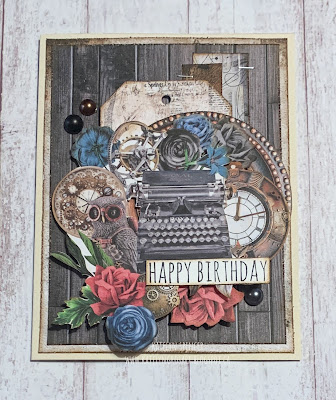
You'll need to choose one of the wood papers out of the Dark Wood 6x6 Pattern Paper Pack. Cut a piece that measures 3 3/4" x 5". Next, you'll need to choose one of the patterned papers out of the Steampunk Dreams 6x6 Pattern Paper Collection. Cut a piece that measures 4" x 5 1/4". You will also need to choose two more patterned papers. Cut one piece that measures 7/8" x 4". Cut the second piece to 5/8" x 3 3/4". Distress the edges of all the papers. Ink the edges of all the papers using Walnut Stain Distress Ink and a blending tool with foam.
Choose one tag from the Steampunk Dreams Tags Small. Choose a circle frame out of the Steampunk Dreams Frame Collection. Fussy cut around the frame. Distress the edges of all of the pieces. Ink the edges of all of the pieces using Walnut Stain Distress Ink and a blending tool with foam.
From the Steampunk Dreams Ephemera Pack 2, you'll need the clock. Out of the Steampunk Dreams Ephemera 1, you'll need the embellishment cluster with typewriter. Choose three flowers out of the Steampunk Dreams Flower Ephemera. Fussy cut around each image. Ink the edges of all the pieces using Walnut Stain Distress Ink and a blending tool with foam.
From the Crazy Talk Stamp Set, you'll need the Happy Birthday sentiment. Apply Jet Black Archival Ink to the sentiment and stamp onto a piece of white cardstock. Cut the sentiment into a word strip. Distress the edges of the sentiment. Ink the edges of the sentiment using Walnut Stain Distress Ink and a blending tool with foam.
Adhere the 3 3/4" patterned paper to the 4" patterned paper piece. Staple the 7/8" pattern paper piece 1/2" from the right and 1/8" from the top of the 3 3/4" patterned paper piece. Staple the 5/8" pattern paper piece 7/8" from the right and 3/8" from the top of the 3 3/4" patterned paper piece.
Foam square the tag 3/4" from the right and 5/8" from the top of the 3 3/4" patterned paper piece. Adhere the circle frame to the middle of the tag as desired. Adhere two of the single flowers to the top right portion of the frame. Adhere the other single flower to the bottom right portion of the frame. Adhere the clock to the right side of the frame as desired.
Foam square the embellishment bunch 3/4" from the right and all the way to the bottom of the 3 3/4" patterned paper piece. Adhere the Happy Birthday word strip to the bottom of the typewriter as desired. Adhere three Droplets - Halloween as desired on the cardfront.
To finish the card, cut a cardbase out of kraft cardstock that measures 4 1/4" x 11", score at 5 1/2". Adhere the cardfront to the cardbase.
Here are a few closeups of the finished card.
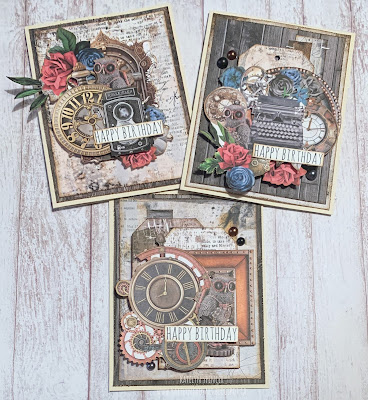
Here are the finished Steampunk Happy Birthday Cards.
Supplies Used:
- Nadine Karen Design: Steampunk Dreams 6x6 Pattern Paper Collection, Dark Wood 6x6 Pattern Paper Pack, Steampunk Dreams Ephemera 1, Steampunk Dreams Ephemera Pack 2, Steampunk Dreams Flower Ephemera, Steampunk Dreams Frame Collection and Steampunk Dreams Tags Small
- Tim Holtz/Ideaology: Droplets - Halloween
- Tim Holtz/Stampers Anonymous: Crazy Talk Stamp Set
- Tim Holtz for Ranger Ink: Distress Ink - Walnut Stain and Blending Tool with Foam
- Ranger Ink: Jet Black Archival Ink
Misc: White Cardstock and Kraft Cardstock
I hope that my Steampunk Happy Birthday Cards have inspired you to recreate your own at home! Make sure to come back next week as I share with you some tags using the same collection.
- Katelyn


Wowwww, love all of the cards you made!!! Thank you for sharing!
ReplyDeleteThank you Marjolijn!
ReplyDelete