Happy Monday!
Today, I'm sharing these Steampunk Birthday Tags that feature the Steampunk Dreams Collection from Nadine Karen Design. Grab a cup of your favourite beverage and learn how to create these Steampunk Birthday Tags at home.
To start, we will create the Make a Wish Tag.
To start, you'll need to choose one of the Steampunk Dreams Tags Large. From the Dark Wood 6x6 Pattern Paper Pack, cut a piece of paper that measures 3/4" x 4". Distress the edges of the tag and paper. Ink the edges of the tag and paper using Walnut Stain Distress Ink and a blending tool with foam.
From the Steampunk Dreams Ephemera Pack 2, you'll need the balloon. Choose a circle frame out of the Steampunk Dreams Frame Collection. Take two single flowers and a flower bunch out of the Steampunk Dreams Flower Ephemera. Fussy cut around the images. Ink the edges of the ephemera using Walnut Stain Distress Ink and a blending tool with foam.
Staple the wood paper 1/2" from the right and 1/2" from the top of the tag. Foam square the frame 3/8" from the left and 1 1/2" from the top of the tag.
Use adhesive and foam squares to adhere the balloon to the left side of the frame as desired. Adhere the flower bunch to the right of the balloon. Adhere the two single flowers to the left of the balloon.
Choose a sentiment from the Tim Holtz Ideaology Small Talk - Occasions and stick to the bottom right of the balloon. To finish the tag, tie twine through the hole at the top of the tag.
Here are a few closeups of the finished tag.
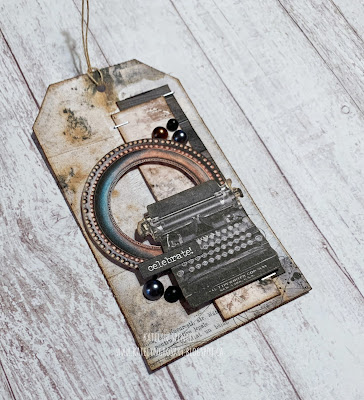
Now we'll create the Celebrate! Tag.
Choose one of the Steampunk Dreams Tags Large. Choose a piece of paper from the Dark Wood 6x6 Pattern Paper Pack, cut a piece of paper that measures 1" x 3 3/4". Choose a piece of paper from the Steampunk Dreams 6x6 Pattern Paper Pack, cut a piece that measures 7/8" x 3 3/4". Distress the edges of the tag and papers. Ink the edges of the tag and papers using Walnut Stain Distress Ink and a blending tool with foam.
From the Steampunk Dreams Ephemera Pack 2, you'll need the typewriter. Choose a circle frame out of the Steampunk Dreams Frame Collection. Fussy cut around the images. Ink the edges of the ephemera using Walnut Stain Distress Ink and a blending tool with foam.
Staple the wood paper 1/4" from the right and 5/8" from the top of the tag. Staple the pattern paper 3/8" from the right and 7/8" from the top of the tag.
Foam square the circle frame 1/4" from the right and 1 3/8" from the top of the tag. Use adhesive and foam squares to adhere the typewriter 1/4" from the right and 1/2" from the bottom of the tag.
Choose a sentiment from the Tim Holtz Ideaology Small Talk - Occasions and stick to the middle left of the typewriter. Adhere five Droplets - Halloween to the tag as desired. To finish the tag, tie twine through the hole at the top of the tag.
Here are a few closeup photos of the finished tag.
Now we'll create the Wishing you Happiness Tag.
Choose one of the Steampunk Dreams Tags Large. Choose a square frame out of the Steampunk Dreams Frame Collection. Fussy cut around the frame. Distress the edges of the tag and frame. Ink the edges of the tag and frame using Walnut Stain Distress Ink and a blending tool with foam.
From the Steampunk Dreams Ephemera 1, you'll need the horse image. Choose three single flowers out of the Steampunk Dreams Flower Ephemera. Fussy cut around the images. Ink the edges of the ephemera using Walnut Stain Distress Ink and a blending tool with foam.
Foam square the frame 3/4" from the left and 1" from the bottom of the tag. Adhere two single flowers to the top left corner of the frame. Adhere the remaining single flower to the middle bottom of the frame.
Use adhesive and foam squares to adhere the horse image to the left side of the frame. Choose a sentiment from the Tim Holtz Ideaology Small Talk - Occasions and stick to the right of the horse image as desired. To finish the tag, tie twine through the hole at the top of the tag.
Here are a few closeup photos of the finished tag.
Here are the finished Steampunk Birthday Tags and some closeups.
Supplies Used:
- Nadine Karen Design: Steampunk Dreams 6x6 Pattern Paper Collection, Dark Wood 6x6 Pattern Paper Pack, Steampunk Dreams Ephemera 1, Steampunk Dreams Ephemera Pack 2, Steampunk Dreams Flower Ephemera, Steampunk Dreams Frame Collection and Steampunk Dreams Tags Small
- Tim Holtz/Ideaology: Droplets - Halloween and Small Talk - Occasions
- Tim Holtz for Ranger Ink: Distress Ink - Walnut Stain and Blending Tool with Foam
Misc: Twine
I hope that my Steampunk Birthday Tags have inspired you to recreate your own at home!
- Katelyn


No comments:
Post a Comment