Merry Christmas! I hope that you are having a wonderful day spending time with your loved ones and friends.
Today's post, is all about this Noel Gift Box that I've used to wrap a gift in for this holiday season. To create my gift box, I've used dies from the Paper Flower Collection and stamps from Joset Designs. You'll want to read below as I have a full tutorial on how to recreate my gift box at home.

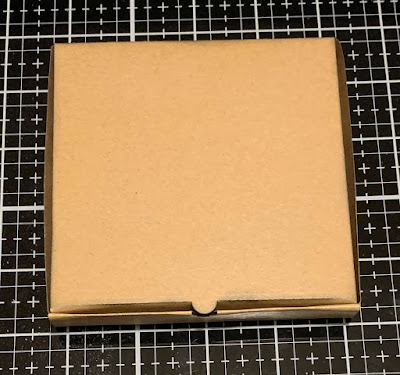
The first two steps use the Pizza Box Die.
Die cut the pizza box out of a piece of kraft cardstock. Ink the edges of the pizza box using Black Soot Distress Ink and a blending tool with foam.

I chose two pieces of patterned paper from the Warmest Wishes Paper Pack. Die cut the scallop square out of one of the patterned papers. Die cut the stitched square out of the other patterned paper. Distress the edges of both pieces. Ink the edges of both pieces using Black Soot Distress Ink and a blending tool with foam.

Die cut the Elegant Ornament out of a piece of lightly patterned white paper. Trim the ornament down to 3 3/4".

From the Pizza Box die, die cut the 2 1/4" stitched circle out of a piece of White Soft Finish Cardstock. From the Classic Christmas Sentiments, you'll need the Noel word. Apply Festive Berries Distress Ink to the Noel word and stamp in the middle of the circle. Distress the edges of the circle. Ink the edges of the circle using Black Soot Distress Ink and a blending tool with foam.

From the Leaves & Branches die, die cut the skinny branch twice out of a piece of White Soft Finish Cardstock. Using a blending tool with foam, blend Forest Moss Distress Ink over the entire surface of each branch.
From the Winter Greens die, die cut the holly branch three times and the round leaves branch twice out of a piece of White Soft Finish Cardstock. Using a blending tool with foam, blend Peeled Paint Distress Ink over the entire surface of each holly branch. Shape the holly branches as desired.

Assemble the box.
Adhere the scallop square to the top of the pizza box. Foam square the stitched square to the scallop square.

In the top left side of the stitched square, adhere a holly branch, a skinny branch and a rounded leaf branch as desired. In the middle left side of the stitched square, adhere a holly branch as desired. In the bottom left side of the stitched square adhere the remaining branches as desired.

Adhere the elegant ornament to the stitched circle. Foam square the stitched circle to the right of the branches, making sure it covers all of the ends of the branches.

Here are a few closeup photos of the finished gift box.


Here is the finished Noel Gift Box.

Elizabeth Craft Designs Supplies Used:
Other Supplies Used:
- Tim Holtz for Ranger Ink: Distress Ink - Black Soot, Festive Berries, Forest Moss & Peeled Paint and Blending Tool with Foam
- Vicki Boutin: Warmest Wishes 6x8 Paper Pad
- Misc: Kraft Cardstock
I hope that my Noel Gift Box has inspired you to recreate your own version at home.
Merry Christmas!
- Katelyn
No comments:
Post a Comment