Happy Tuesday!
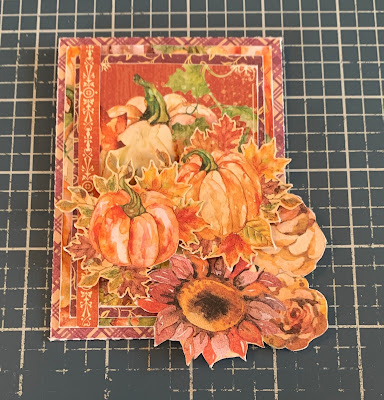
I'm in the Fall mood and have been creating some Fall projects over the last few weeks. So, for today's post I'm sharing this vintage Fall-Elujah Envelope using Graphic 45's Hello Pumpkin Collection.
To start, cut out the policy envelope from the Policy & Decorative Dies out of the purple plaid paper from the Hello Pumpkin 12x12 Patterns & Solids. Die cut the scallop circles from the same die out of a piece of orange paper from the Hello Pumpkin 12x12 Patterns & Solids. Sand the edges of the envelope and circles.
From the Hello Pumpkin 12x12 Collection Pack, you'll need the Harvest Time Paper and Falling Leaves Paper. Cut the Harvest Time paper to 2 3/8" x 3 3/8". Cut the Falling Leaves paper to 2 5/8" x 3 5/8". Sand the edges of the papers.
Cut the flourish border strip and pumpkin image from the Beautiful Bounty Paper. Cut the flourish border strip to 3 5/8". Cut the pumpkin image to 2 1/4" x 3 1/8". Sand the edges of both papers.
From the Color Me Happy Paper, fussy cut three pumpkins out. Sand the edges of the pumpkins.
From the Hello Pumpkin paper, fussy cut a three flower bunch, a two acorn bunch a single yellow flower and a double yellow flower. Sand the edges of the images.
Out of the Hello Pumpkin Ephemera, you'll need the Fall-Elujah banner. Sand the edges of the banner.
Adhere the policy envelope together.
Adhere the circles over the dots on the back of the policy envelope.
Adhere the pumpkin paper to the envelope. Adhere the purple vine paper to the pumpkin paper. Adhere the pumpkin image to the purple vine paper. Adhere the flourish border strip to the left side of the pumpkin image.
Adhere the three flower bunch to the bottom right corner of the envelope. Use foam squares and adhesive to adhere two pumpkins slightly over top of the flowers and around the large pumpkin on the image.
Use adhesive and foam squares to adhere the last pumpkin to the bottom of the other two pumpkins. Adhere the acorns to the left of the bottom pumpkin.
Adhere the yellow flowers as desired in amongst the top portion of the foam squared pumpkins. Foam square the Fall-Elujah banner to the bottom left portion of the pumpkins and acorns.
To finish off the envelope, stick a total of five black and gold Matte Pearl Gems to the envelope as desired.
Here are a few closeups of the finished envelope.
Supplies Used:
- Graphic 45: Hello Pumpkin 12x12 Collection Pack, Hello Pumpkin 12x12 Patterns & Solids Pack, Hello Pumpkin Ephemera, Matte Pearl Gems and Policy & Decorative Dies
I hope that my Fall-Elujah Envelope has inspired you to recreate your own at home!
- Katelyn


No comments:
Post a Comment