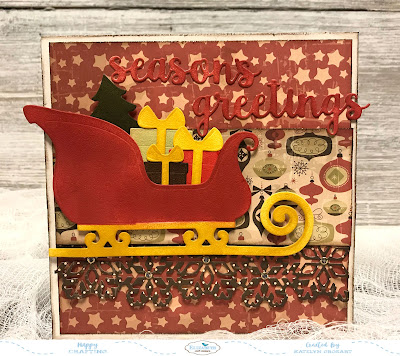
It's time for a new Designer Challenge on the Elizabeth Craft Designs Blog today. For September's challenge it's all about Classic Christmas. The inspiration for my project came from Joset Designs new Santa's Sleigh and Snowflake Border. With those two dies in hand, I also added a few other dies from Joset Designs and paper from ModaScrap to create my Season's Greetings card. Grab your favourite holiday beverage and read below as I have a tutorial for you so that you can re-create my card at home. You'll also want to read all the way down to the bottom of the post as there's some information on how to get in on the fabulous giveaway from Elizabeth Craft Designs.
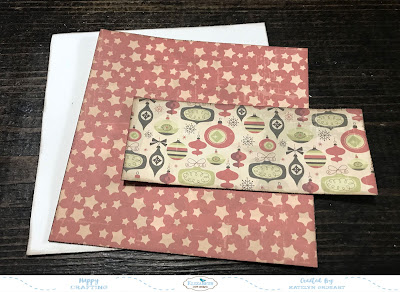
To start, choose two pieces of patterned paper from the ModaScrap Xmas Vintage Collection Paper Pack. From the first piece of patterned paper, cut a piece that measures 5 1/4" x 5 1/4" and cut a second piece that measures 5" x 5". The 5 1/4" piece will be flipped over and you'll use the plain side. From the second piece of patterned paper, cut a piece that measures 2" x 5". Distress the edges of all three patterned paper pieces. Ink the edges of all three pieces using Ground Espresso Distress Ink and a blending tool with foam.
With the ModaScrap Xmas Vintage Collection Paper Pack still out, choose a third piece of patterned paper. From that paper, cut a piece that measures 3" x 5". Place the Snowflake Border at the bottom of the patterned paper piece and die cut. Pick out the die cut pieces from the snowflakes. Distress the edges of the patterned paper piece. Ink the edges of the patterned paper piece using Ground Espresso Distress Ink and a blending tool with foam.
From the Words 5 - Winter Wishes, die cut the Season's Greetings out of White Soft Finish Cardstock. Using a blending tool with foam, blend Candied Apple Distress Ink over the entire surface of both words.
The next step is to die cut all the pieces from Santa's Sleigh out of White Soft Finish Cardstock.
Place a couple of Post It Notes on the top portion of the sleigh. Use a blending tool with foam to blend Fossilized Amber Distress Ink along the bottom portion of the sleigh. Remove the sticky notes and place them at the bottom portion of the sleigh. Use a blending tool with foam to blend Fired Brick Distress Ink along the top portion of the sleigh. Remove the sticky notes.
Use a blending tool with foam to blend Forest Moss Distress Ink over the entire surface of the Christmas tree.
Use a blending tool with foam to blend Fossilized Amber Distress Ink over the entire surface of each of the bows for the presents.
On the large present, use a blending tool with foam to blend Shabby Shutters Distress Ink over the entire surface. On the medium present, use a blending tool with foam to blend Candied Apple Distress Ink over the entire surface. On the small present, use a blending tool with foam to blend Ground Espresso Distress Ink over the entire surface.
Now it's time for assembly. Adhere the 5" patterned paper piece to the 5 1/4" paper piece. Adhere the snowflake border to the 2" patterned paper piece. Adhere the 2" patterned paper piece 1 1/2" from the top of the 5 1/4" paper.
Adhere the bows to each of the presents. Adhere the tree and presents to the inside of the sleigh.
Foam square the sleigh 1" from the top and all the way to the left hand side of the 5 1/4" paper piece.
Adhere the Season's Greetings sentiment to the top right portion of the card.
Cut a cardbase out of White Soft Finish Cardstock that measures 5 1/4" x 10 1/2", score at 5 1/4". Adhere the cardfront to the cardbase. To finish off your card, add transp. glitter/gold dots to the centers of the snowflakes.
Here are a few closeup shots of the card.
And here's the finished Season's Greetings Card.
*******************
For today's challenge Elizabeth Craft Designs are giving away a $20 Gift Card to use on our website to 3 winners.
To enter simply leave a comment on the Elizabeth Craft Designs Facebook Giveaway Blog Post or the Elizabeth Craft Designs Challenge post and tell us What Elizabeth Craft Designs die or stamp set would you select if making a Christmas card.
We will select 3 lucky winners in a random drawing
The winners will be announced on Friday, September.21st on the Elizabeth Craft Designs Blog and our Facebook page.
*****************
Elizabeth Craft Designs Products Used:
- ModaScrap: Xmas Vintage Collection Paper Pack
Other Products Used:
- Tim Holtz for Ranger Ink: Distress Ink - Shabby Shutters, Forest Moss, Festive Berries, Fired Brick, Fossilized Amber & Ground Espresso and Blending Tool with Foam
- Misc: Black Gel Pen
- Katelyn


No comments:
Post a Comment