Happy Friday!
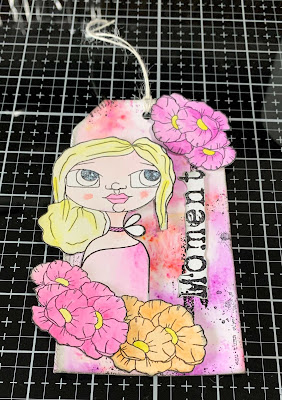
Today's project is a fun Moment Tag which features a variety of stamps from Charlene as well as dies from the Planner Essentials Collection. You'll want to read below as I have a full tutorial on how to recreate my Moment Tag at home.
To start, die cut the large tag from the Planner Essentials 26 - Planner Pocket 3 - Tag & Topper out of watercolour cardstock. Cut the tag down to 5 1/2". Spritz the entire tag with water. Sprinkle Magenta Nuance in Raspberry, Coral and Rosebud over the tag. Allow the tag to dry.
Apply Jet Black Archival Ink to the Autumn stamp from the Autumn Surprise stamp set and stamp randomly on the tag. Reapply ink as needed to the stamp. Distress the edges of the tag. Ink the edges of the tag using Black Soot Distress Ink and a blending tool with foam.
Apply Emboss It Ink to the strip stamp from the Journaling Elements stamp set and stamp on the right hand side of the tag. Reapply ink to the stamp and stamp directly underneath the first strip. Sprinkle Black Magic Molten Dimensions Embossing Powder over the stamped images. Tap off the excess powder and emboss with a heat tool.
Apply Jet Black Archival Ink to the girl stamp from the Make a Wish stamp set and stamp onto a piece of watercolour cardstock. Watercolour the girl in using Scribble Sticks 1 & 2 and a waterbrush. Once the girl has dried, fussy cut the girl out. Ink the edges of the girl using Black Soot Distress Ink and a blending tool with foam.
Apply Jet Black Archival Ink to the flower stamp from the Make a Wish stamp set and stamp onto a piece of watercolour cardstock. Reapply ink to flower stamp and stamp two more times on the watercolour cardstock. Watercolour the flowers in using Scribble Sticks 1 & 2 and a waterbrush. Once the flowers have dried, fussy cut the flowers out. Ink the edges of the girl using Black Soot Distress Ink and a blending tool with foam.
Apply Jet Black Archival Ink to the moment stamp from the Journaling Elements stamp set and stamp onto a piece of watercolour cardstock. Fussy cut the word out and ink the edges of the word using Black Soot Distress Ink and a blending tool with foam.
Foam square the girl to the left hand side of the tag. Adhere the moment word over top of the black embossed strips.
Use adhesive and foam squares to adhere two of the flower bunches to the bottom left side of the girl.
Foam square the other flower to the top right corner of the tag. To finish the tag, tie a piece of white twine through the top of the tag.
Here are a few closeup photos of the finished tag.
Here is the finished Moment Tag.
Elizabeth Craft Designs Supplies Used:
Other Supplies Used:
- Tim Holtz for Ranger Ink: Distress Ink - Black Soot and Blending Tool with foam
- Dina Wakley for Ranger Ink: Scribble Sticks 1 & 2
- Ranger Ink: Emboss It Dabber, Jet Black Archival Ink and Mister
- Emerald Creek Craft Supplies: Molten Dimensions - Black Magic Embossing Powder
- Magenta Nuance: Rosebud, Raspberry and Coral
- Misc: White Twine, Watercolour Cardstock and Waterbrush
I hope that my wall hanging has inspired you to recreate your own version of my Moment Tag.
- Katelyn


No comments:
Post a Comment