Sunday, July 31, 2016

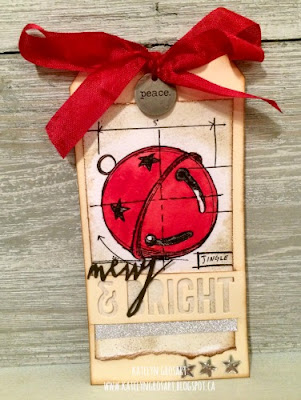
Merry & Bright Tag

July has come and is almost gone and I've managed to get my July Tim Tag done.  This month's tag features the Water Colour Resist and Layered Words Techniques. For July's tag I thought it would be fun to make it into a Christmas tag. Let's be honest, it's never too early to create something Christmasy.


To add some interest to the bottom of my tag, I added a strip of the silver deco sheets just underneath the "& Bright". Once strip was adhered, I added three mirrored stars to the bottom right hand corner.


For the top of the tag, I added a red bow. Once I made the bow the way I liked it, I used a piece of twine to tie the peace typed token to the middle of the bow.


Here's what my tag looks like finished with all the extra elements.


Supplies Used:

- Ranger Ink/Tim Holtz: Distress Micro Glaze, Distress Markers: Candied Apple, Black Soot, Pumice Stone, Gathered Twigs, Antique Linen, Distress Ink: Vintage Photo and Distress Spritzer
- Ranger Ink: Archival Ink - Jet Black and #8 Manilla Tags
- Tim Holtz/Stampers Anonymous: Christmas Blueprints #5
- Tim Holtz/Sizzix: Handwritten Holidays and Holiday Words: Block
- Tim Holtz Idea-ology: Deco Sheets, Mirrored Stars and Typed Tokens
- Prima Marketing: Waterbrush
- Misc: Ribbon, Twine and Watercolour paper

Challenges Entered:


I hope I have inspired you to start playing along with the 12 tags of 2016. 
-Katelyn


Wednesday, July 27, 2016

UpCycled Letter Tray on the Graphic 45 Blog

Today I'm back on the Graphic 45 blog today with an Up Cycled Letter Tray project featuring the DIY Craft Rolls and the Communique Deluxe Collectors Edition.   You can head over to the Graphic 45 blog to check out the rest of the photos of my project  as well as fellow design team member Elena who has also created an up cycle project.

For this month our second project was creating an Up Cycled  project using the DIY Craft Rolls. Up cycling is a whole new thing for me as I don’t normally do projects like this, but let me tell you, it was a ton of fun to create. One of the fun parts other than actually creating the project is finding the piece that you'll want to work with. So I challenge you to also give it a try and create something out of a piece you really don’t like!

Here is the before photo of my letter tray.


Here is the after photo of my Letter Tray. 


Tip: Be careful when cutting the Craft Rolls, as the paper can rip easily.

Tip: Add claw feet to the bottom of your shadow box to give it extra character.

Tutorial:


Supplies Used:

- DIY Craft Rolls: Quotes & Newsprints, Typography & Type Numbers
- 12x12 Communique Deluxe Collectors Edition
- Staples: Antique Brass Claw Feet
- Distress Ink: Black Soot
- Blending Tool
- Sookwang Tape
- Tombow Glue
- Foam Squares
- Misc: Letter Tray


Thanks for stopping by and make sure to head over to the Graphic 45 blog  to check out the rest of the photos of my project as well as Elena's fabulous project!

-Katelyn


Saturday, July 23, 2016

Sneak Peek for my second Graphic 45 project


Here's a sneak peek for you today of my second Graphic 45 project. Mark your calendars for Wednesday, July. 27th as I will be up on the Graphic 45 Blog to share an up cycled project project. The same day I will be sharing the blog with Elena and she will also share her up cycle project. We hope that you'll take the time to stop by the Graphic 45 blog and check out our projects. On the 27th, I will also have more photos of my project on my blog to share with you.

-Katelyn

Friday, July 22, 2016

Live in the Present, Dream in the Future Tag

 I'm back on the Southern Ridge Trading blog today sharing some inspiration for our current monthly challenge which is "Anything Summer". For my project I went with another ocean theme but this time on a Giant Kraft Tag from Ranger Ink.


I would love for you to head over to the Southern Ridge Trading Company Blog so that you can check out all the details on how I created my tag.  While you're there, make sure to participate in our monthly challenge. You can find all of the details here on how to enter.

Challenges Entered:
Anything But Cute - Summertime Fun

- Katelyn

Thursday, July 14, 2016

Blast From the Past - Anything Goes Challenge on the Emerald Creek Dares Blog

It's time for a brand new challenge on the Emerald Creek Dares blog, featuring Blast From the Past - "Anything Goes". For this challenge, we were able to choose one of our favourite projects we've created forEmerald Creek. For my project I decided I would re-share my grungy mixed media canvas. So lets get started as I show you how to re-create my grungy mixed media canvas at home.


To start my canvas, I covered my Wood Tray from Prima with Black Gesso. You will need to allow 20 minutes for the gesso to dry.


Once the gesso has dried, apply Embossing Distress Ink to the tread mark stamp and stamp onto the now black canvas. Continue applying ink and stamping until the entire canvas is covered. After the canvas has been stamped, sprinkle Onyx Frost Embossing Powder overtop of the entire canvas. Tap off excess powder and emboss with heat tool.


After the tread marks are embossed, spritz the entire top of the canvas with Black Soot, Picket Fence, Pumice Stone and Perfect Pearls Mist. Allow at least 45 minutes for the canvas to dry.


After the spray has dried, I applied Embossing Distress Ink to the four corners. Once the ink is applied to the corners, sprinkle Hammered Metal Embossing Powder to the corners and then emboss with your heat tool.


After the corners are embossed, apply Mushroom and Gold Adirondack ink lightly over top of the embossed corners. Allow 10 minutes to thoroughly dry.


The next layer for the canvas is the faux metal embossed panel. To create this piece, cut a 4 1/4" x 5 1/2" piece of 100lb white cardstock and apply a Foil Tape sheet to the cardstock. Using the Riveted Metal Embossing folder, run it through your big shot. Once the foil is embossed, paint on black gesso over the entire embossed surface. Before the gesso completely dries, take some hand sanitizer on a piece of paper towel and remove the gesso from the foil. You will end up with some gesso on the lines of the embossed piece. Once the gesso completely dries, apply Mushroom Adirondack Alcohol Ink to the entire embossed image. Allow 10 minutes for the alcohol ink to fully dry.


The final piece that needed to cover was my barbed wire circle frame from Southern Ridge Trading Company and applied a layer of Black Soot Distress Ink overtop of the entire piece. Once the ink was applied, I covered the entire barbed wire circle with Hammered Metal Embossing Powder and tapped off the excess. After the extra embossing powder is removed, emboss with a heat tool.


After the barbed wire circle frame was embossed, I applied Mushroom and Gold Adirondack Alcohol Ink randomly on the frame. Allow 10 minutes for the alcohol ink to fully dry.


Some of the finishing touches on my grungy mixed media canvas was adding the picture in the middle of the frame. Along with adding three gears to the top left hand corner, the Industrial Edision lightbulb in the bottom right hand corner and then the Believe Buckle Connector word in the bottom middle of the canvas. To finish the believe word, I added linen ribbon that I tinted with vintage photo and then put the ribbon through the charm having it span the entire length of the canvas. 


Products used from Emerald Creek:

Other Products Used:
- Southern Ridge Trading Company: Barbed Wire Circle Frame - Large
- Ranger/Tim Holtz: Adirondack Alcohol Ink: Gold & Mushroom,  Distress Ink: Black Soot, Vintage Photo & Embossing Ink, and Distress Spray Stain: Picket Fence, Black Soot & Pumice Stone
- Ranger Ink: Foil Tape Sheets & Perfect Pearls Mists: Perfect Pearls
- Ranger/Dina Wakley: Paint Brush & Black Gesso
- Tim Holtz/Stampers Anonymous: Mixed Media 2 stamp
- Tim Holtz/Sizzix: Diamond Plate & Riveted Metal Set - Embossing Folders
- Tim Holtz/Ideaology: Found Relatives, Mini Gears & Linen Ribbon
- Prima Marketing: Wood Tray

Make sure that you go and check out the rest of the Emerald Creek Dares Design Team as they have all created fantastic pieces for this weeks challenge:


Thanks for stopping by and checking out my grungy mixed media canvas. Don't forget to enter your project into our Emerald Creek Dares Challenge for your chance to win a $25.00 gift certificate for the Emerald Creek Store!


Until Next Time!
-Katelyn


Friday, July 8, 2016

Ocean Inspired Scrapbook Layout

 I'm up on the Southern Ridge Trading blog today sharing with you some inspiration for our current monthly challenge which is "Anything Summer". To participate, you can find all of the details here on how to enter.  


Head on over to the Southern Ridge Blog and check out my Ocean Inspired layout and how you can create it at home.

Challenges Entered:

Anything But Cute - Summertime Fun!

- Katelyn

Tuesday, July 5, 2016

Beach Tags on the Graphic 45 Blog

Today I'm up on the Graphic 45 blog today with some fun beach tags featuring the new ivory square tags and Voyage Beneath the Sea paper.  You can head over to the Graphic 45 blog to check out the rest of the photos of my project as well as fellow design team member Sandy who has also created a summer themed project.

For this month one of our projects was creating a project that took under 60 minutes and with it being in the month of  July, summer and heading to the beach was the first thing that came to mind. Even though the first official day of summer is in June, but here in Calgary, Canada, we have had summer weather since May. These beach themed tags, are perfect to dress up a gift bag or give as a card to a family member or friend. By mixing the different patterns from the Voyage Beneath the Sea paper pad, it gives each tag a unique look. When the tags are side by side they compliment each other beautifully. Hopefully these tags will inspire you to dig into your paper stash and create a few of your own.


Tip: Add Glossy Accents to eyes and other parts of the images on the tags to highlight certain areas.


Tip: To get the base paper on the tag to go around the eyelet at the top, use a ½” circle punch to punch a hole. That way the paper will go right over top of the eyelet.


Supplies Used:

- 8x8 Voyage Beneath the Sea Paper Pad
- Voyage Beneath the Sea Ephemera
- Staples: Ivory Square Tags
- Distress Ink: Vintage Photo
- Blending Tool
- Edge Distressor
- Glossy Accents
- Seam Binding Ribbon: Dark Turquoise
- ½” Circle Punch
- Sookwang Tape
- Foam Squares

Thanks for stopping by and make sure to head over to the Graphic 45 blog  to check out the rest of the photos of my project as well as Sandy's fabulous project!

-Katelyn


Friday, July 1, 2016

Sneak Peek for Graphic 45


I have a sneak peek to share with you today of a fun beach inspired project for Graphic 45 that will be on their blog on Tuesday, July.5th.  The same day I will be sharing the blog with Sandy with her summer or beach inspired project. We hope that you'll take the time to stop by the Graphic 45 blog and check out our projects. On the 5th, I will also have more photos of my project to share with you.

-Katelyn