Showing posts with label Tim Holtz/Sizzix. Show all posts

Sunday, September 4, 2016

Life Doesn't Have To Be Perfect To Be Wonderful Tag

August has come and gone and I didn't manage to get my August Tim Tag done on time, but I managed to get my August tag done today. This month's tag features the Brayered Stain and Frameworks Techniques. For August's tag, I switched it up a little bit from what Tim Holtz did. This tag is by far one of my favourites from this year.


For the floral silhouette in the middle of my tag, I used two of the flower dies out of the Wildflower set and cut them out of black Core'dinations. Once the wildflowers were cut out, I layered them on top of each other.


For the bottom of the tag, I took a sentiment off the small talk set and cut it apart. The other element I added, was part of a film strip rubon. To finish the film strip rubon, I added a small mirror star that I coloured using Mushroom Adirondack Alcohol Ink.


In the top right hand corner of the tag, I used the rest of the film strip rubon. Overtop of the film strip, I added a metal key and coloured it with Mushroom Adirondack ink.


To finish the tag, I added twine ribbon to the top of the tag. I added some speckles using my Distress Spritzer with Black Soot and Ground Espresso Distress Markers. 


Supplies Used:

- Ranger Ink/Tim Holtz: Distress Markers: Ground Espresso & Black Soot, Distress Ink: Vintage Photo& Walnut Stain, Distress Stain: Weathered Wood, Distress Paint: Hickory Smoke & Antique Linen, Adirondack Alcohol Ink: Mushroom, Distress Spritzer, Distress Sprayer and Multi Medium - Matte
- Ranger Ink: #8 Manilla Tags
- Tim Holtz/Sizzix: Thinlits - Wildflowers and Frameworks - Honeycomb
- Tim Holtz Idea-ology: Mirrored Stars, Remnant Rubs - Elements, Linen Ribbon, Small Talk, Grunge Paper, Textile Surfaces and Paper Stash - Dapper
- Emerald Creek Craft Supplies: Metal Keys
- Misc: Brayer and Sanding Tool

I hope I've inspired you to start playing along with the 12 tags of 2016. 

-Katelyn


Friday, August 5, 2016

Happy Birthday Card

 I'm back on the Southern Ridge Trading blog today sharing some inspiration for our current monthly challenge which is "Anything Goes". With the challenge in mind I created a birthday card that will be sure to inspire you.


I would love for you to head over to the Southern Ridge Trading Company Blog so that you can check out all the details on how I created my card.  While you're there, make sure to participate in our monthly challenge. You can find all of the details here on how to enter.

- Katelyn


Sunday, July 31, 2016

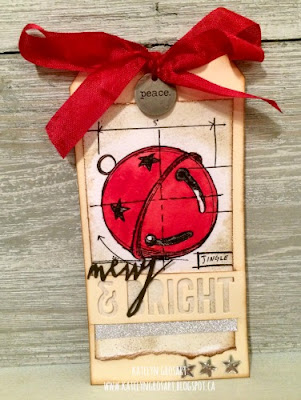
Merry & Bright Tag

July has come and is almost gone and I've managed to get my July Tim Tag done.  This month's tag features the Water Colour Resist and Layered Words Techniques. For July's tag I thought it would be fun to make it into a Christmas tag. Let's be honest, it's never too early to create something Christmasy.


To add some interest to the bottom of my tag, I added a strip of the silver deco sheets just underneath the "& Bright". Once strip was adhered, I added three mirrored stars to the bottom right hand corner.


For the top of the tag, I added a red bow. Once I made the bow the way I liked it, I used a piece of twine to tie the peace typed token to the middle of the bow.


Here's what my tag looks like finished with all the extra elements.


Supplies Used:

- Ranger Ink/Tim Holtz: Distress Micro Glaze, Distress Markers: Candied Apple, Black Soot, Pumice Stone, Gathered Twigs, Antique Linen, Distress Ink: Vintage Photo and Distress Spritzer
- Ranger Ink: Archival Ink - Jet Black and #8 Manilla Tags
- Tim Holtz/Stampers Anonymous: Christmas Blueprints #5
- Tim Holtz/Sizzix: Handwritten Holidays and Holiday Words: Block
- Tim Holtz Idea-ology: Deco Sheets, Mirrored Stars and Typed Tokens
- Prima Marketing: Waterbrush
- Misc: Ribbon, Twine and Watercolour paper

Challenges Entered:


I hope I have inspired you to start playing along with the 12 tags of 2016. 
-Katelyn


Thursday, July 14, 2016

Blast From the Past - Anything Goes Challenge on the Emerald Creek Dares Blog

It's time for a brand new challenge on the Emerald Creek Dares blog, featuring Blast From the Past - "Anything Goes". For this challenge, we were able to choose one of our favourite projects we've created forEmerald Creek. For my project I decided I would re-share my grungy mixed media canvas. So lets get started as I show you how to re-create my grungy mixed media canvas at home.


To start my canvas, I covered my Wood Tray from Prima with Black Gesso. You will need to allow 20 minutes for the gesso to dry.


Once the gesso has dried, apply Embossing Distress Ink to the tread mark stamp and stamp onto the now black canvas. Continue applying ink and stamping until the entire canvas is covered. After the canvas has been stamped, sprinkle Onyx Frost Embossing Powder overtop of the entire canvas. Tap off excess powder and emboss with heat tool.


After the tread marks are embossed, spritz the entire top of the canvas with Black Soot, Picket Fence, Pumice Stone and Perfect Pearls Mist. Allow at least 45 minutes for the canvas to dry.


After the spray has dried, I applied Embossing Distress Ink to the four corners. Once the ink is applied to the corners, sprinkle Hammered Metal Embossing Powder to the corners and then emboss with your heat tool.


After the corners are embossed, apply Mushroom and Gold Adirondack ink lightly over top of the embossed corners. Allow 10 minutes to thoroughly dry.


The next layer for the canvas is the faux metal embossed panel. To create this piece, cut a 4 1/4" x 5 1/2" piece of 100lb white cardstock and apply a Foil Tape sheet to the cardstock. Using the Riveted Metal Embossing folder, run it through your big shot. Once the foil is embossed, paint on black gesso over the entire embossed surface. Before the gesso completely dries, take some hand sanitizer on a piece of paper towel and remove the gesso from the foil. You will end up with some gesso on the lines of the embossed piece. Once the gesso completely dries, apply Mushroom Adirondack Alcohol Ink to the entire embossed image. Allow 10 minutes for the alcohol ink to fully dry.


The final piece that needed to cover was my barbed wire circle frame from Southern Ridge Trading Company and applied a layer of Black Soot Distress Ink overtop of the entire piece. Once the ink was applied, I covered the entire barbed wire circle with Hammered Metal Embossing Powder and tapped off the excess. After the extra embossing powder is removed, emboss with a heat tool.


After the barbed wire circle frame was embossed, I applied Mushroom and Gold Adirondack Alcohol Ink randomly on the frame. Allow 10 minutes for the alcohol ink to fully dry.


Some of the finishing touches on my grungy mixed media canvas was adding the picture in the middle of the frame. Along with adding three gears to the top left hand corner, the Industrial Edision lightbulb in the bottom right hand corner and then the Believe Buckle Connector word in the bottom middle of the canvas. To finish the believe word, I added linen ribbon that I tinted with vintage photo and then put the ribbon through the charm having it span the entire length of the canvas. 


Products used from Emerald Creek:

Other Products Used:
- Southern Ridge Trading Company: Barbed Wire Circle Frame - Large
- Ranger/Tim Holtz: Adirondack Alcohol Ink: Gold & Mushroom,  Distress Ink: Black Soot, Vintage Photo & Embossing Ink, and Distress Spray Stain: Picket Fence, Black Soot & Pumice Stone
- Ranger Ink: Foil Tape Sheets & Perfect Pearls Mists: Perfect Pearls
- Ranger/Dina Wakley: Paint Brush & Black Gesso
- Tim Holtz/Stampers Anonymous: Mixed Media 2 stamp
- Tim Holtz/Sizzix: Diamond Plate & Riveted Metal Set - Embossing Folders
- Tim Holtz/Ideaology: Found Relatives, Mini Gears & Linen Ribbon
- Prima Marketing: Wood Tray

Make sure that you go and check out the rest of the Emerald Creek Dares Design Team as they have all created fantastic pieces for this weeks challenge:


Thanks for stopping by and checking out my grungy mixed media canvas. Don't forget to enter your project into our Emerald Creek Dares Challenge for your chance to win a $25.00 gift certificate for the Emerald Creek Store!


Until Next Time!
-Katelyn


Thursday, June 30, 2016

June Remix Tag - Remember to Play

 It's hard to believe that the end of June is here and I have managed to get my June Tim Tag done.  This month's tag features the Tissue Wrap Collage and Stencil Plaid Techniques. For June's tag I had a ton of fun playing with lots of new products that Tim released at CHA this year. The top favourites from this tag is the Distress Collage Medium in Vintage and the Substrate Sheets. 


I didn't have the die that Tim used on his tag, so I substituted it for the new Gearhead thinlit die. To finish the gears, I added some of the nail heads to the centres of the gears. To highlight the gears, I lightly went around with a Black Soot Distress marker and then rubbed it into the tag.


For the bottom of the tag, I added a saying using the small talk as well as adding the arrow over top of an extra piece of linen fabric I covered with a stencil & ink.


The last piece on my tag was adding a remnant rub and stapling some film ribbon to the right side of the tag to finish it off. 


I have entered my tag here: 

June Remix Tag - Tim Holtz Blog

Supplies Used:

- Ranger Ink/Tim Holtz: Walnut Stain, Vintage Photo and Ground Espresso Distress Ink, Black Soot Distress Marker and Distress Collage Medium - Vintage 
- Ranger Ink: Jet Black Archival Ink, Multi Medium Matte and #8 Manilla Tags
- Tim Holtz/Stampers Anonymous: Stripes Layering Stencil and Halftones & Rings Stamp
- Tim Holtz/Idea-ology: Tissue Wrap - Plain, Remnant Rubs - Elements, Nail Heads, Film Strip Ribbon, Linen Ribbon, Adornments - Arrows, Small Talk, Handheld Stapler, Textile Surfaces and Substrate Sheets
- Tim Holtz/Sizzix: Gearhead Thinlits

I hope I have inspired you to start playing along with the 12 tags of 2016.
-Katelyn


Thursday, June 2, 2016

May Remix Tag - "Dream as if You'll live forever"

 I'm a couple days late in getting May tag's done, but I made sure that it got done.  This year for Tim's 12 tags, it's all about remixing past techniques and combining them together with other techniques that he has shared over the past years. This month's tag features the Tissue Tape Resist and Tattered Florals Techniques.  For my tag, I played with a variety of older products from the Tim Holtz Ideaology line to create my tag.  It was fun to bring older product out to use as many times the old product gets lost underneath the new product.


For the tittle on my tag, I used one of the word bands and added metallic ribbon to it. For the tiny tattered florals, I used my blending tool and applied a layer of Abandoned Coral Distress Ink to them. For the leaves, I used my blending tool and applied a layer of Peeled Paint Distress Ink. I didn't want to use all three tattered florals in the corner, so I added a heirloom rose into the mix. Before adhering the flowers and leaves down, I added a strip of film ribbon to the bottom right hand side.


The first finishing touch for the top of my tag was adding an arrow adornment and wrapping some paper string around the bottom of it. The second finishing touch was adding the crinkle ribbon which was dyed using Scattered Straw Distress Stain.  


Products Used:

- Tim Holtz/Sizzix: Tiny Tattered Florals
- Ranger Ink: Texture Paste, Black Archival Ink & #5 Manilla Tags
- Ranger Ink/Dina Wakley: Palette Knife
- Ranger Ink/Tim Holtz: Peeled Paint & Abandoned Coral Distress Ink, Tattered Rose, Scattered Straw & Brushed Pewter Distress Stain, Cracked Pistachio Distress Spray Stain, Splatter Brush
- Tim Holtz Ideaology: Film Strip Ribbon, Trimmings - Metallics, Adornments - Arrows, Heirloom Roses, Paper String - Solids, Tissue Tape - Symphony
- Tim Holtz/Stampers Anonymous: Typo Stencil, Perspective & Wildflowers Stamps

-Katelyn


Thursday, May 19, 2016

Here comes Summer on the Emerald Creek Dares Blog

It's all about Summer on the Emerald Creek Dares blog for this weeks two week challenge. For this challenge I focused on the ocean aspect of summer. With growing up on the west coast of Canada I was spoiled to be able to go and relax by the ocean. So, for my project I decided that I would create a ocean inspired happy birthday card. Lets get started as I show   you how you can create my ocean birthday card at home.


To start you will need to cut a 4" x 5 1/4" piece out of 100lb white cardstock. Once the cardstock is cut, apply Distress Embossing Ink to the Mayflower stamp. Stamp the ship starting at the top of the white piece of cardstock. Continue applying ink to the ship and stamping it onto the white cardstock piece until the entire piece is covered in ships. After the white cardstock is covered in ships, sprinkle  Fine Clear Embossing powder over top of the entire piece, tap off the excess and then emboss with a heat tool.


After the ships have been embossed, it's time to blend Broken China, Tumbled Glass, Mermaid Lagoon and Faded Jeans Distress Ink over top of the entire ship embossed piece of paper. If  the background turns out to blue for you, blend a bit of Vintage Photo Distress Ink over top to tone it down. To finish the custom background, edge distress the edges and then ink them with Vintage Photo Distress Ink.


Now that the custom ship background piece is done, it's time to move on to the oval piece. For the oval you will need to use the Tim Holtz Stitched Ovals Dies from Sizzix and a small piece of 100lb white cardstock. Once the oval has been cut, blend Broken China, Tumbled Glass, Mermaid Lagoon and Faded Jeans Distress Ink over the entire oval. To finish the oval, edge distress the edges and then ink the edges with Vintage Photo Distress Ink.


After the oval is coloured with the Distress Ink, it's time to work on the sentiment. For the sentiment I used the Happy Birthday stamp and applied Vintage Photo Distress Ink to it. Once the stamp is inked, stamp onto a small piece of 100lb white cardstock. After it's been stamped, blend Broken China, Tumbled Glass, Mermaid Lagoon and Faded Jeans Distress Ink over the entire sentiment. When your happy with the coloured background on the sentiment, trim the Happy and the Birthday apart.  To finish the sentiment, edge distress the edges and then ink the edges with Vintage Photo Distress Ink.


With the sentiment being done, it's time to move on to the Anchor Charm. To get rid of the bright silver on the anchor charm, apply a layer of Gold Alcohol Adirondack Ink to it. Once the gold layer is dry, apply a layer of Mushroom Alcohol Adirondack Ink randomly over top of the gold. Set aside to dry.


The next step is to work on the stamped images. The first stamped image is the Starfish. Apply Vintage Photo Distress Ink to the starfish and stamp on to the 100lb white cardstock. Once stamped, colour the starfish with the Candied Apple Distress Marker. Fussy cut out the starfish and then ink the edges with Vintage Photo Distress Ink.


After the starfish is done, the next image that you will stamp is the Octopus. Apply Vintage Photo Distress Ink to the octopus stamp and stamp on to the 100lb white cardstock. After the octopus has been stamped, colour the octopus with the Scattered Straw Distress Marker. Fussy cut out the octopus and then ink the edges with Vintage Photo Distress Ink.


The last stamped image is the Water Logged. Apply Vintage Photo Distress Ink to the water logged stamp and stamp on to the 100lb white cardstock, repeat this step two more times. Once the water logged images are stamped, colour them with Gathered Twigs, Candied Apple and Scattered Straw Distress Marker. Fussy cut the water logged images out and then ink the edges with Vintage Photo Distress Ink. Once all of the images are cut, adhere them along with the sentiment to the oval.


One of the finishing touches for my card, is wrapping linen twine around the middle of the boat custom background and then foam squaring the oval overtop in the middle of the background. The second finishing touch is adding glossy accents to the starfish and octopus stamped images. The last finishing touch is adding a piece of teal cardstock to behind the ship custom background that measures 4 1/8" x 5 3/8", make sure to edge distress the edges and ink them with Vintage Photo Distress Ink.


Products used from Emerald Creek:

Other Products Used:
- Ranger/Tim Holtz: Distress Markers: Gathered Twigs, Scattered Straw & Candied Apple, Distress Ink: Broken China, Tumbled Glass, Faded Jeans, Mermaid Lagoon, Embossing Ink & Vintage Photo and Adirondack Alcohol Ink: Mushroom & Gold
- Ranger Ink: Glossy Accents
- Tim Holtz/Sizzix: Stitched Ovals
- Bazzill: Blue Oasis Cardstock
- Misc: Linen Twine


Make sure that you go and check out the rest of the Emerald Creek Dares Design Team as they have all created fantastic pieces for this weeks challenge:


Thanks for stopping by and checking out my Ocean Happy Birthday Card. Don't forget to enter your project into our Emerald Creek Dares Challenge for your chance to win a $25.00 gift certificate for the Emerald Creek Store!


Until Next Time!
-Katelyn