Showing posts with label Ranger Ink/Tim Holtz. Show all posts

Friday, October 5, 2018

For You Favour Box

Happy Friday! I'm up on the Elizabeth Craft Designs blog today sharing my For You Favour Box, which is perfect to add to your Thanksgiving table this weekend if you are in Canada. To create my box I used some dies from Joset Designs and ModaScrap. 


I have a full tutorial on how I made my favour box over on the Elizabeth Crafts Designs Blog

- Katelyn

Monday, June 4, 2018

I Do. I Do. Wedding Card

Happy Monday! I'm up on Wild Whisper's blog today sharing my first post for the month.  For my post today, I've been playing with the Forever & Always Collection and have created this I Do. I Do. Wedding Card.


For all the details and a full tutorial on my I Do. I Do. Wedding Card, you'll want to stop by the Wild Whisper blog. Make sure to keep on checking out my blog as well as Wild Whisper's blog because myself and the rest of the design team will be sharing lots of projects featuring the Forever & Always Collection as well the Small Patterns Collection. 

Thank for stopping by!
- Katelyn

Sunday, December 31, 2017

Celebrate ATC

 Happy Everyone! I have one more post for the 2017 year. It has been a wonderful year of crafty fun and I can't wait to see what 2018 holds.
For my last project of 2017, I created this fun Celebrate ATC which features some dies from Joset Designs as well as Els van de Burgt Studio. Grab a cup of your favourite winter beverage and enjoy as I walk you through how to recreate my Celebrate ATC at home.


To start, adhere the 2 1/2" x 3 1/2" piece of white cardstock to the 2 1/2" x 3 1/2" chipboard piece. 


From ModaScrap's Just Say Cheese patterned paper, pick two patterned paper pieces out. Cut one piece of patterned paper to 2 1/2" x 3 1/2". Cut the second patterned paper piece to 2 1/4" x 3 1/4". Ink the edges of each patterned paper using Black Soot Distress Ink and a blending tool with foam.


Die cut the 2 1/4" Stitched Circle out of one of the previously used patterned paper pieces. Ink the edges of the stitched circle using Black Soot Distress Ink and a blending tool with foam.


Die cut the small Entwined Circle die from a third piece of patterned paper. Ink the edges of the entwined circle using Black Soot Distress Ink and a blending tool with foam.


Die cut two of the balloons out of White Soft Finish Cardstock. Using Stormy Sky Distress Ink and a blending tool with foam, blend the ink over one of the balloons. For the other balloon, use Weathered Wood Distress Ink and a blending tool with foam and blend the ink over the balloon. Ink the edges of the balloons using Black Soot Distress Ink and a blending tool with foam.


From the Balloons die, die cut two of the balloon strings out of White Soft Finish Cardstock. Using Black Soot Distress Ink and a blending tool with foam, blend the ink over each string. 


Using the Balloons die, die cut two bows out of White Soft Finish Cardstock.


From the Celebration Flags die, die cut the star flag out of White Soft Finish Cardstock. Using Stormy Sky Distress Ink and a blending tool with foam and dab the ink over four of the stars. Using Weathered Wood Distress Ink and a blending tool with foam and dab the ink over the other four stars.


Die cut the banner out of White Soft Finish Cardstock. Using Jet Black Archival Ink, stamp the celebrate word from the Banner Sentiments onto the banner. Ink the edges of the banner using Black Soot Distress Ink and a blending tool with foam.


Now it's time to create your ATC.

Adhere the 2 1/4" x 3 1/4" patterned paper to the 2 1/2" x 3 1/2" patterned paper piece. Adhere the 2 1/2" x 3 1/2" patterned paper piece to the ATC base.


Adhere the stitched circle to the entwined circle. Foam square the entwined circle to the middle of the ATC.


Cut five stars off of the flag. Adhere two on the top right hand side of the circle, adhere one on the bottom right hand side of the circle and adhere two on the bottom left hand side of the circle.


Adhere the balloon strings to each balloon. Adhere the balloons to the circle. To finish off the balloons, add a bow to the bottom of each balloon.


Cut two more stars from the flag banner and adhere onto the circle. Adhere the Celebrate banner to the bottom of the balloons. Your ATC is now finished.


And here's the finished Celebrate ATC.


Elizabeth Craft Designs Products Used:

- ModaScrap: Just Say Cheese

Other Products Used:

- Tim Holtz for Ranger Ink: Distress Ink - Black Soot, Weathered Wood and Stormy Sky
- Ranger Ink: Jet Black Archival Ink
- Emerald Creek Craft Supplies: ATC Cards


Thanks for stopping by and checking out my Celebrate ATC. I hope that I've inspired you to recreate them at home.  

- Katelyn


Monday, November 13, 2017

Feel Better Card

Happy Monday! I hope that you had a long wonderful weekend spending time with friends and family. Today, I'm up on the Elizabeth Craft Designs blog sharing my Feel Better Card. I've created my Feel Better Card using some of the new dies from Joset Designs as well as a few dies from Els van de Burgt Studio. To compliment the die cut images, I've used ModaScrap's Butterfly Dream Patterned Paper Pack.


You'll want to make sure your way over to Elizabeth Crafts Designs Blog to read all about how I created my Feel Better Card, so that you're able to recreate it at home. 


- Katelyn


Friday, July 21, 2017

Feminine Happy Birthday Tag

I'm up on Southern Ridge Trading Company's blog today sharing with you my Feminine Happy Birthday Tag which features a variety of chipboard pieces. I hope that my Feminine Happy Birthday Tag will inspire you to want to recreate it at home.


Make sure to head over to the Southern Ridge Trading Company Blog so that you can learn all about how I created my Feminine Happy Birthday Card.

- Katelyn

Friday, April 21, 2017

Love & Happiness Wall Hanging

I'm up on the Elizabeth Craft Designs blog today sharing my beautiful Love & Happiness Wall Hanging. I've created this beautiful wall hanging as a fabulous addition to your home decor. 


You'll want to make sure your way over to Elizabeth Crafts Designs Blog to read all about how I created my Love & Happiness Wall Hanging, so that you can recreate it at home. 


- Katelyn


Sunday, April 16, 2017

Any Occasion Gatefold Card

Happy Easter! With it being a long weekend, I was able to play a bit in my craftroom. With Mother's Day right around the corner as well as a few birthdays in the month of May, I thought I would give the Gatefold - Elegant Rose die from Elizabeth Craft Designs a try. I have to say, this is one is one of my new favourite dies as the final project looks fantastic and doesn't take a long time to create. So, today I have an Any Occasion Gatefold card as well as a tutorial below for you so that you can recreate my beautiful Any Occasion Gatefold Card at home. 


To start, cut a piece of Super Stock cardstock that measures 5 1/2" x 5 5/8". Using an edge distressor, distress the edges of the cardstock. With the edges distress, use a blending tool and Vintage Photo Distress Ink to ink the edges of the cardstock.


Cut a piece of navy blue patterned paper that measures 5 1/2" x 5 5/8".  Using an edge distressor, distress the edges of the navy blue patterned paper. With the edges distress, use a blending tool and Vintage Photo Distress Ink to ink the edges of the navy blue patterned paper.


Using the Stitched Square dies, die cut the 4 1/4" stitched square out of cream patterned paper and the 4 3/4" stitched square out of pink/white polka dot patterned paper. Using an edge distressor, distress the edges of both stitched squares. With the edges distress, use a blending tool and Vintage Photo Distress Ink to ink the edges of both stitched squares.


With the paper cut for the inside and base of your card, now it's time to start the die cutting.

To start, place the Gatefold - Elegant Rose die 1/4" from the left hand side of your patterned paper and run it through your die cutting machine. Take the Gatefold - Elegant Rose again a place it this time 1/4" from the right hand side of your patterned paper and run it through your die cutting. Note: You'll want to make sure that part of your shim involves a metal plate, that way the die's detail gets completely cut out.


Once the Gatefold pieces have been cut, trace each gatefold piece onto a piece of turquoise patterned paper. Cut the traced pieces out. Ink the edges of the cut out gatefold pieces using Vintage Photo Distress Ink.


Using the Dotted Scallop Circles die, die cut the 1 1/2" dotted scallop circle out of cream patterned paper and the 2" dotted scallop circle out of pink patterned paper. Ink the edges of the dotted scallop circles use a blending tool and Vintage Photo Distress Ink.


From the Curvy Leaves die, die cut one - three leaves leaf out of Super Stock cardstock. Using a blending tool and Shabby Shutters Distress Ink over the entire leaf. Shape the leaves using the leaf tool and leaf pad.


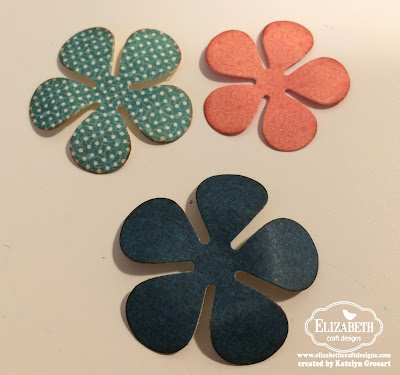
Using the Bunch of Flowers 3, die cut the flowers three times using pink patterned paper, navy blue patterned paper and turquoise/white dot patterned paper. Ink the edges of the small pink, medium turquoise and large navy blue flowers using Vintage Photo Distress Ink. 


Start by adhering the small pink flower to the medium turquoise flower. Adhere the medium turquoise flower to the large navy flower. To finish off the center of the flower, add a white pearl. Adhere the three - leaves leaf to the right hand side of the flower.


With the flowers still out, adhere the small turquoise flower to the medium navy blue flower. Adhere the medium navy blue flower to the large pink flower. To finish the center of the flower, add a white pearl. 


Adhere the 5 1/2" x 5 5/8" piece of navy blue patterned paper to the 5 1/2" x 5 5/8" super stock cardstock piece.


Adhere the cream stitched square to the white/pink dot patterned paper. Adhere the white/pink dot patterned paper to the middle of the navy blue patterned paper.


Adhere the two turquoise pieces in behind the two die cut gatefold - elegant roses pieces. With the turquoise pieces adhered, fold along the fold line on the sides of the gatefold - elegant roses pieces.  Ink the edges of the gatefold pieces using Vintage Photo Distress Ink.


Apply adhesive on the inside of the flap of the gatefold piece and adhere the flap of the panel to the left hand side of the card base, making sure that the folded edge sits on the back side of the cardbase. Apply adhesive on the inside of the flap of the gatefold piece and adhere the flap of the panel to the right hand side of the card base, making sure that the folded edge sits on the back side of the cardbase.


Adhere the small cream dotted scallop circle to the medium pink dotted scallop circle. Apply adhesive to the right hand side of the medium pink dotted scallop circle and adhere half of the circle to the right hand side of the gatefold.


Adhere the flower with the leaf to the middle of the cream dotted scallop circle.


To finish the inside of the card, adhere the other flower in the bottom right hand corner of the cream stitched square.


Here are some photos of my finished Any Occasion Gatefold Card.


Thanks for joining me today! I hope that I've inspired you to re-create my Any Occasion Gatefold Card at home.

Elizabeth Craft Designs Products Used:


Other Products Used:

- Graphic 45: Cafe Parisian - 12x12 Patterns/Solids, Upper Crust and Creme de la Creme
- Tim Holtz for Ranger Ink: Distress Ink - Vintage Photo and Blending Tool/Foam
- Creative Scrapbooker/Cathie Allan: Super Stock
- Melissa Frances: Pearls

- Katelyn


Friday, April 14, 2017

Family Wall Hanging

I'm on the Southern Ridge Trading blog today sharing with you some beautiful everyday home decor. With home decor on my mind lately,  I created this beautiful Family Wall Hanging piece that's sure to inspire you to want to recreate it at home.


Make sure to head over to the Southern Ridge Trading Company Blog so that you can learn all about how I transformed the chipboard pieces for my Family Wall Hanging.

- Katelyn

Thursday, March 30, 2017

Thank You Note Card

I hope that you are having a fabulous Thursday! Today I get to share with you my beautiful Thank You Note Card that features a variety of dies from ModaScrap and Els van de Burgt Studio. I have a tutorial below for you so that you can recreate my beautiful Thank You Note Card at home.


Using the Dotted Scallop Circles die, cut the 2" dotted scallop circle out of watercolour paper. 


With the Dotted Scallop Circles die still out, cut out the 2 1/2" dotted scallop circle out of Black Soft Finish Cardstock.


Next, use the Stitched Fishtail Banners Die, cut the 3/4" banner out of White Soft Finish Cardstock. Once the banner has been cut, flip the banner die to the non pennant side and cut out the other side to create the banner pennant on that side. 


To finish the banner, apply Jet Black Archival Ink to the 'Thank You" sentiment stamp. Stamp the sentiment in the middle of the banner.


Using the Stitched Square die, cut out two 3 3/4" stitched squares out of watercolour paper.


With the stitched squares cut out, set one of stitched squares aside. Put the second stitched square in front of you. Taking the Rosebud Nuance powder, pick a bit up with a paint brush and tap it onto your stitched square. Once your happy with the amount of Rosebud powder you have on your square, then you'll move onto the Wisteria Nuance powder. Pick a bit of the Wisteria powder up with a paint brush and tap it onto your stitched square. With the powder on your square, spritz the entire surface with water. Set the square aside to dry and here is one of the results you can get.


With the Nuance powder still out, pick up a bit of the Rosebud Nuance powder with a paint brush and tap it onto your dotted scallop circle. Once your happy with the amount of Rosebud powder you have on your circle, then you'll move onto the Wisteria Nuance powder. Pick a bit of the Wisteria powder up with a paint brush and tap it onto your dotted scallop circle. With the powder on your circle, spritz the entire surface with water. Set the dotted scallop circle aside to dry and here is one of the results you can get.


The last element you'll need to die cut is the small and medium Dancing Butterflies out of watercolour paper. Once the small and medium dancing butterflies have been cut out, pick up a bit of the Rosebud Nuance powder with a paint brush and tap it onto both of the dancing butterflies. Once your happy with the amount of Rosebud powder you have on your butterflies, then you'll move onto the Wisteria Nuance powder. Pick a bit of the Wisteria powder up with a paint brush and tap it onto your dancing butterflies. With the powder on your butterflies, spritz the entire surface with water. Using a heat tool, dry both of your butterflies. After your butterflies are dry, apply Emboss It ink to both butterflies. Sprinkle Fractured Ice Embossing Powder to both butterflies and tap off the excess powder. With the embossing powder on each butterfly, emboss the butterflies with your heat tool. 


With your pieces embossed and coloured, ink the edges of all the die cut images using Black Soot Distress Ink and a blending tool with foam. You'll also want to ink the edges of your first stitched square which will go in the inside of your card.


Adhere the coloured dotted scallop circle to the black dotted scallop circle.


Foam square the black dotted scallop circle to the middle of the coloured stitched square background.


Adhere the "Thank You" banner to the middle of the dotted scallop circles. With the banner adhered, adhere the small butterfly in the top right hand corner of the dotted scallop circle.


Cut a 4" x 8" cardbase out of black cardstock, score the cardbase at 4". Adhere the plain white stitched square to the inside of the cardbase. Adhere the medium butterfly in the bottom right hand corner of the stitched square. 


Adhere your card front to the front of the cardbase.


Here are a few close up photos of my Thank You Note Card.


Thanks for joining me today! I hope that I've inspired you to re-create my Thank You Note Card at home.


Elizabeth Craft Design Products Used:


Other Products Used:

- Emerald Creek Craft Supplies: Fractured Ice Embossing Powder
- Magenta: Nuance Powder - Rosebud and Wisteria 
Tim Holtz for Ranger Ink: Distress Watercolour Paper and Distress Ink - Black Soot. Blending Tool and Replacement Foam.
- Ranger Ink: Jet Black Archival Ink and Mister
- Scrapbook Adhesives by 3L: Foam Squares

- Katelyn