Tuesday, January 30, 2018

You Fill My Heart - Designer Challenge

We're kicking off a new Designer Challenge on the Elizabeth Craft Designs Blog today.  For January it's all about Valentine's Day. With this month's challenge in mind, I set out to create a cute Valentine's Day Card that you could give to that special someone in your life. You'll want to make sure to read below as I have a tutorial for you so that you can re-create my Love You Card at home. Read all the way down to the bottom of the post as I have some information on how to get in on a fabulous giveaway from Elizabeth Craft Designs.


To start, die cut two of the hearts from the True Love Die out of White Soft Finish Cardstock. Blend Candied Apple Distress Ink using a blending tool with foam over the entire surface of each heart. Apply VersaMark Ink to the xoxoxo stamp and stamp onto the hearts, making sure the hearts are covered with xoxoxo's. Ink the edges of the hearts using Black Soot Distress Ink and a blending tool with foam.


From the Words 2 - Thinking of You die set, die cut the Love You out of White Soft Finish Cardstock.


Die cut the Arrow from the Love Struck Die out of White Soft Finish Cardstock.


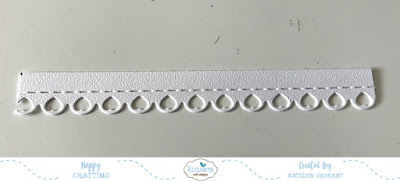
From the Valentine's Edges, die cut the scalloped heart border out of White Soft Finish Cardstock. Cut the border down to 4 3/4".


Die cut the 3 1/4" Dotted Scallop Circle out of White Soft Finish Cardstock. Ink the edges of the scalloped circle using Black Soot Distress Ink and a blending tool with foam.


Die cut the Heart Cutouts three times on three different patterned paper pieces from ModaScrap's Simply Love Patterned Paper Pack. Die cut the outline of the heart out of White Soft Finish Cardstock. Choose which patterned paper you want to use as your heart that you've die cut the small hearts from. Place the heart outline around the heart cutouts to create your patterned paper heart. Ink the edges of the two hearts using Black Soot Distress Ink and a blending tool with foam.


From ModaScrap's Simply Love Patterned Paper Pack, choose two patterned papers. Cut one of the papers down to 4 3/4" x 4 1/4". Cut the other patterned paper to 4 3/8" x 3 7/8". Cut a piece of White Soft Finish Cardstock that measures 4 1/2" x 4". Distress the edges of each paper and ink the edges using Black Soot Distress Ink and a blending tool with foam.


Adhere the White Soft Finish Cardstock to the 4 3/4" patterned paper piece. Adhere the 4 3/8" piece of patterned paper to the White Soft Finish Cardstock. Adhere the scalloped heart border to the bottom of the 4 3/4" patterned paper piece.


Adhere the heart cut out to the white soft finish cardstock heart. From the hearts that you die cut out of the patterned paper, adhere them randomly to the hearts on the heart cut out. You'll want to leave some of the hearts just showing the white soft finish cardstock.


Adhere the dotted scallop circle to the middle of the patterned paper. Foam square the heart to the middle of the dotted scallop circle.


Adhere the arrow, two hearts and the Love You sentiment on the bottom right hand side of the large heart. Take a Zig Marker and create stitch marks around the 4 3/8" piece of patterned paper.
To finish off your card, adhere the card front to a piece of White Soft Finish Cardstock that measures 5" x 9 1/2", score at 4 3/4"


Here are a few close up photos of the Love You Card. 


Here's the finished Love You Card. 


****************

For today's challenge Elizabeth Craft Designs are giving away a $20 Gift Card to use on our website to 3 winners

To enter simply leave a comment on the Elizabeth Craft Designs Challenge post and tell us "What Elizabeth Craft Designs dies or stamp sets would you use to create a Valentine’s Card??”

We will select 3 lucky winners in a random drawing 

The winners will be announced on Friday, February 1st on the Elizabeth Craft Designs blog.


****************


Other Products Used:

- Tim Holtz for Ranger Ink: Distress Ink - Black Soot, Candied Apple, Festive Berries, Blending Tool & Foam
- Kuretake: Zig Marker - 03
- Imagine Crafts: VersaMark Ink Pad

- Katelyn


Monday, January 29, 2018

Dream Scrapbook Layout

I have one more project to share with you today.  I'm up on Graphic 45's blog  sharing with you my Dream Scrapbook Layout which features the Fairie Dust Collection as well as a few of their Staples from the Staples Collection. I have a few photos to share with you on my blog, but if you haven't stopped by Graphic 45's blog yet, make sure you do so that you can check out the rest of the photos of my Dream Scrapbook Layout as well as a tutorial so that you can recreate it at home.


With our winter being very wet and grey, I was ready to play with brighter spring like colours and I ended up creating this pretty Dream Scrapbook Layout which features a family photo taken on our Alaskan Cruise. This layout can be used for a variety of different themes, not just family photos.


Tip: From the Decorative Stickers, adhere a photo corner into the lighter embellished corner.


For a full tutorial on how I created my Dream Scrapbook Layout as well as some more photos of my project, you'll want to stop by Graphic 45's blog


-Katelyn


January Kit Release Part 2 For Scrap Shotz

Happy Monday! I'm back on Scrap Shotz's blog today sharing a few more projects using the January Kit which features Kaisercraft's "Documented" collection. I hope that my projects will inspire you to recreate them at home.


You'll want to make sure to stop by Scrap Shotz's Blog so that you can see and read all the details about the three projects using the January Kit. You also won't want to miss the tutorial for my altered clipboard.

- Katelyn

Sunday, January 28, 2018

Dream Sneak Peek


I'm back with one more post for you today. It's a sneak peek of a new project that will be on Graphic 45's blog. Make sure to mark your calendars for Monday, January. 29th. I hope that you'll take the time to stop by the Graphic 45 blog and check out all the photos of my project. I will be sharing some photos and other details about this project on my blog on Monday.

- Katelyn

Happy Birthday ATC

Happy Sunday! I'm on Creative Scrapbooker Magazine's Blog today as a monthly blogger sharing my Happy Birthday ATC that features the new awesome Baked Texture Embossing Powder by Seth Apter and Emerald Creek Craft SuppliesElizabeth Craft DesignsRanger Ink, Creative Scrapbooker Magazine and Scrapbook Adhesives by 3L products. 


You'll want to make sure to stop by the Creative Scrapbooker Blog to read about  my Happy Birthday ATC so that you can recreate it at home.

- Katelyn

Saturday, January 27, 2018

Love Tag

I'm back on Southern Ridge Trading Company's blog today to share with you my shabby chic Love Tag which is perfect for that special someone on Valentine's Day. This tag features a variety of chipboard frames, embellished with different techniques. I hope that my shabby chic Love Tag will inspire you to want to recreate it at home.


You'll want to make sure to stop by Southern Ridge Trading Company's Blog so that you can learn how to recreate my shabby chic Love Tag at home.

- Katelyn

Friday, January 26, 2018

January Kit Release for Scrap Shotz

Happy Friday! I'm up on Scrap Shotz's blog today sharing a scrapbook layout featuring the January Kit. I hope that my layout will inspire you to recreate it at home.


You'll want to make sure to stop by Scrap Shotz's Blog so that you can see the rest of the details on my scrapbook layout. You'll also want to stop by next week as I will be sharing a few more projects the feature the January Kit.

- Katelyn

Tuesday, January 23, 2018

Krista Schneider Release Day - Just For You Card

It's time for our last new release day over on the Elizabeth Craft Designs blog, featuring Krista Schneider's new stamp and die release.

For my project, I featured a few of the new Krista Schneider dies and stamps and  created this Just For You Card. 


For the front of my card, I used the Floral Background stamp as the focal piece for my card and coloured the stamped image using Tombow Markers. 

The "Just For You" sentiment can be found in the Gift Wrapped stamp set and I stamped it using Jet Black Archival Ink. To cut out the sentiment, I used the Stitched Fishtail Banners and cut a second one out using patterned paper and layered them together. For the flowers around the sentiment, I stamped the flowers from the Cacti stamp set and cut them out with the coordinating die. 


To finish off the inside of the card, cut out a few more flowers and adhere the flowers in the bottom right hand corner.


You'll want to make sure to check out the rest of the projects the design team has created using Krista Schneider's dies on the Elizabeth Craft Designs blog.


Elizabeth Craft Designs Supplies Used:

- Cacti Coordinating Die

Other Supplies Used:

- Ranger Ink: Jet Black Archival Ink 
- Tim Holtz for Ranger Ink: Black Soot Distress Ink & Blending Tool with Foam
- Tombow: Tombow Markes - 743, 815, 373, 933, 676, 296, 055, 636, 946, 177, 249 & N15
- Creative Scrapbooker Magazine: Super Stock Cardstock
- Misc: Watercolour Cardstock


- Katelyn


Monday, January 22, 2018

Joset Designs Release Day - For You Card

Happy Monday! It's a new release day over on the Elizabeth Craft Designs blog, featuring Joset Designs new die and stamp release. You'll want to stop by my blog tomorrow as we have one more release post featuring inspiration on the Elizabeth Craft Designs blog.

For my project featuring some of the new Joset Designs dies, I created this pretty For You card. 


The leaves are from the Trio of Leaves die and coloured using Bundled Sage and Shabby Shutters Distress Ink. The flowers are from the Small and Large Flower Set and coloured using Abandoned Coral and Tattered Rose Distress Ink. For the "For You" sentiment, I die cut it out of the Words 2 - Thinking of You set and coloured it using Vintage Photo Distress Ink.


For the banner, I cut two banners from the Celebration Flags die using patterned paper from the Secret Garden collection. 


To finish off the edges of all the patterned paper pieces, I used Vintage Photo Distress Ink.

You'll want to make sure to check out the rest of the projects the design team has created on the Elizabeth Craft Designs blog

Elizabeth Craft Designs Supplies Used:


Other Supplies Used:

- Tim Holtz for Ranger Ink: Distress Ink - Vintage Photo, Abandoned Coral, Tattered Rose, Bundled Sage and Shabby Shutters & Blending Tool with Foam
- Graphic 45: Secret Garden Patterned Paper

- Katelyn


Friday, January 19, 2018

On Cabin Time Card

I'm up on Southern Ridge Trading Company's blog today sharing with you my On Cabin Time Card which features a few of our chipboard Christmas pieces used for my winter themed card. I hope that my On Cabin Time Card will inspire you to want to recreate it.


You'll want to make sure to head over to the Southern Ridge Trading Company Blog so that you can learn how to recreate my On Cabin Time Card at home.

- Katelyn

Wednesday, January 17, 2018

Follow Your Dreams Card


Today, I'm excited to get to share with you my Follow Your Dreams Card that's on Graphic 45's blog. Although this card looks simple, there's a reason for that, I was challenged to create a project within 60 seconds. With only having 60 seconds to create a project, it makes you look at things a little differently. So, by using the Ephemera Cards from Fairie Dust, along with some patterned paper and decorative stickers, I was able to create this simple but quick card easy for anyone to recreate at home.  I hope that you'll enjoy the video tutorial of my Follow Your Dreams Card.

Tip: Use the photo corners from the Decorative stickers to add some interest in the corners of the Ephemera card.


Here's the video tutorial on how I created my card:


Graphic 45 Supplies Used:


Other Supplies Used:

- Tombow: Permanent  Adhesive
- Misc: White Cardstock


Thanks for stopping by and checking out my project! You'll want to make sure to head over to Graphic 45's blog for a few other tips and tricks. 

-Katelyn


Monday, January 15, 2018

Becky Seddon Release Day - Let Your Dreams Soar

It's time for another new release day over on the Elizabeth Craft Designs blog, featuring Becky Seddon's new die releases. There will be one more of these release posts featuring inspiration using the new products throughout this month on the Elizabeth Craft Designs blog.

For my project, I featured some of the new Becky Seddon dies and I created this Let Your Dreams Soar Card. 


For the base of the cardfront, I layered three of the Stitched Fishtails together using patterned paper from ModaScrap's Viaggi Vintage Paper Pack.

All three Hot Air Balloons can be found in the Vintage Balloon Race die. I layered patterned paper in behind the balloons that had some cut out pieces. To layer in amongst the hot air balloons, I cut out three birds from the Free as a Bird die and blended Vintage Photo Distress Ink over each bird. The sentiment came from the Soar Collection Clear Stamp set. I stamped the sentiment in Vintage Photo Distress Ink on the backside of one of the scrap patterned paper pieces. You'll need to fussy cut the sentiment out. 


I placed the last bird in amongst the three hot air balloons. In the top portion of the card, I wrapped some twine three times around the top of the card and tied a knot at the top right hand corner. 


To finish off the edges of all the pieces, I used Vintage Photo Distress Ink.

You'll want to make sure to check out the rest of the projects the design team has created using Becky Seddon's dies on the Elizabeth Craft Designs blog.


Elizabeth Craft Designs Supplies Used:


Other Supplies Used:

- Tim Holtz for Ranger Ink: Vintage Photo Distress Ink & Blending Tool with Foam
- Misc: Twine


- Katelyn