It's time for a brand new Designer Challenge on the Elizabeth Craft Designs Blog today. For December's challenge it's all about using Susan Garden Notes - Frame It/Stitched Dies. The inspiration for my project came from Susan's Frame It/Stitched Oval Die. With that die in my hand, I also added a few other dies from Els van de Burgt Studio and Joset Designs to create my Birthday Wishes Card. Grab your favourite holiday beverage and read below as I have a tutorial for you so that you can re-create my card at home. You'll want to make sure to read all the way down to the bottom of this post as there's some details on how to get in on an awesome giveaway from Elizabeth Craft Designs.
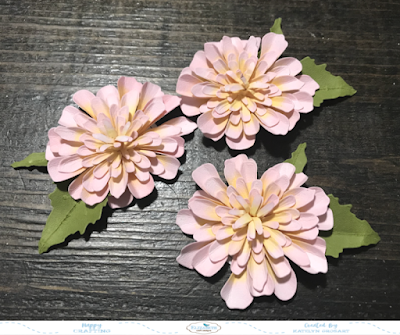
To start, die cut three of the large leaves and three of the small leaves from the Dahlia 2 die out of White Soft Finish Cardstock. Using a blending tool with foam, blend Peeled Paint Distress Ink over the entire surface of each leaf. Use the leaf molding pad and tool to shape your leaves.
From the same die, you'll need to cut out six extra large petals, six large petals, six medium petals, three small petals, three extra small petals and three centers. Using a blending tool with foam, blend Spun Sugar Distress Ink over each petal and center. Using a detailer brush, brush in Squeezed Lemonade Distress Ink in the middle of the petals.
Shape your petals and centers using the flower shaping tools and molding pad.
Adhere the flowers together. Each flower will need two extra large petals, two large petals, two medium petals, one small petal, one extra small petal and one center. For the center, you'll need to apply glue to the bottom portion of it and roll it up. Once the flower is assembled, adhere a large and small petal to each flower.
Die cut a 4 1/2" Stitched Rectangle out of White Soft Finish Cardstock. Place the 3 1/4" Frame It/Stitched Oval in the center of the stitched rectangle, run the piece through your die cutting machine.
Die cut the 4" Stitched Rectangle out of White Soft Finish Cardstock.
Die cut the Birthday Wishes Sentiment from the Words 1 - Celebration die out of White Soft Finish Cardstock. Using a blending tool with foam, blend Spun Sugar Distress Ink over the entire surface of the words.
Adhere the 4" Stitched Rectangle to the backside of the 4 1/2" Stitched Rectangle.
Adhere two of the Dahlia's in the top left corner of the oval and adhere the other Dahlia in the bottom right hand corner of the oval.
Adhere the birthday wishes sentiment in the middle of the oval, making sure that the flowers aren't covering it up.
To finish your card, cut a piece of White Soft Finish Cardstock that measures 5 3/4" x 9", score at 4 1/2". Adhere the cardfront to the cardbase.
Here are a few closeup shots of the card.
And here's the finished Birthday Wishes Card.
*******************
For today's challenge Elizabeth Craft Designs are giving away a $20 Gift Card to use on our website to 3 winners.
To enter simply leave a comment on the Elizabeth Craft Designs Facebook Giveaway Blog Post or the Elizabeth Craft Designs Challenge post and tell us Which of the Garden Notes - Frame It/Stitched die sets would you use on a project and how would you use it
We will select 3 lucky winners in a random drawing
The winners will be announced on Friday, December.21st on the Elizabeth Craft Designs Blog and our Facebook page.
*****************
Elizabeth Craft Designs Products Used:
- Leaf Pad
Other Products Used:
- Tim Holtz for Ranger Ink: Distress Ink - Spun Sugar, Squeezed Lemonade & Peeled Paint and Blending Tool with Foam
- Dynasty Brushes: Small Flat Blend Brush
- Katelyn


No comments:
Post a Comment