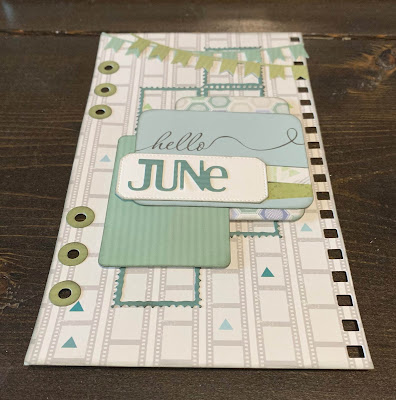
Happy Saturday! I'm thrilled to be sharing with you today my Hello June Planner Page, which marks the start of the new month in my planner. To create my page, I've used a variety of the dies from the Planner Essentials line. You'll want to read below to learn how I created my Hello June Planner Page.
To start, choose a piece of patterned paper from the Just Say Cheese Paper Pack. Die cut the planner page from the Planner Essentials - 10 set out of the patterned paper. Ink the edges of the page using Black Soot Distress Ink and a blending tool with foam.
From the same paper pack, choose another piece of patterned paper. Die cut the reinforcement circles from the Planner Essentials - 1 out of the patterned paper. Ink the edges of the circles using Black Soot Distress Ink and a blending tool with foam.
Choose another piece of patterned paper from the paper pack. From the Planner Months die, die cut the June word out of the patterned paper.
Choose one of the labels from the Planner Labels die. Die cut the label out of White Soft Finish Cardstock. Ink the edges of the label using Black Soot Distress Ink and a blending tool with foam.
Next, you'll need two of the patterned papers that you've already used. Choose one of the flags from the Celebration Flags set. Die cut the Celebration Flags die once out of each patterned paper piece.
You'll need to choose another piece of patterned paper from the Just Say Cheese Paper Pack. Die cut the rectangle strips from the Planner Elements out of the patterned paper. Ink the edges of the rectangle strips using Black Soot Distress Ink and a blending tool with foam.
Choose one more piece of patterned paper from the Just Say Cheese Paper Pack. You'll also need one of the patterned papers you used before. Die cut the large rectangle out of one of the patterned papers from the Planner Essentials - 6 die. Die cut the small rectangle out of the other patterned paper from the Planner Essentials - 6 die. Ink the edges of both rectangles using Black Soot Distress Ink and a blending tool with foam.
From the cut aparts in the Just Say Cheese Paper Pack, cut out the Hello card. Cut the card down to 2 1/2" x 3 1/4". Round all four corners. Ink the edges of the card using Black Soot Distress Ink and a blending tool with foam.
Adhere the reinforcement circles overtop of the holes on the planner page. Adhere the rectangle strip to the middle of the planner page.
Foam square the large rectangle 1/2" from the right and 2 1/4" from the top of the planner page. Adhere the small rectangle 1 7/8" x 1 5/8". Adhere the Hello card 3/8" from the right and 2 1/2" from the top of the planner page.
Adhere the June month to the label. Adhere the label underneath the Hello on the rectangle. Adhere the two celebration flags at the top of the page. Cut the flags down as desired.
Here's a few closeup photos of the the finished Hello June Planner Page.
Here is the finished Hello June Planner Page.
Elizabeth Craft Designs Supplies Used:
- ModaScrap: Just Say Cheese Paper Pack
Other Supplies Used:
- Tim Holtz for Ranger Ink: Black Soot Distress Ink and a Blending tool with foam
- Katelyn


No comments:
Post a Comment