Happy Tuesday!
With the release of brand new dies and stamps released from Joset Designs yesterday, I figured it was no better time to share a card using the new release. My Just Breathe card features three of the brand new dies and one of the new stamp sets. This new collection will have you creating so many beautiful Japanese inspired cards. You'll want to read below to learn how to recreate my Just Breathe Card at home.
To start, you'll need the Bridge & Lotus Die.
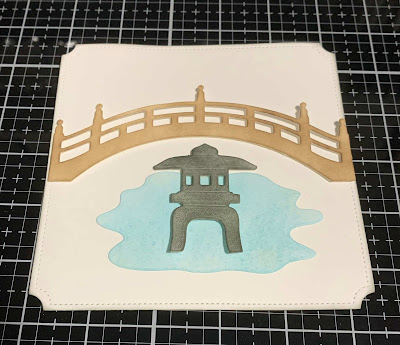
Die cut the bridge, water and ornament out of White Soft Finish Cardstock. Using a blending tool with foam, blend Ground Espresso Distress Ink lightly over the entire surface of the bridge. Using a blending tool with foam, blend Tumbled Glass Distress Ink over the entire surface of the water. Using a blending tool with foam, blend Black Soot Distress Ink over the entire surface of the ornament.
Die cut the two bullrushes out of White Soft Finish Cardstock. Using a blending tool with foam, blend Ground Espresso Distress Ink lightly over the top portion of the bullrushes. Using a blending tool with foam, blend Shabby Shutters Distress Ink over the bottom portion of the bullrushes.
Die cut all the elements for the water lily twice and the water lily pads out of White Soft Finish Cardstock. Using a blending tool with foam, blend Worn Lipstick Distress Ink over the entire surface of the flower portions of the water lilies. Using a blending tool with foam, blend Shabby Shutters Distress Ink over the entire surface of the water lily pads.
From the Cherry Blossom Branch, die cut the branch, the cherry blossom three times and the centers three times out of White Soft Finish Cardstock. You will only need eight of the cherry blossoms and eight of the centers. Using a blending tool with foam, blend Ground Espresso Distress Ink over the entire surface of the branch. Using a blending tool with foam, blend Picked Raspberry Distress Ink lightly over the entire surface of the eight cherry blossoms. Using a blending tool with foam, blend Squeezed Lemonade Distress Ink over the entire surface of the eight centers.
Die cut a 4 3/4" Stitched Indented Square out of White Soft Finish Cardstock. Apply Jet Black Archival Ink to the Just Breathe sentiment from the Zen sentiments stamp and stamp in the middle of the square. Ink the edges of the square using Black Soot Distress Ink and a blending tool with foam.
Die cut the 5 1/4" Stitched Indented Square out of White Soft Finish Cardstock. Ink the edges of the square using Black Soot Distress Ink and a blending tool with foam.
Foam square the bridge 1 1/4" from the top of the 5 1/4" square. Adhere the water 1/2" from the bottom and 7/8" from the left of the square. Foam square the ornament to the right side of the water.
Adhere the waterlilies together and then adhere the waterlilies to the water pads. Adhere one of the bullrushes to the left side of the water. Adhere the other bullrush to the right hand side of the water. Adhere the one waterlily to the left side of the water. Adhere the other waterlily to the right side of the water. The ornament will sit overtop of the waterlily on the right hand side.
Adhere the cherry blossoms to the branch as desired. Add centers to the cherry blossoms. Use foam squares to adhere the cherry blossom branch to the top right side of the 5 1/4" square.
To finish the cherry blossoms, add a dot of Craft Drops - Transparent Crystal to the centers of each cherry blossom.
Apply Jet Black Archival Ink to the Zen sentiment and stamp onto the bottom right side of the cardfront.
Cut a cardbase that measures 5 1/4" x 10 1/2", score at 5 1/4". Adhere the cardfront to the cardbase.
To finish the card, adhere the 4 3/4" square to the inside of the cardbase.
Here is the finished Zen Card.
Elizabeth Craft Designs Supplies Used:
- Craft Drop - Transparent Crystal
Other Supplies Used:
- Tim Holtz for Ranger Ink: Distress Ink - Black Soot, Ground Espresso, Tumbled Glass, Shabby Shutters, Picked Raspberry, Worn Lipstick & Squeezed Lemonade and Blending Tool with Foam
- Ranger Ink: Jet Black Archival Ink
- Katelyn


No comments:
Post a Comment