Tuesday, January 15, 2019

Love Valentine's Day Card

Happy Tuesday! I'm up on the Elizabeth Craft Designs blog today sharing my Love Valentine's Day Card, which features dies from ModaScrap and Joset Designs to create my card.


I have a full tutorial on how I made my Love Valentine's Day Card over on the Elizabeth Crafts Designs Blog


- Katelyn


Monday, January 14, 2019

You Are so Loved Art Journal Page

Happy Monday!
I have a new post over on Quietfire Design blog today, where I'm sharing my You Are so Loved Art Journal Page which features a variety of Quietfire stamps and A Way With Words Stencil.


For a full tutorial and a few more photos of my project, you'll want to head over to Quietfire Design blog for all the details. 

- Katelyn

Friday, January 11, 2019

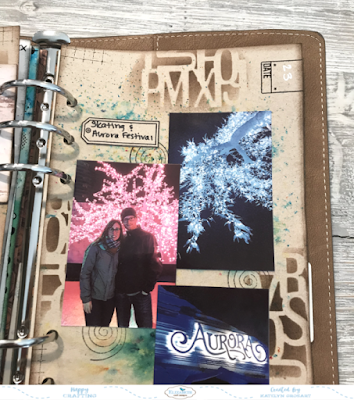
December 22nd & 23rd Planner Pages

This year, I've decided to make most Fridays Planner Post Friday. So today I'm sharing one of my planner spreads from December. Yes I know that they're from December, but if you're like me, the week between Christmas and New Years becomes a big blur and the days seem to go by quickly and then all of a sudden it's January. To create my planner page spread, I've used a variety of the dies and stamps from the Planner Essentials line as well as patterned paper from ModaScrap. You'll want to read below to learn how I created my planner pages.


To create the base for the left planner page, use the Planner Essentials 1 page die and die cut it out of Kraft Cardstock. To create the background of the page, I sprinkled Mango Tango, Turquoise and Jade Magenta Nuance Powder and then spritz with water. I created a stencil out of an acetate sheet and the letters from the Planner Patterns Die. Place the stencil randomly on the page and blend Ground Espresso Distress Ink overtop of the stencil. Repeat the previous step two more times. I stamped the December word, and a couple of the patterns on the page. As well I added the Date square and wrote in the number 22. To finish off the page, add photos and a journaling tag. 


To add some extra spaces for photos, I chose a piece of patterned paper from the ModaScrap Wood Effect Paper Pack and die cut two tags from the Planner Essentials 4 die. Ink the edges of the tags using Ground Espresso Distress Ink and a blending tool with foam. Foam square a photo to each tag.


Choose a second piece of patterned paper from the ModaScrap Wood Effect Paper Pack and die cut two tags from the Planner Essentials 4 die. Ink the edges of the tags using Ground Espresso Distress Ink and a blending tool with foam. Adhere the tag to other tag. Repeat for the other tag. Foam square a photo to each tag.


To create the base for the right planner page, use the Planner Essentials 4 page die and die cut it out of Kraft Cardstock. To create the background of the page, I sprinkled Mango Tango, Turquoise and Jade Magenta Nuance Powder and then spritz with water. I created a stencil out of an acetate sheet and the letters from the Planner Patterns Die. Place the stencil randomly on the page and blend Ground Espresso Distress Ink overtop of the stencil. Repeat the previous step two more times. I stamped the December word, and a couple of the patterns on the page. As well I added the Date square and wrote in the number 23. To finish off the page, add photos and a journaling tag. 


Elizabeth Craft Supplies Used:


Other Supplies Used:

- Tim Holtz for Ranger Ink: Ground Espresso Distress Ink and a blending tool with foam
- Ranger Ink: Jet Black Archival Ink
- Magenta: Nuance - Mango Tango, Turquoise and Jade
- Misc: White Gel Pen, Black Gel Pen and Kraft Cardstock 

- Katelyn


Monday, January 7, 2019

Elizabeth Craft January Group Post - New Year means New Planner Ideas

Happy Monday and Happy New Year!

We are switching things up on the Elizabeth Craft Designs blog this year and instead of having a designer challenge, we are now having group posts each month. Each month the group post will have a theme and some or all of the design team members will participate. For January's theme it's all about "New Year means New Planner Ideas". 

With it being the start of January it's time for me to start planning the month. I'm loving the new Planner Essentials line, as its perfect for me to customize my planner pages. For planner project, I've created a weekly planner spread that will keep me on track of what I need to complete and allows me to add in things where needed. Grab your favourite winter beverage and read below as I have a tutorial for you so that you can re-create my planner spread at home. You'll also want to make sure to stop by the Elizabeth Craft Designs Blog to check out the rest of the team's projects. 


To start, choose a piece of patterned paper from the ModaScrap - Relax in the Garden paper Pack. Cut the paper in half. From the one patterned paper piece, die cut the Planner Essentials 3 page die out the patterned paper. From the other patterned paper piece, die cut the Planner Essentials 2 page die out of the patterned paper. Apply Jet Black Archival Ink to the January stamp out of the Months Stamp set and stamp onto the tab of the left hand page. Apply Jet Black Archival Ink to the Grid Pattern stamp out of the Patterns 1 Stamp set and stamp randomly five times on the left hand side page. Re ink the stamp as needed. Apply Jet Black Archival Ink to the Grid Pattern stamp out of the Patterns 1 Stamp set and stamp randomly five times on the right hand side page. Re ink the stamp as needed. Ink the edges of each page using Ground Espresso Distress Ink and a blending tool with foam.


Choose three more patterned paper pieces from the ModaScrap - Relax in the Garden Paper Pack. From the Planner Essentials 1, you'll need the large and small squares. From one piece of the patterned paper, die cut two large squares. from the other two patterned paper pieces, die cut two small squares from each paper. From the Planner Essentials 2, you'll need the large arrow, die cut two out of one of the patterned paper pieces. From the Planner Essentials 4, you'll need the small arrow, die cut one out of one of the patterned paper pieces. Ink the edges of the arrows and squares using Ground Espresso Distress Ink and a blending tool with foam.


Next you'll need a piece of White Soft Finish Cardstock. From the Schedule Stamp Set you'll need the large rectangle. Apply Jet Black Archival Ink to the large rectangle and stamp onto the White Soft Finish Cardstock. Continue to reapply ink to the stamp and stamp five more times onto the White Soft Finish Cardstock. From the Reminders Stamp Set you'll need the To Do rectangle. Apply Jet Black Archival Ink to the To Do rectangle and stamp onto the White Soft Finish Cardstock. Continue to reapply ink to the stamp and stamp one more time onto the White Soft Finish Cardstock. Cut out each rectangle. Apply Jet Black Archival Ink to each of the day stamps from the Calendar stamp set and stamp onto each rectangle. Using a black journaling pen, write in each rectangle. Ink the edges of each rectangle using Ground Espresso Distress Ink and a blending tool with foam.


Lay the planner pages together. On the left hand planner page, adhere a large square and two small squares. Each square will slightly overlap one another. Repeat the previous step on the right hand planner page.


On the left hand page, adhere the Monday to Wednesday rectangles as well as one of the To do rectangles. On the right hand page, adhere the Thursday to Sunday rectangles as well as the other To Do rectangle.  


To finish off the planner spread, adhere on large arrow in between the Tuesday and Wednesday rectangles. Adhere the other large arrow in between the Thursday and Friday rectangles. Adhere the small arrow on the right planner page tab.


Here are a few closeups of the left hand planner page.


Here are a few closeups of the right hand planner page.


And here's the finished Planner spread.


Elizabeth Craft Designs Products Used:


Other Products Used:

- Tim Holtz for Ranger Ink: Distress Ink - Ground Espresso and Blending Tool with Foam
- Ranger Ink: Jet Black Archival Ink
- Misc: Black Gel Pen

- Katelyn


Monday, December 31, 2018

Christmas Memories

Happy Monday! I'm up on Creative Scrapbooker Magazine's Blog as a monthly blogger sharing my Christmas Memories Scrapbook Layout. My scrapbook layout features the Christmas Collection from Carta Bella as well as a variety of other products from Ranger Ink and Scrapbook Adhesives by 3L.


You'll want to make sure to stop by the Creative Scrapbooker Blog to learn all about how I created my Christmas Memories Scrapbook Layout.

Thank for stopping by and Happy New Year!
- Katelyn

Friday, December 28, 2018

Get Well Soon Notecard

Happy Friday!
I have a new post over on Quietfire Design blog today, where I'm sharing my Get Well Soon Notecard which features a variety of Quietfire stamps.


For a full tutorial and a few more photos of my project, you'll want to head over to Quietfire Design blog for all the details. 

- Katelyn

Monday, December 24, 2018

Merry Christmas!

Happy Christmas Eve! Before I share with you my new project, I want to wish you a very Merry Christmas and hope that you have a wonderful Christmas spending time with friends and family. I'm sharing one last Merry Christmas Card with you today which features dies from Els van de Burgt Studio and Joset Designs as well as patterned paper from ModaScrap. Grab a Christmas beverage or goodie and enjoy my tutorial below.


To start, you'll need to die cut all of the elements from the Moose die out of White Soft Finish Cardstock. 

From the now die cut moose, you'll need the head, nose, ear, body, leg and fill in circles for the nose. Using a blending tool with foam, blend Gathered Twigs Distress Ink over the entire surface of all the elements listed above. Ink the edges of the pieces using Ground Espresso Distress Ink and a blending tool with foam.


Next from the moose die cuts, you'll need the antlers, scruff and four hooves. Using a blending tool with foam, blend Ground EspressoDistress Ink over the entire surface of all the elements listed above. 


Next you'll need the eyes. Using a blending tool with foam, blend Black Soot Distress Ink over the entire surface of each eye.


The last element from the moose die cuts are the four ornaments. Using a blending tool with foam, blend Festive Berries Distress Ink over the entire surface of two of the ornaments. Using a blending tool with foam, blend Pine Needles Distress Ink over the entire surface of the other two ornaments. 


From the Words 5 - Winter Wishes die, die cut the Merry Christmas out of White Soft Finish Cardstock. Using a blending tool with foam, blend Pine Needles Distress Ink over the entire surface of the Merry. Using a blending tool with foam, blend Festive Berries Distress Ink over the entire surface of the Christmas.


Choose one of the wood patterned papers from the ModaScrap Wood Effects Paper Pack. Die cut the 4 1/2" Stitched Rectangle out of the wood paper. Die cut the 4" Stitched Rectangle out of White Soft Finish Cardstock. Ink the edges of each rectangle using Ground Espresso Distress Ink and a blending tool with foam.


Adhere all of the elements together to make the moose.


Adhere the 4" stitched rectangle to the 4 1/2" stitched rectangle.


Foam square the moose to the top portion of the 4" stitched rectangle.


Adhere the Merry Christmas sentiment underneath the moose.


Adhere a red and green ornament underneath the right antler. Adhere the other red and green ornaments underneath the left antler. Draw a line using a black gel pen to each ornament to attach them to the antlers. Cut a piece of White Soft Finish Cardstock that measures 5 3/4" x 9", score at 4 1/2". Adhere the cardfront to the cardbase.


Here are a few closeups of the finished card.


Here's the finished Merry Christmas Card.


Elizabeth Craft Designs Supplies Used:


Other Supplies Used:

- Tim Holtz for Ranger Ink: Distress Ink - Ground Espresso, Gathered Twigs, Pine Needles, Festive Berries & Black Soot Distress Ink and Blending Tool with Foam
- Misc: Black Gel Pen

- Katelyn