Happy Easter! With it being a long weekend, I was able to play a bit in my craftroom. With Mother's Day right around the corner as well as a few birthdays in the month of May, I thought I would give the Gatefold - Elegant Rose die from Elizabeth Craft Designs a try. I have to say, this is one is one of my new favourite dies as the final project looks fantastic and doesn't take a long time to create. So, today I have an Any Occasion Gatefold card as well as a tutorial below for you so that you can recreate my beautiful Any Occasion Gatefold Card at home.
To start, cut a piece of Super Stock cardstock that measures 5 1/2" x 5 5/8". Using an edge distressor, distress the edges of the cardstock. With the edges distress, use a blending tool and Vintage Photo Distress Ink to ink the edges of the cardstock.
Cut a piece of navy blue patterned paper that measures 5 1/2" x 5 5/8". Using an edge distressor, distress the edges of the navy blue patterned paper. With the edges distress, use a blending tool and Vintage Photo Distress Ink to ink the edges of the navy blue patterned paper.
Using the Stitched Square dies, die cut the 4 1/4" stitched square out of cream patterned paper and the 4 3/4" stitched square out of pink/white polka dot patterned paper. Using an edge distressor, distress the edges of both stitched squares. With the edges distress, use a blending tool and Vintage Photo Distress Ink to ink the edges of both stitched squares.
With the paper cut for the inside and base of your card, now it's time to start the die cutting.
To start, place the Gatefold - Elegant Rose die 1/4" from the left hand side of your patterned paper and run it through your die cutting machine. Take the Gatefold - Elegant Rose again a place it this time 1/4" from the right hand side of your patterned paper and run it through your die cutting. Note: You'll want to make sure that part of your shim involves a metal plate, that way the die's detail gets completely cut out.
Once the Gatefold pieces have been cut, trace each gatefold piece onto a piece of turquoise patterned paper. Cut the traced pieces out. Ink the edges of the cut out gatefold pieces using Vintage Photo Distress Ink.
Using the Dotted Scallop Circles die, die cut the 1 1/2" dotted scallop circle out of cream patterned paper and the 2" dotted scallop circle out of pink patterned paper. Ink the edges of the dotted scallop circles use a blending tool and Vintage Photo Distress Ink.
From the Curvy Leaves die, die cut one - three leaves leaf out of Super Stock cardstock. Using a blending tool and Shabby Shutters Distress Ink over the entire leaf. Shape the leaves using the leaf tool and leaf pad.
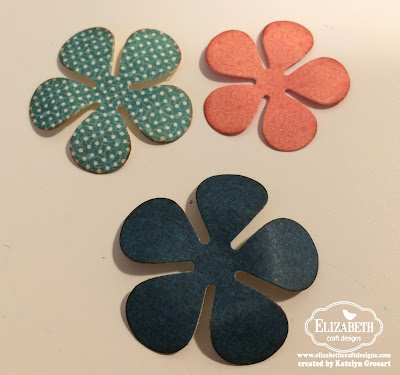
Using the Bunch of Flowers 3, die cut the flowers three times using pink patterned paper, navy blue patterned paper and turquoise/white dot patterned paper. Ink the edges of the small pink, medium turquoise and large navy blue flowers using Vintage Photo Distress Ink.
Start by adhering the small pink flower to the medium turquoise flower. Adhere the medium turquoise flower to the large navy flower. To finish off the center of the flower, add a white pearl. Adhere the three - leaves leaf to the right hand side of the flower.
With the flowers still out, adhere the small turquoise flower to the medium navy blue flower. Adhere the medium navy blue flower to the large pink flower. To finish the center of the flower, add a white pearl.
Adhere the 5 1/2" x 5 5/8" piece of navy blue patterned paper to the 5 1/2" x 5 5/8" super stock cardstock piece.
Adhere the cream stitched square to the white/pink dot patterned paper. Adhere the white/pink dot patterned paper to the middle of the navy blue patterned paper.
Adhere the two turquoise pieces in behind the two die cut gatefold - elegant roses pieces. With the turquoise pieces adhered, fold along the fold line on the sides of the gatefold - elegant roses pieces. Ink the edges of the gatefold pieces using Vintage Photo Distress Ink.
Apply adhesive on the inside of the flap of the gatefold piece and adhere the flap of the panel to the left hand side of the card base, making sure that the folded edge sits on the back side of the cardbase. Apply adhesive on the inside of the flap of the gatefold piece and adhere the flap of the panel to the right hand side of the card base, making sure that the folded edge sits on the back side of the cardbase.
Adhere the small cream dotted scallop circle to the medium pink dotted scallop circle. Apply adhesive to the right hand side of the medium pink dotted scallop circle and adhere half of the circle to the right hand side of the gatefold.
Adhere the flower with the leaf to the middle of the cream dotted scallop circle.
To finish the inside of the card, adhere the other flower in the bottom right hand corner of the cream stitched square.
Here are some photos of my finished Any Occasion Gatefold Card.
Thanks for joining me today! I hope that I've inspired you to re-create my Any Occasion Gatefold Card at home.
Elizabeth Craft Designs Products Used:
Other Products Used:
- Graphic 45: Cafe Parisian - 12x12 Patterns/Solids, Upper Crust and Creme de la Creme
- Tim Holtz for Ranger Ink: Distress Ink - Vintage Photo and Blending Tool/Foam
- Creative Scrapbooker/Cathie Allan: Super Stock
- Melissa Frances: Pearls
- Katelyn


No comments:
Post a Comment