Showing posts with label Cafe Parisian. Show all posts

Sunday, April 16, 2017

Any Occasion Gatefold Card

Happy Easter! With it being a long weekend, I was able to play a bit in my craftroom. With Mother's Day right around the corner as well as a few birthdays in the month of May, I thought I would give the Gatefold - Elegant Rose die from Elizabeth Craft Designs a try. I have to say, this is one is one of my new favourite dies as the final project looks fantastic and doesn't take a long time to create. So, today I have an Any Occasion Gatefold card as well as a tutorial below for you so that you can recreate my beautiful Any Occasion Gatefold Card at home. 


To start, cut a piece of Super Stock cardstock that measures 5 1/2" x 5 5/8". Using an edge distressor, distress the edges of the cardstock. With the edges distress, use a blending tool and Vintage Photo Distress Ink to ink the edges of the cardstock.


Cut a piece of navy blue patterned paper that measures 5 1/2" x 5 5/8".  Using an edge distressor, distress the edges of the navy blue patterned paper. With the edges distress, use a blending tool and Vintage Photo Distress Ink to ink the edges of the navy blue patterned paper.


Using the Stitched Square dies, die cut the 4 1/4" stitched square out of cream patterned paper and the 4 3/4" stitched square out of pink/white polka dot patterned paper. Using an edge distressor, distress the edges of both stitched squares. With the edges distress, use a blending tool and Vintage Photo Distress Ink to ink the edges of both stitched squares.


With the paper cut for the inside and base of your card, now it's time to start the die cutting.

To start, place the Gatefold - Elegant Rose die 1/4" from the left hand side of your patterned paper and run it through your die cutting machine. Take the Gatefold - Elegant Rose again a place it this time 1/4" from the right hand side of your patterned paper and run it through your die cutting. Note: You'll want to make sure that part of your shim involves a metal plate, that way the die's detail gets completely cut out.


Once the Gatefold pieces have been cut, trace each gatefold piece onto a piece of turquoise patterned paper. Cut the traced pieces out. Ink the edges of the cut out gatefold pieces using Vintage Photo Distress Ink.


Using the Dotted Scallop Circles die, die cut the 1 1/2" dotted scallop circle out of cream patterned paper and the 2" dotted scallop circle out of pink patterned paper. Ink the edges of the dotted scallop circles use a blending tool and Vintage Photo Distress Ink.


From the Curvy Leaves die, die cut one - three leaves leaf out of Super Stock cardstock. Using a blending tool and Shabby Shutters Distress Ink over the entire leaf. Shape the leaves using the leaf tool and leaf pad.


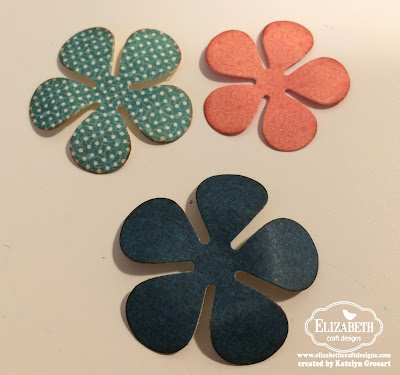
Using the Bunch of Flowers 3, die cut the flowers three times using pink patterned paper, navy blue patterned paper and turquoise/white dot patterned paper. Ink the edges of the small pink, medium turquoise and large navy blue flowers using Vintage Photo Distress Ink. 


Start by adhering the small pink flower to the medium turquoise flower. Adhere the medium turquoise flower to the large navy flower. To finish off the center of the flower, add a white pearl. Adhere the three - leaves leaf to the right hand side of the flower.


With the flowers still out, adhere the small turquoise flower to the medium navy blue flower. Adhere the medium navy blue flower to the large pink flower. To finish the center of the flower, add a white pearl. 


Adhere the 5 1/2" x 5 5/8" piece of navy blue patterned paper to the 5 1/2" x 5 5/8" super stock cardstock piece.


Adhere the cream stitched square to the white/pink dot patterned paper. Adhere the white/pink dot patterned paper to the middle of the navy blue patterned paper.


Adhere the two turquoise pieces in behind the two die cut gatefold - elegant roses pieces. With the turquoise pieces adhered, fold along the fold line on the sides of the gatefold - elegant roses pieces.  Ink the edges of the gatefold pieces using Vintage Photo Distress Ink.


Apply adhesive on the inside of the flap of the gatefold piece and adhere the flap of the panel to the left hand side of the card base, making sure that the folded edge sits on the back side of the cardbase. Apply adhesive on the inside of the flap of the gatefold piece and adhere the flap of the panel to the right hand side of the card base, making sure that the folded edge sits on the back side of the cardbase.


Adhere the small cream dotted scallop circle to the medium pink dotted scallop circle. Apply adhesive to the right hand side of the medium pink dotted scallop circle and adhere half of the circle to the right hand side of the gatefold.


Adhere the flower with the leaf to the middle of the cream dotted scallop circle.


To finish the inside of the card, adhere the other flower in the bottom right hand corner of the cream stitched square.


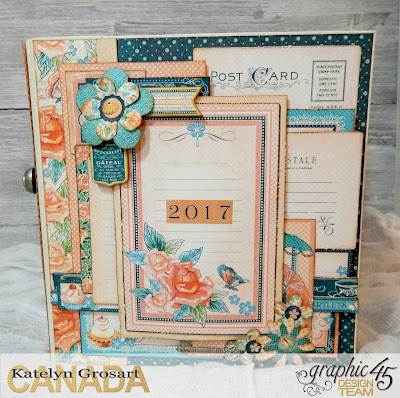
Here are some photos of my finished Any Occasion Gatefold Card.


Thanks for joining me today! I hope that I've inspired you to re-create my Any Occasion Gatefold Card at home.

Elizabeth Craft Designs Products Used:


Other Products Used:

- Graphic 45: Cafe Parisian - 12x12 Patterns/Solids, Upper Crust and Creme de la Creme
- Tim Holtz for Ranger Ink: Distress Ink - Vintage Photo and Blending Tool/Foam
- Creative Scrapbooker/Cathie Allan: Super Stock
- Melissa Frances: Pearls

- Katelyn


Friday, February 17, 2017

Celebrate Card

I'm up on the Elizabeth Craft Designs blog today sharing my feminine Celebrate Card. I've created this pretty celebrate card for any occasion that you need or want to celebrate for that special someone.  My card features a variety of Elizabeth Craft Designs dies, paper and adhesives.


You'll want to make sure your way over to Elizabeth Crafts Designs Blog to read all about how I created my Celebrate card, so that you can recreate it at home. 

If your looking for my Southern Ridge Trading Company post, head here.

-Katelyn

Wednesday, January 25, 2017

Love Mini Album

I'm back from the craziness of Creativation and I get to share with you my Love Mini Album that's up on the Graphic 45 blog today using Policy Envelopes, Alpha Banner, Café Parisian, Place in Time Deluxe Collectors Edition as well as a variety of staples.  Having this little mini album will allow me to add special photos and mementos from Valentine's Day. You'll want to make sure to head over to the Graphic 45 blog to check out the rest of the photos of my project.


Tip: Mix and match collections to create the perfect embellishments to add to the front of each envelope.


Tip: To add some extra interest to the Alpha Banner tags, add a piece of coordinating pattern paper in behind the letter.


These are just a few of the photos of the pages in my Love Mini Album. To see more pictures of my Love Mini Album, you'll want to head over to the Graphic 45 blog. 

Supplies Used:

- Café Parisian 12x12 Patterns & Solids
- Café Parisian 12x12 Paper: Floral Souffle & Café Parisian
- Place in Time Deluxe Collectors Edition: February Cut Aparts
- Children’s Hour 8x8 Paper Pad: February Collective & February Montage
- Staples: Shabby Chic Metal Keys, Shabby Chic Metal Clock Keys, Policy Envelopes – Regular Black, Alpha Banner – ATC Red and Ring from ATC Tags Album
- Doilies
- Petaloo: Crochet Lace Trim – Cream
- Hug a Bug Seam Binding Ribbon: Black & Cream
- Black Cardstock
- Crop-a-Dile
- Sookwang Tape
- Glue Dots
- Foam Squares
- Paper Trimmer
- Scissors
- Black Soot Distress Ink & Blending Tool
- Edge Distressor

- Katelyn


Saturday, January 7, 2017

2017 Scrapbook Planner

2017 is here and that means it's time to start thinking about creating a new planner. Today I'm on the Graphic 45 blog sharing with you a 2017 Scrapbook Planner using Children’s Hour, Café Parisian as well as a variety of other collections from this year.  Having a planner that will allow me to document birthdays, important events or things and being able to scrapbook those special moments during the month is so important to me. You'll want to head over to the Graphic 45 blog to check out the rest of the photos of my project.


Tip: Add policy envelopes into your planner as a way to hold important receipts, ticket stubs or other important pieces of paper.


Tip: Add different size papers and fold outs into your planner to add some extra interest as well as give you more space to document your memories.


This is just a few of the photos of the inside of my planner. To see more pictures of my 2017 Scrapbook planner, you'll want to head over to the Graphic 45 blog. I'm warning you though, that you'll want to grab a cup of tea or coffee before reading the post as the post is top heavy with photos. 

Supplies Used:

- 12” x 12” Café Parisian: Confectionary
Café Parisian 12”x12: Patterns & Solids
- 12”x12” St. Nicholas: Sweet Tooth and Bells & Bows
- 12”x12” St. Nicholas: Patterns & Solids
- 12”x12” Off to the Races: Run for the Roses and Elegance Running
- Off to the Races 12”x12” Patterns & Solids
- Children’s Hour 12”x12” Pad
- Children’s Hour 12”x12” Calendar Pad
- Children’s Hour 8”x8” Calendar Pad
- Hallowe’en in Wonderland Deluxe Collectors Edition
- ABC Primer Deluxe Collectors Edition
- Secret Garden Deluxe Collectors Edition
- Café Parisian Chipboard 1 & 2
- Café Parisian Flowers
- Café Parisian 12”x12” Cardstock Stickers
- Café Parisian Ephemera Cards
- Children’s Hour Ephemera Cards
- Staples: Ivory Mixed Media Album, Shabby Chic Ornate Metal Keys, Square Black Policy Envelopes, Square Red Policy Envelopes & Shabby Chic Metal Door Plate & Knobs
- Vintage Photo Distress Ink & Blending Tool
- Mixed Media Cardstock
- Doilies
- Sookwang Tape
- Foam Squares
- Edge Distressor
- Scissors
- Crop a Dile
- Black Journaling Pen
- 1 3/8” Circle Punch


- Katelyn


Monday, October 24, 2016

Cafe Parisian Home Decor

Today on the Graphic 45 blog, we kick off a blog hop with Scrapbook Adhesives by 3L. I created a home decor piece featuring Graphic 45's Cafe Parisian collection along with a variety of fabulous adhesives from Scrapbook Adhesives by 3L.  You'll want to head over to the Graphic 45 blog to check out the rest of the photos of my project as well as fellow design team members Elena and Sandy who have also created fabulous projects for you. Once your finished checking out our projects, you'll want to pop over to the Scrapbook Adhesives by 3L blog to see what their design team has created. 

Using a candleholder from Ikea, I decorated the inside and outside using the newly released Café Parisian collection. To add some extra interest within the paper, I added in some shabby chic metal keys. To adhere my paper and keys to my candleholder, I used some fabulous products from Scrapbook Adhesives. You’ll want to get your hands on Café Parisian as well head over to Scrapbook Adhesives to check out their extensive line of fabulous adhesive products.


Scrapbook Adhesives by 3L has a large range of fantastic adhesives that they offer. For my project, I used their EZ Runner Micro, Crafty Foam Tape, Thin 3D Foam Squares and Dodz (8mm). 


Tip: By adhering some of the layered elements with Crafty Foam Tape and other elements using the thin foam squares, it creates even more dimension on your piece.


To see more pictures of my Cafe Parisian Home Decor piece, you'll want to head over to the Graphic 45 blog.

Supplies Used:

- 12x12 Café Parisian Pad
- Staples: Shabby Chic Metal Keys
- Ikea Candle Holder
- Vintage Photo Distress Ink
- Circle Dies
Scrapbook Adhesives: EZ Runner Micro, Crafty Foam Tape, Thin 3D Foam Squares & Dodz - 8mm

Thanks for stopping by and make sure to head over to the Graphic 45 blog  to check out the rest of the photos of my project as well as Elena and Sandy's fabulous projects!

You'll want to check out the Graphic 45 blog all week to see more fabulous projects from the design team using Scrapbook Adhesives Products. While your there, you'll also see sneak peeks of the new Nature Sketchbook collection as well as the re-release of Place in Time which will be available as in a Deluxe Collectors Edition.


-Katelyn


Sunday, October 23, 2016

Cafe Parisian Sneak Peek


I hope that you are having a fabulous weekend, I just wanted to stop in to share with you a sneak peek of my Cafe Parisian project for Graphic 45's and Scrapbook Adhesives by 3L Blog Hop. You'll want to mark your calendars for tomorrow, Monday, October.24th as I will be up on the Graphic 45 Blog starting off the blog hop. On the same day I get to share the blog with Elena and Sandy who have also created fantastic project to share with you. I hope that you'll take the time to stop by the Graphic 45 blog and check out all of our projects. I will also be sharing on Monday with you some photos of my project on my blog.

- Katelyn