Sunday, September 30, 2018

Ho, Ho, Ho & Merry Christmas Card

We are celebrating the new releases from A Way With Words over on Quietfire Design blog today. I designed this cute Ho, Ho, Ho & Merry Christmas Card which features a couple of the new releases. 


You'll want to head over to Quietfire Design blog where I have a few more photos of my project as well as a full tutorial. Plus there is an exciting giveaway on the blog which you don't want to miss. 

- Katelyn

Friday, September 28, 2018

Happy Fall Card

Happy Friday! I'm up on Southern Ridge Trading Company's blog sharing my Happy Fall Card. I hope that my card will inspire you to want to recreate your own version at home.


You'll want to stop by Southern Ridge Trading Company's Blog so that you can learn how I embellished my chipboard pieces for my card.

- Katelyn

Wednesday, September 26, 2018

'Tis the Season Notecard

Happy Wednesday! I'm excited to share with you my 'Tis the Season Notecard today. For my notecard, I've featured dies from ModaScrap and Els van de Burgt Studio as well as stamps from Krista Schneider and ModaScrap patterned paper. You'll want to read below as I share with you how to recreate my notecard at home.


To start, choose two patterned papers from the ModaScrap It's Christmas Paper Pack. Die cut 3 3/4" Dashing Squares out of one of the patterned papers. Die cut the 3 1/4" Dashing Squares out of the other patterned paper piece. Distress the edges of both patterned papers. Ink the edges of both patterned papers using Black Soot Distress Ink and a blending tool with foam.


Choose a third piece of patterned paper from the ModaScrap It's Christmas Paper Pack. Die cut the 3" Dotted Scallop Circle out of it. Ink the edges of the scallop circle using Black Soot Distress Ink and a blending tool with foam.


Die cut the 2 3/4" Stitched Circle out of White Soft Finish Cardstock. Distress the edges of the circle. Ink the edges of the circle using Black Soot Distress Ink and a blending tool with foam.


Die cut the 3/4" Stitched Fishtail Banner out of the backside of one of the patterned papers. Apply Jet Black Archival Ink to the 'Tis the Season stamp and stamp onto the banner. Place the notched side of the stitched fishtail banner on the other side of the banner and run through your die cutting machine. Now the other side of the banner will be notched. Distress the edges of the banner. Ink the edges of the banner using Black Soot Distress Ink and a blending tool with foam.


Apply Jet Black Archival Ink to the Snowman stamp and stamp onto a piece of watercolour cardstock. Watercolour the snowman scene using Tombow Markers - 249, 933, 528, 847, 990, 969 and 493. Place the corresponding dies over top of the stamped images and die cut with your die cutting machine.


Now it's time to assemble your card.

Adhere the 3 1/4" dashing square to the 3 3/4" dashing square.


Adhere the 2 3/4" stitched circle to the 3" dotted scallop circle. Foam square the scalloped circle to the middle of the 3 1/4" dashing rectangle.


Foam square the snowman scene to the middle of the 2 3/4" stitched circle.


Adhere the 'Tis the Season banner to the bottom of the snowman. Cut a piece of White Soft Finish Cardstock that measures 3 3/4" x 7 1/2", score at 3 3/4". Adhere the cardfront to the cardbase.


Here are is a closeup photos of the finished notecard.


And here's the finished 'Tis the Season Notecard.


Elizabeth Craft Designs Supplies Used:


Other Supplies Used:

- Ranger Ink: Jet Black Archival Ink
- Tim Holtz for Ranger Ink: Distress Ink- Black Soot and Blending tool with Foam
- Tombow: Markers - 249, 933, 528, 847, 990, 969 and 493

Thanks for stopping by and checking out my card. I hope that I've inspired you to recreate my 'Tis the Season Notecard at home.

- Katelyn 


Tuesday, September 25, 2018

Something Wicked Art Journal Page

Happy Tuesday! It's time for a new project over on Quietfire Design blog today and I'm sharing my Something Wicked Art Journal Page that features a variety of Quietfire Design stamps. 


For a full tutorial and a few more photos of my project, you'll want to head over to Quietfire Design blog for all the details. 

- Katelyn


Monday, September 24, 2018

Always Be Yourself Unless You Can Be A Mermaid Tag

Happy Monday! I'm up on Creative Scrapbooker Magazine's Blog as a monthly blogger sharing my Always Be Yourself Unless You Can Be A Mermaid Tag. My tag features the Dream Big Collection from Simple Stories, the Medium Etcetera Tag from Stampers Anonymous, Ink from Ranger Ink and adhesive from Scrapbook Adhesives by 3L.


You'll want to make sure to stop by the Creative Scrapbooker Blog to learn all about how I created my Always Be Yourself Unless You Can Be A Mermaid Tag.

Thank for stopping by!
- Katelyn


Friday, September 21, 2018

Happy Holidays Card

Happy Friday! There are only 13 Tuesdays until Christmas and I've started to create Christmas cards. Today, I'm sharing with you my Happy Holidays Card, which features dies from Els van de Burgt Studio, stamps from Joset Designs and Krista Schneider as well as ModaScrap patterned paper. You'll want to read below as I share with you how to recreate my Happy Holidays Card at home.


To start, choose two patterned papers from ModaScrap's Xmas Vintage Collection Paper Pack. Die cut the 4 1/2" Dashing Rectangle die out of one of the patterned paper pieces. Die cut the 4" Dashing Rectangle die out of the other patterned paper piece. Distress the edges of both patterned paper rectangles. Ink the edges of both rectangles using Ground Espresso Distress Ink and a blending tool with foam. 


Choose a third piece of patterned paper from ModaScrap's Xmas Vintage Collection Paper Pack. Die cut the medium size Entwined Circles out of the third patterned paper piece. Ink the edges of the circle using Ground Espresso Distress Ink and a blending tool with foam.


From a scrap piece of patterned paper from the paper pack. Die cut the 1 1/8" Stitched Fishtail Banner from the backside of the paper. Cut the banner down to 3 3/8". Apply Potting Soil Archival Ink to the Happy Holidays stamp and stamp onto the banner. Distress the edges of the banner. Ink the edges of the banner using Ground Espresso Distress Ink and a blending tool with foam.


Get a second piece of scrap patterned paper from the paper pack. Die cut the 3 1/4" Stitched Circle from the backside of the paper. Apply VersaMark Ink to the snowflake stamp and stamp onto the circle. Continue to apply the ink to the stamp and stamp onto the circle until the circle is full of snowflakes. The snowflakes will be faint on the circle. Distress the edges of the circle. Ink the edges of the circle using Ground Espresso Distress Ink and a blending tool with foam.


Apply Jet Black Archival Ink to the reindeer stamp and stamp onto a piece of watercolour cardstock. Water colour the image using Tombow Markers - 977, 969, 025, 249, 847, 443 and 476. Die cut the image using the coordinating dies.


Now it's time to adhere your card together.

Adhere the 4" rectangle to the 4 1/2" rectangle.


Adhere the Happy Holidays banner 1/4" from the bottom and all the way to the right of the brown patterned paper. Foam square the 3 1/4" stitched circle to the top portion of the cardfront. Adhere the entwined circle overtop of the stitched circle.


Foam square the coloured image to the middle of the stitched circle. To finish the card, cut a cardbase out of White Soft Finish Cardstock that measures 5 3/4" x 9", score at 4 1/2". Adhere the cardfront to the cardbase.


Here are a couple of closeup photos of the finished card.


And here's the finished Happy Holidays Card.


Elizabeth Craft Designs Supplies Used:


Other Supplies Used:

- Ranger Ink: Jet Black and Potting Soil Archival Ink
- Tim Holtz for Ranger Ink: Distress Ink- Ground Espresso and Blending tool with Foam
- Tombow: Markers - 977, 969, 025, 249, 847, 443 and 476
- Imagine Crafts: VersaMark
- Misc: Watercolour Cardstock

Thanks for stopping by and checking out my card. I hope that I've inspired you to recreate my Happy Holidays Card at home.

- Katelyn 


Tuesday, September 18, 2018

Classic Christmas - September Designer Challenge

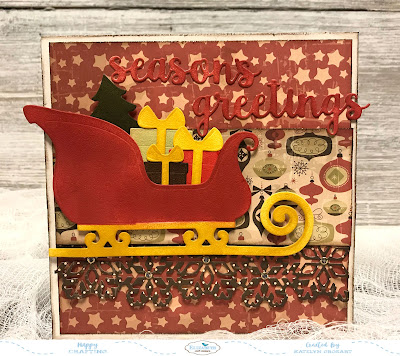
It's time for a new Designer Challenge on the Elizabeth Craft Designs Blog today.  For September's challenge it's all about Classic Christmas. The inspiration for my project came from Joset Designs new Santa's Sleigh and Snowflake Border. With those two dies in hand, I also added a few other dies from Joset Designs and paper from ModaScrap to create my Season's Greetings card. Grab your favourite holiday beverage and read below as I have a tutorial for you so that you can re-create my card at home. You'll also want to read all the way down to the bottom of the post as there's some information on how to get in on the fabulous giveaway from Elizabeth Craft Designs.


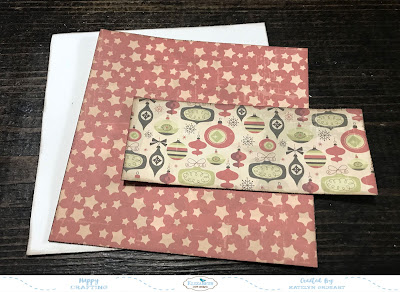
To start,  choose two pieces of patterned paper from the ModaScrap Xmas Vintage Collection Paper Pack. From the first piece of patterned paper, cut a piece that measures 5 1/4" x 5 1/4" and cut a second piece that measures 5" x 5". The 5 1/4" piece will be flipped over and you'll use the plain side. From the second piece of patterned paper, cut a piece that measures 2" x 5". Distress the edges of all three patterned paper pieces. Ink the edges of all three pieces using Ground Espresso Distress Ink and a blending tool with foam.


With the ModaScrap Xmas Vintage Collection Paper Pack still out, choose a third piece of patterned paper. From that paper, cut a piece that measures 3" x 5". Place the Snowflake Border at the bottom of the patterned paper piece and die cut. Pick out the die cut pieces from the snowflakes. Distress the edges of the patterned paper piece. Ink the edges of the patterned paper piece using Ground Espresso Distress Ink and a blending tool with foam.


From the Words 5 - Winter Wishes, die cut the Season's Greetings out of White Soft Finish Cardstock. Using a blending tool with foam, blend Candied Apple Distress Ink over the entire surface of both words.


The next step is to die cut all the pieces from Santa's Sleigh out of White Soft Finish Cardstock.

Place a couple of Post It Notes on the top portion of the sleigh. Use a blending tool with foam to blend Fossilized Amber Distress Ink along the bottom portion of the sleigh. Remove the sticky notes and place them at the bottom portion of the sleigh. Use a blending tool with foam to blend Fired Brick Distress Ink along the top portion of the sleigh. Remove the sticky notes.


Use a blending tool with foam to blend Forest Moss Distress Ink over the entire surface of the Christmas tree.


Use a blending tool with foam to blend Fossilized Amber Distress Ink over the entire surface of each of the bows for the presents.


On the large present, use a blending tool with foam to blend Shabby Shutters Distress Ink over the entire surface. On the medium present, use a blending tool with foam to blend Candied Apple Distress Ink over the entire surface. On the small present, use a blending tool with foam to blend Ground Espresso Distress Ink over the entire surface.


Now it's time for assembly. Adhere the 5" patterned paper piece to the 5 1/4" paper piece. Adhere the snowflake border to the 2" patterned paper piece. Adhere the 2" patterned paper piece 1 1/2" from the top of the 5 1/4" paper.


Adhere the bows to each of the presents. Adhere the tree and presents to the inside of the sleigh.


Foam square the sleigh 1" from the top and all the way to the left hand side of the 5 1/4" paper piece.


Adhere the Season's Greetings sentiment to the top right portion of the card.


Cut a cardbase out of White Soft Finish Cardstock that measures 5 1/4" x 10 1/2", score at 5 1/4". Adhere the cardfront to the cardbase. To finish off your card, add transp. glitter/gold dots to the centers of the snowflakes.


Here are a few closeup shots of the card.


And here's the finished Season's Greetings Card.


*******************

For today's challenge Elizabeth Craft Designs are giving away a $20 Gift Card to use on our website to 3 winners

To enter simply leave a comment on the Elizabeth Craft Designs Facebook Giveaway Blog Post or the Elizabeth Craft Designs Challenge post and tell us What Elizabeth Craft Designs die or stamp set would you select if making a Christmas card.

We will select 3 lucky winners in a random drawing 

The winners will be announced on Friday, September.21st on the Elizabeth Craft Designs Blog and our Facebook page.


*****************

Elizabeth Craft Designs Products Used:


Other Products Used:

- Tim Holtz for Ranger Ink: Distress Ink - Shabby Shutters, Forest Moss, Festive Berries, Fired Brick, Fossilized Amber & Ground Espresso and Blending Tool with Foam
- Misc: Black Gel Pen

- Katelyn