Today is the day! I finally get to spill the beans, that Elizabeth Craft Designs is launching a new line of planner dies. I'm thrilled to be able to design with this new collection. Within the collection, there is ten stamps and ten dies which allow you create your own beautiful planner pages. So today, I'm going to share with you a planner spread for the last week in October/beginning of November.
Here's the left hand side of the planner page.
For the left side of the page, I used the Planner Essentials - 4 die to create the base of the page as well as ModaScrap's Magic Mountain Paper Pack. Along with the banner die, squares, arrow and today word which came from the Planner Essentials - 1, Planner Essentials - 2 and Planner Pocket - 1 dies as well as the rectangle stamp from Schedule stamp set, it allowed me to add journaling spots on my page. For the days and word stamps, they came from the Calendar and Months stamp sets, which were stamped using Potting Soil Archival Ink. Before adhering down my squares and other elements, I inked the edges using Vintage Photo Distress Ink and a blending tool with foam. To finish the page, I stamped stitching from the Schedule stamp set along the top and bottom of the page using Jet Black Archival Ink.
Here's the right hand side of the planner page.
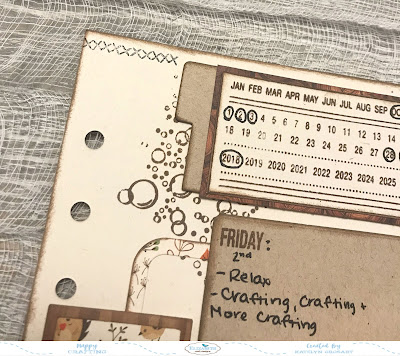
For the right hand side of the planner page, I featured the Planner Essentials - 1 die to create the base of the page as well as the backside of one of the patterned papers from ModaScrap's Magic Mountain Paper Pack. Along with the banner die, squares, tabs and tags from the Planner Essentials - 3, Planner Essentials - 1 and Planner Essentials - 4 dies as well as the To Do stamp and calendar stamp from Calendar and Reminders stamp sets, they were perfect for adding journaling spots on my page. For the days and word stamps, which came from the Calendar and Months stamp sets, I stamped them on the squares using Potting Soil Archival Ink.
To add some extra interest in behind the squares and rectangles, I randomly stamped the bubbles stamp from the Patterns 2 stamp set using Vintage Photo Distress Ink. Before adhering down my squares and other elements, I inked the edges using Vintage Photo Distress Ink and a blending tool with foam. I finished the page by stamping stitching from the Schedule stamp set along the top, bottom and side of the page using Jet Black Archival Ink.
Elizabeth Craft Designs Supplies Used:
- Calendar
- Months
- Schedule
- ModaScrap: Magic Mountain Paper Pack
Other Supplies Used:
- Ranger Ink: Potting Soil Archival Ink and Jet Black Archival Ink
- Tim Holtz for Ranger Ink: Vintage Photo Distress Ink and Blending Tool with Foam
Stay tuned as I share some more planner pages with you over the next few weeks.
- Katelyn


Oh, Katelyn, I'm a little late to the party, but I am SO glad I found your blog. You have wonderful layouts and fantastic ideas and I plan to spend this entire quarantine period (however long it takes!) to read and digest every single planner post you have. THANK YOU so much for your awesome inspiration. Stay safe.
ReplyDeleteThanks Ann! Enjoy all of the inspiration and happy creating!
DeleteKatelyn