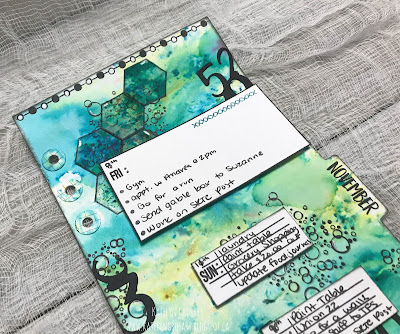
Happy Thursday! I'm excited to be sharing another planner spread with you. I've been playing with the different stamps and dies in the planner collection from Elizabeth Craft Designs to create week 2 of November. You'll want to read below as I have a tutorial for you on how to recreate week 2 of November.
To start, die cut the left planner page from the Planner Essentials 4 die out of White Soft Finish Cardstock. Die cut the right planner page from the Planner Essentials 3 die out of White Soft Finish Cardstock. Apply some patterned washi tape onto a piece of White Soft Finish Cardstock. Die cut the reinforcement circles from the Planner Essentials 1 die twice. Adhere the reinforcement circles over the holes on each planner page.
Sprinkle Spring Green, Aquamarine and Chartreuse Magenta Nuance randomly onto each page. Spritz with water. You can either dry it with a heat tool or let the pages dry on their own.
Apply Jet Black Archival Ink to the November stamp from the Months stamp and stamp onto the tab on the right hand side planner page. Apply Jet Black Archival Ink to the bubbles stamp from the Patterns 2 stamp and start stamping randomly on the right hand side page. Repeat the previous step three more times on the right planner page and three times on the left planner page. From the schedule stamp set, you'll need the dot border. Apply Jet Black Archival Ink to the dot border and stamp at the top, part of the bottom and part of the right side of the left planner page. Apply Jet Black Archival Ink to the dot border stamp and stamp the top and part of the bottom right planner page. Add white markings to some of the bubbles. Colour in the dot border using white and black ink. Ink the edges of each planner page using Black Soot Distress Oxide Ink and a blending tool with foam.
From a piece of black cardstock, die cut the numbers from the Planner Patterns die twice. Cut the numbers into five parts.
Apply Jet Black Archival Ink to the rectangle stamp from the Schedule stamp set and stamp onto a piece of White Soft Finish Cardstock. Repeat the previous step two more times. Fussy cut all three rectangles out. From the Calendar stamp set, apply Jet Black Archival Ink to the Mon stamp and stamp onto one of the rectangles. Apply Jet Black Archival Ink to the Fri stamp and stamp onto a second rectangle. Apply Emerald City Ink to the Thu stamp and stamp onto the last rectangle. Number the days and add dots just after the weekdays. Ink the edges of all three rectangles using Black Soot Distress Oxide Ink and a blending tool with foam.
From the Reminders stamp set, you'll need the lined stamp. Apply Jet Black Archival Ink to the lined stamp and stamp onto a piece of White Soft Finish Cardstock. Repeat the previous step three more times onto a piece of White Soft Finish Cardstock. Cut the lined pieces to 3/4" x 2". From the Calendar stamp set, apply Jet Black Archival Ink to the Wed stamp and stamp onto one of the lined rectangles. Apply Jet Black Archival Ink to the Sun stamp and stamp onto the second lined rectangles. Apply Emerald City Ink to the Tue stamp and stamp onto the third lined rectangles. Apply Emerald City Ink to the Sat stamp and stamp onto the fourth lined rectangles. Number the days and add dots just after the weekdays. Ink the edges of all four of the lined rectangles using Black Soot Distress Oxide Ink and a blending tool with foam.
Tear a piece of Collage Paper - Plain off the roll. Sprinkle Aquamarine and Chartreuse Magenta Nuance over the piece of collage paper. Spritz the paper with water. Dry the paper with a heat tool. Apply Jet Black Staz On to the Hexagon stamp from the Months stamp set and stamp onto the piece of paper. Repeat the previous step seventeen more times. Fussy cut the hexagons out. Ink the edges of all of the hexagons using Black Soot Distress Oxide Ink.
Adhere two of the numbers randomly on the left planner page. Adhere the other three numbers randomly on the right planner page.
On the left planner page, adhere three hexagons together in the bottom left hand side and adhere seven hexagons together in the top right side of the page. On the right planner page, adhere three hexagons together in the bottom left hand side and adhere five hexagons together in to top left side of the page.
On the left planner page, foam square the Monday and Thursday rectangle as well as the Tuesday and Wednesday lined rectangles. On the right planner page, foam square the Friday rectangle as well as the Saturday & Sunday lined rectangles.
Here's some closeup photos of the left planner page.
Here are a few closeup photos of the right side of the planner page.
Here are the finished planner pages.
Elizabeth Craft Designs Supplies Used:
- Calendar
- Months
- Schedule
Other Supplies Used:
- Ranger Ink: Jet Black Archival Ink, Mister and Fude Ball Pen - Black
- Tim Holtz for Ranger Ink: Black Soot Distress Oxide Ink and Blending Tool with Foam
- Imagine Crafts: Staz On - Emerald City and Jet Black
- Magenta: Nuance - Spring Green, Aquamarine and Chartreuse
- Tim Holtz Ideaology: Collage Paper - Plain
- Jane Davenport: Journal Tape Strips
- Misc: Black Cardstock, Black Gel Pen and White Gel Pen
Stay tuned as I share some more planner pages with you over the next few weeks.
- Katelyn


No comments:
Post a Comment