Showing posts with label Tim Holtz/Ideaology. Show all posts

Tuesday, June 27, 2023

Father's Day Card Set

  Happy Tuesday!

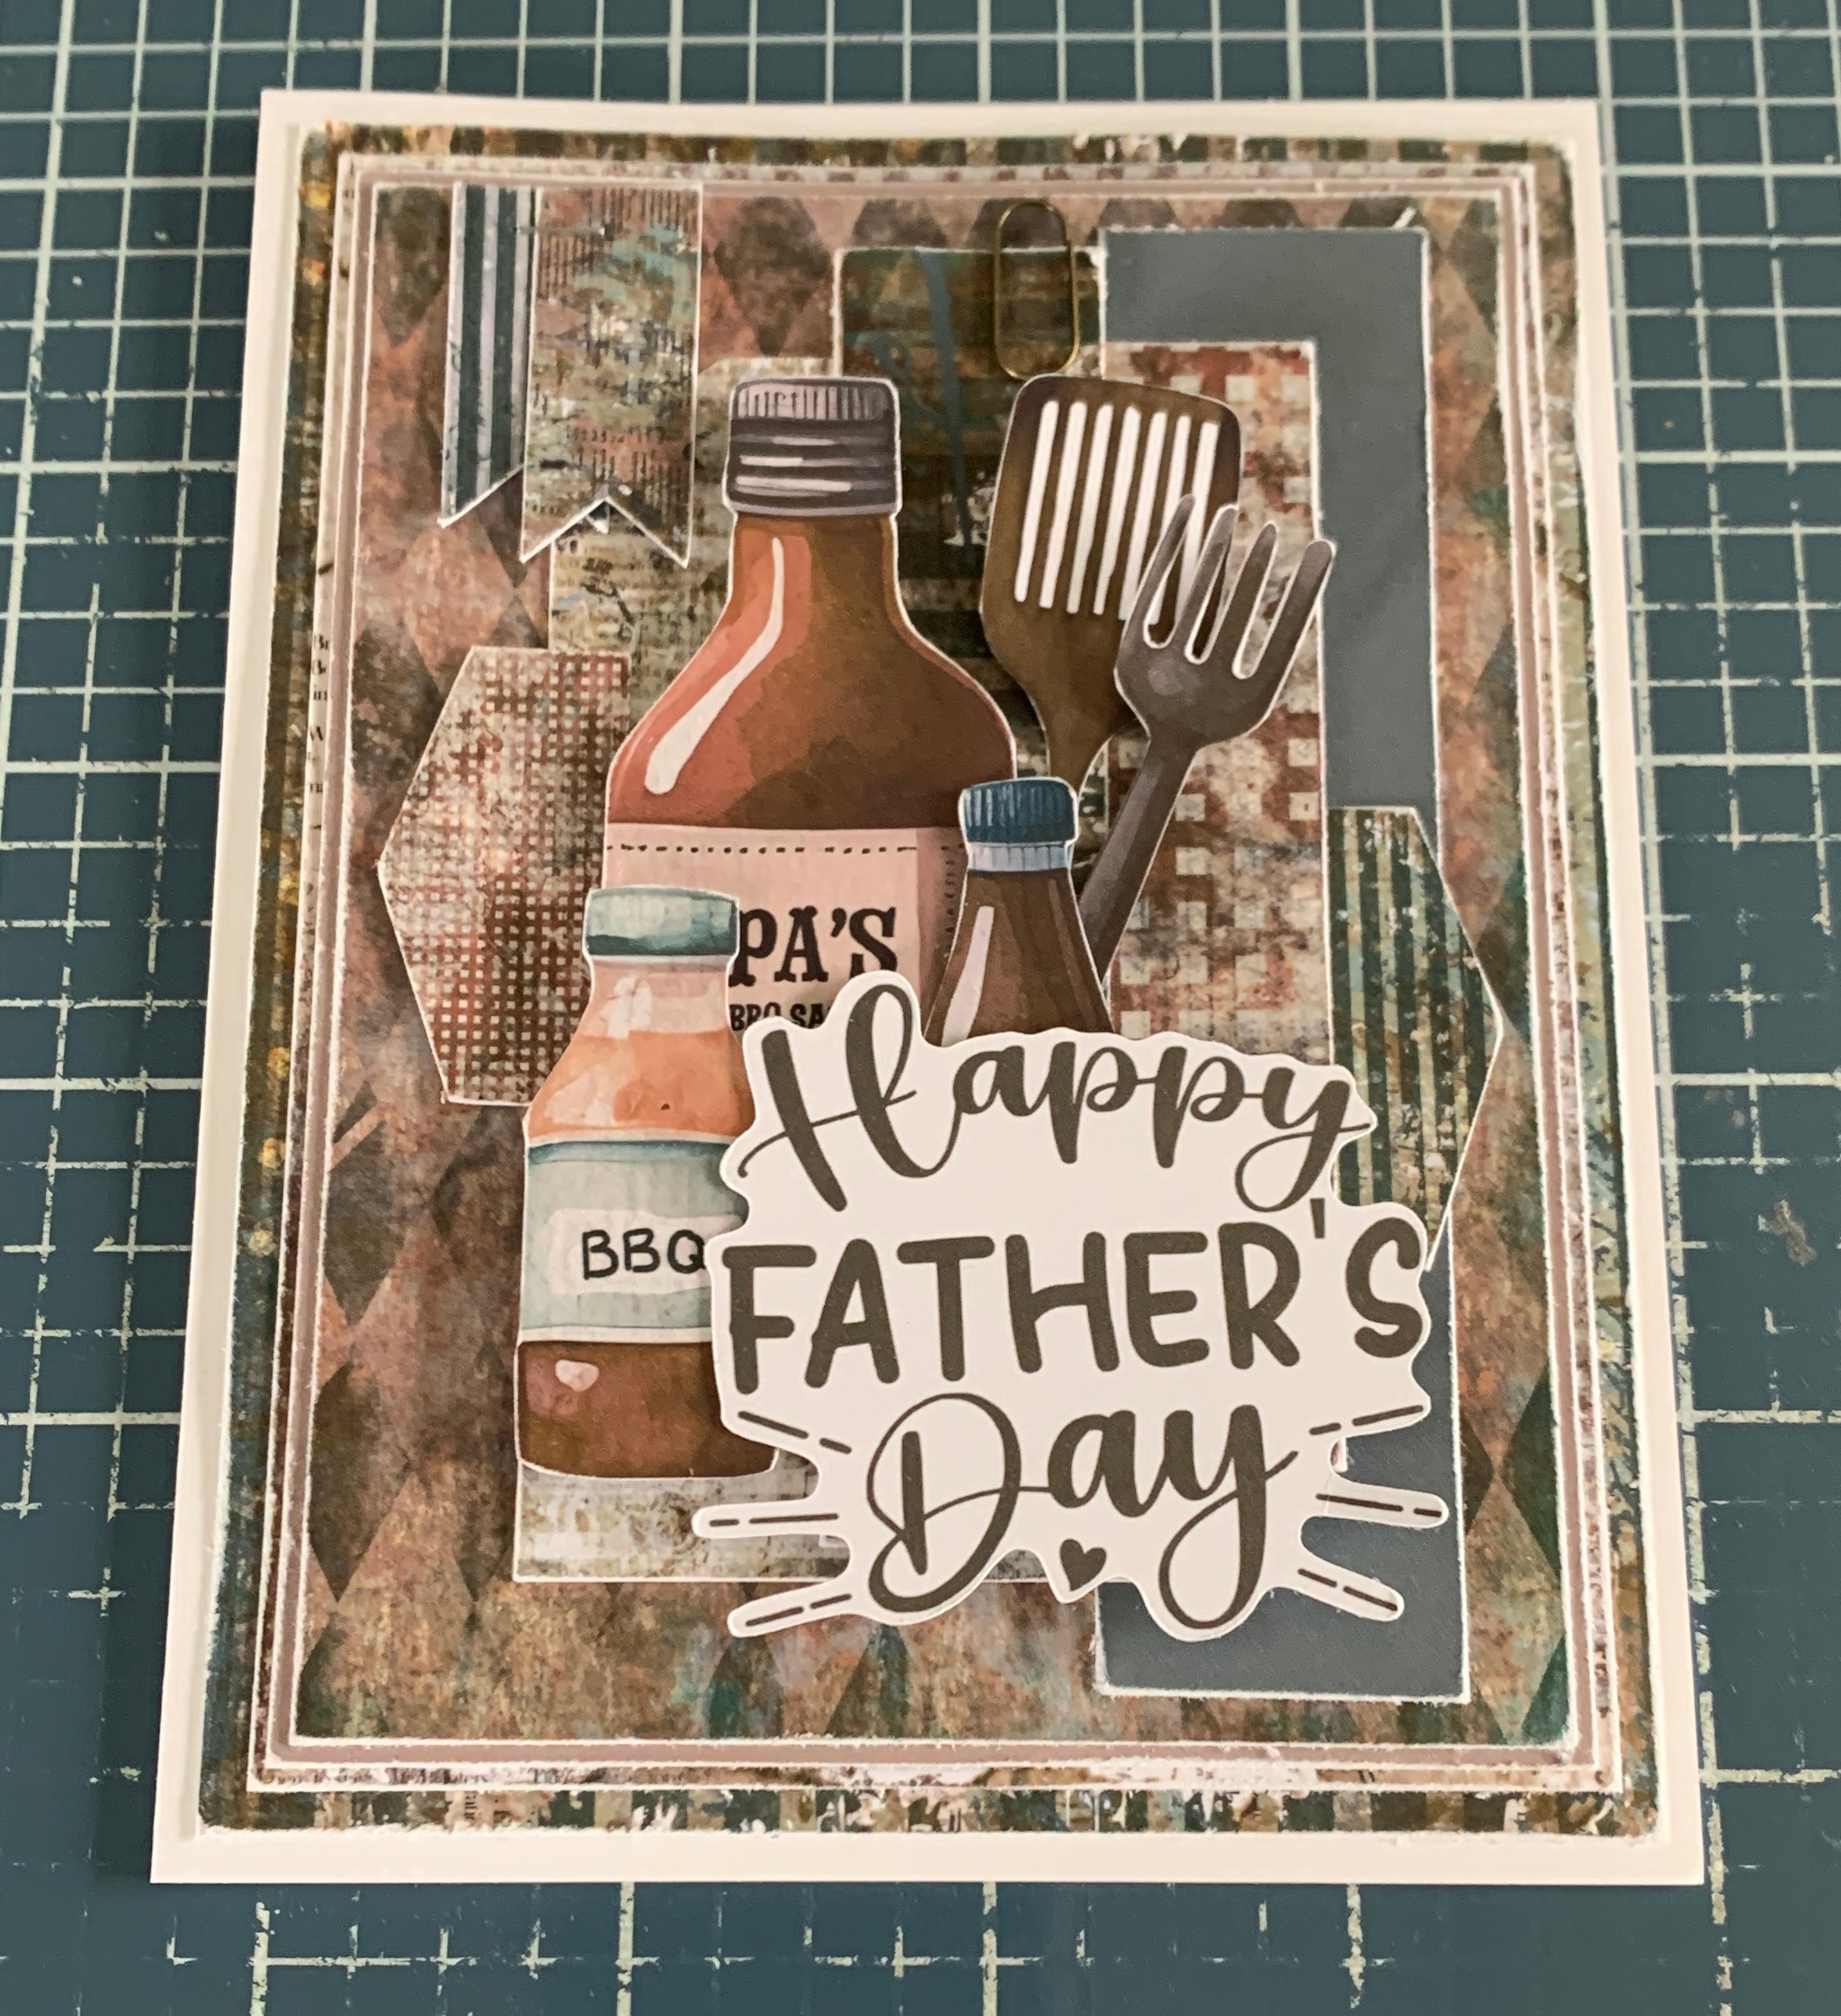
Now that Father's Day has passed, yes I know that I'm a week late in sharing these, I'm sharing these awesome Father's Day Cards. The cards feature the Dad The Man The Myth The Legend Collection from Simply Stated Design.


To start, we will create the Happy Father's Day Card.


Out of the Dad The Man The Myth The Legend 12x12 Paper Pack, you'll need the brown diamond, red gingham and dark blue striped paper. Cut the dark blue striped paper to 4" x 5 1/4" and a second piece 3/4" x 3 1/4". Cut the red gingham paper to 3 3/4" x 5" and a second piece 1" x 3 1/2". Cut the brown diamond paper to 3 1/2" x 4 3/4". Sand the edges of all of the papers.


Out of the Dad The Man The Myth The Legend 12x12 Solids Paper Pack, you'll need the light brown and dark blue paper. Cut the dark blue paper to 1" x 4 1/2". Cut the light brown paper to 3 5/8" x 4 7/8". Sand the edges of all of the papers.


Out of the Dad The Man The Myth The Legend Essentials Ephemera, you'll need the white striped tag, two pennant banners, two banners and the Happy Father's Day sentiment. Sand the edges of all of the ephemera pieces.


Out of the Dad The Man The Myth The Legend BBQ Accessories Ephemera, you'll need the three bottles, and a couple of bbq tools. Fussy cut the images out. Sand the edges of all of the ephemera pieces.


Adhere the large red gingham paper to the large dark blue striped paper. Adhere the light brown paper to the red gingham paper. Adhere the brown diamond paper to the light brown paper.


Adhere the blue strip 1/4" from the right and 1 1/8" from the top of the brown diamond paper. Adhere the white striped tag 1/2" from the left and 3/4" from the top of the brown diamond paper. Adhere the red gingham banner to the left side of the white striped tag as desired. Adhere the striped banner to the right of the red gingham paper as desired. Adhere the red gingham paper 1/2" from the right and 1 1/2" from the top of the brown diamond paper. Adhere the blue striped paper 1 1/4" from the right and 1 1/4" from the top of the brown diamond paper. 


Staple the two pennants to the top left side of the cardfront as desired. Use adhesive and foam squares to adhere the bottles and tools in the middle of the card as desired. Use adhesive and foam squares to adhere the sentiment to the right of the bottles as desired. 


Add a metal paper clip to the top of the blue striped paper as desired. To finish the card, cut a cardbase out of white cardstock that measures 4 1/4" x 11", score at 5 1/2". Adhere the cardfront to the cardbase.

Now we'll move on to Dad the Man Card.


Out of the Dad The Man The Myth The Legend 12x12 Paper Pack, you'll need the dark grunge, red gingham and white striped paper. Cut the dark grunge paper to 4" x 5 1/4" and a second piece 3/4" x 4". Cut the red gingham paper to 3 1/2" x 4 3/4". Cut the white striped paper to 3 3/4" x 5" and a second piece that measures 1" x 3 1/4". Sand the edges of all of the papers.


Out of the Dad The Man The Myth The Legend 12x12 Solids Paper Pack, you'll need the light brown and dark blue paper. Cut the dark blue paper to 3 5/8" x 4 7/8" and a second piece that measures 1" x 4 1/2". Cut the light brown paper to 3 7/8" x 5 1/8". Sand the edges of all of the papers.


Out of the Dad The Man The Myth The Legend Essentials Ephemera, you'll need the white striped tab, blue striped circle, red gingham rectangle, one banner and the Happy Father's Day sentiment. Sand the edges of all of the ephemera pieces.


Out of the Dad The Man The Myth The Legend Fishing Accessories Ephemera, you'll need the backpack, worms can and a jar. Fussy cut the images out. Sand the edges of all of the ephemera pieces.


Adhere the light brown paper to the dark grunge paper. Adhere the white striped paper to the light brown paper. Adhere the large blue paper to the white striped paper. Adhere the red gingham paper to the large blue paper.


Adhere the blue strip 3/8" from the right and 1/8" from the top of the red gingham paper. Adhere the white striped tab to the right of the white striped paper. Adhere the white striped paper 1 3/8" from the right and 1/2" from the top of the red gingham paper. Adhere the blue striped paper 5/8" from the left and 1/2" from the top of the red gingham paper.  


Staple the banner to the top right corner of the cardfront. Adhere the circle and rectangle to the bottom right side of the cardfront as desired. 


Use adhesive and foam squares to layer and adhere the backpack, jar and worm can as desired. Use adhesive and foam squares to adhere the sentiment to the right of the embellishments as desired. 


Add a metal paper clip to the top of the striped circle as desired. To finish the card, cut a cardbase out of white cardstock that measures 4 1/4" x 11", score at 5 1/2". Adhere the cardfront to the cardbase.


Here are a few closeup photos of the finished cards.


Here are the finished Father's Day Cards.


Supplies Used:

- Simply Stated Design: Dad The Man The Myth The Legend 12x12 Paper Pack, Dad The Man The Myth The Legend 12x12 Solid Paper Pack, Dad The Man The Myth The Legend BBQ Accessories Ephemera, Dad The Man The Myth The Legend Fishing Accessories Ephemera and Dad The Man The Myth The Legend Essentials Ephemera
- Tim Holtz/Ideaology: Paperclips
- Misc: White Cardstock

I hope that my Father's Day Cards have inspired you to recreate your own at home!

- Katelyn


Friday, November 17, 2017

Scrap Shotz November Kit Projects Part 2

Hey Friday!! 

Today, I'm sharing a couple more projects featuring Scrap Shotz's November Kit which features the beautiful  Prima Marketing "Amber Moon" collection. I hope that my projects will inspire you to want to recreate them at home.


Make sure to pop by Scrap Shotz's Blog so that you can see the rest of my projects using the November Kit as well as a tutorial for one of the projects.

- Katelyn

Friday, June 10, 2016

Masculine Happy Birthday Card

 I'm back on the Southern Ridge Trading blog today to share with you some inspiration for our current monthly challenge which is "Anything Masculine". 


Head over here to read all about how I created this grungy masculine happy birthday card.

-Katelyn

Thursday, May 5, 2016

It's all about Babies, Buttons, Brads & Buckles on the Emerald Creek Dares Blog

It's all about Babies, Buttons, Brads & Buckles on the Emerald Creek Dares blog for this weeks two week challenge. For this challenge I wanted to focus on the babies, buttons, and brads part as there seems to be a lot of babies born in the spring. So, for my project I decided that I would create a baby girl clipboard, which works easily as a home decor piece. Make sure to read through the entire post as there is a surprise at the bottom. Lets get started on how you can create my Baby Girl clipboard at home.


To start, you will need to unscrew the top off so that you can gesso the clipboard base. Once the top of the clipboard is off, cover the edges of the clipboard surface with a layer of gesso. After the gesso dries, apply 3 coats of Antique Linen Distress Paint. Because Distress paint is opaque, the more coats you apply the less of the gesso you will see.


After your finished painting you clipboard base, it's time to move on to painting the clipboard piece.  Apply a layer of Antique Linen Distress paint over the entire top of the clipboard and let it almost completely dry. While it is slightly wet, take a piece of paper towel with a bit of hand sanitizer on it and rub off some of the paint. This gives it a slightly distressed look.


While your still working with the Antique Linen Distress Paint, you will want to cover the top of 4 Flower Wheel Brads with the Antique Linen Distress Paint. And then repeat the same steps as you did with the top of the clipboard. This is the last item that needs the Antique Linen Distress paint.


To add some interest to your patterned paper, take a heart stencil and apply texture paste to give it a 3D look at the top left and bottom right hand corners. Once the texture paste is dry, with a blending tool apply a layer of Antique Linen Distress Ink over top of both heart stencil patches. This will get rid of the white from the texture paste.


For the flowers, you will want to use the Tattered Florals Die from Tim Holtz and cut out a variety of patterned flowers. You will need to cut out 4 small ones and 1 medium sized one. 


After the flowers have been cut out, take your blending tool and Antique Linen Distress Ink and ink the edges of the flowers. Once the edges have been inked, sprinkle Iridescent Embossing Powder on the edges and emboss with your heat tool.


Some finishing touches that you will want to add to you clipboard is some cream tulle underneath the banner strip. Once the tulle and the top image have been adhered then you can start working on your flowers. Place a brad through one of the small flowers and then adhere it to the top left hand corner. Adhere a small flower to the middle of the medium flower and then place a brad through the centre of the small flower. Adhere the medium flower to the bottom right hand corner in the middle of the corner. For  the remaining two small flowers add the last two brads to the middle of each flower and then adhere one to the left of the medium flower and adhere the other to the right of the medium flower. To add some extra detail, take some glossy accents and apply it to the centres of the blue flowers.  To finish the clipboard off, add a cream bow to the top.


Products used from Emerald Creek:

Other Products Used:
- Ranger/Tim Holtz: Distress Paint: Antique Linen and Distress Ink: Antique Linen
- Ranger Ink:  Texture Paste and Glossy Accents
- Ranger/Dina Wakley: Palette Knife and White Gesso
- Tim Holtz/Stampers Anonymous: Heart Stencil
- Tim Holtz/Ideaology: Mini Clipboard
- Tim Holtz/Sizzix: Tattered Florals
- Graphic 45: Precious Memories: Baby's Breath, Cuddle Time, Cherish, Cutie Pie, Sugar & Spice, and Pat-a-cake
- Melissa Frances: Cream Tulle
- Hug A Bug Seam Binding Ribbon: Cream


Since I couldn't leave out the baby boys, I created a Baby Boy clipboard also. To create the clipboard, it's the same steps as the girls clipboard, the only difference is you will use Broken China Distress Paint and Ink as well as adding buttons and twines to the clipboard instead of tulle and flowers. 


Products used from Emerald Creek:

Other Products Used:
- Ranger/Tim Holtz: Distress Ink: Broken China and Distress Paint: Broken China
- Ranger Ink: Texture Paste and Glossy Accents
- Ranger Ink/Dina Wakley: Palette Knife and White Gesso
- Tim Holtz/Ideaology: Mini Clipboard
- Tim Holtz/Stampers Anonymous: Heart Stencil
- My Minds Eye: Twine and Buttons
- Graphic 45: Precious Memories: Baby's Breath, Cuddle Time, Puppy Dog's Tails and Pat-a-cake
- Hug a Bug Seam Binding Ribbon: White

Make sure that you go and check out the rest of the Emerald Creek Dares Design Team as they have all created fantastic pieces for this weeks challenge:


Thanks for stopping by and checking out my Baby Girl Clipboard. Don't forget to enter your project into our Emerald Creek Dares Challenge for your chance to win a $25.00 gift certificate for the Emerald Creek Store!


Until Next Time!
-Katelyn


Thursday, April 28, 2016

April Remix Tag - "No Journey Is"

It's almost the end of the month and I've managed to get my April "Tim Tag" done with two days to spare. This year for Tim's 12 tags, it's all about remixing past techniques and combining them together with other techniques that he has shared over the past years. This month's tag features the Faux Mosaic and Paint Resist Techniques.  This month I played with a variety of new products and some older products from Tim Holtz to create my tag. My favourite new product is the Distress Paper Mosaic Kit, it's well worth the investment. 


I  created the coloured effect on the woodgrain distress watercolour cardstock piece using Antique Linen paint . Once the paint had dried, I added Broken China, Chipped Sapphire and Brushed Pewter Distress Stains over top.  After the stains had dried, I went over the entire piece of woodgrain cardstock with my Ground Espresso Distress Ink. To finish the woodgrain cardstock piece, I used my Distress Spritzer and spritzed Black Soot and Gathered Twigs in spots on the cardstock. Once the woodgrain cardstock was dry, I wrapped a piece of linen ribbon 1 1/4" from the bottom of the tag. 


For my butterfly I used the Butterfly Duo Bigz die, one of my favourites. After I cut the butterfly out of chipboard, I went to work on creating my mosaic tile look. The paper I used for my mosaic tiles was from the Menagerie 8x8 paper pad. Once the top coat on the tiles were dry, I went over the grout with Ground Espresso Distress Ink. When I go to make another mosaic tile pattern on a die cut image, I will use plain chipboard instead of black chipboard. The black chipboard turned the grout into a purple hue.


The left side of my tag was too plain, so I pulled out my Wildflowers stamp set, and stamped a couple of images. Once the Archival ink dried, I then fussy cut around each flower image. 


 I wanted to add the arrow and a saying to the top right of my tag. So I took a strand of paper string from Tim Holtz's Ideaology line and put it through my "dream" token and wrapped the string around the middle of the arrow, once it was wrapped around enough, I knotted the string at the top of the middle of the arrow.  I also wanted to customize my ribbon, so I used crinkle ribbon and sprayed it using Pumice Stone, Black Soot and Tumbled Glass Distress Spray Stain.


The finishing touch to my tag was adding the saying in the bottom right hand side. My saying came from small talk and I just cut it apart to fit in the bottom right hand corner. 


Products Used: 
-Ranger/Tim Holtz: Black Soot Distress Spray Stain, Pumice Stone Distress Spray Stain, Tumbled Glass Distress Spray Stain, Broken China Distress Stain, Chipped Sapphire Distress Stain, Brushed Pewter Distress Stain, Ground Espresso Distress Ink, Antique Linen Distress Paint, Black Soot Distress Marker, Gathered Twigs Distress Marker, Distress Woodgrain Cardstock, Distress Paper Mosaic Kit and Distress Spritzer
-Ranger Ink: Black Archival Ink and #5 Manilla Tags
-Tim Holtz/Ideaology: Paper String, Crinkle Ribbon, Linen Ribbon, Typed Tokens, Adornments - Arrows, Small Talk and Menagerie 8x8 Paper Stash
-Tim Holtz/Sizzix: Butterfly Duo Bigz Die
-Tim Holtz/Stampers Anonymous: Wildflowers Stamp


I have entered my tag here:
April Tag - Tim Holtz


Until Next Time!
-Katelyn


Thursday, April 7, 2016

Anything Goes Challenge on the Emerald Creek Dares Blog

It's time for a brand new challenge on the Emerald Creek Dares blog, featuring "Anything Goes". When we received this challenge I was excited as I could create anything I wanted. For my project I decided that I would create a grungy mixed media canvas and I will show you how I created it, so that you can make it at home. Lets get started on how you can create my grungy mixed media canvas at home.


To start my canvas, I covered my Wood Tray from Prima with Black Gesso. You will need to allow 20 minutes for the gesso to dry.


Once the gesso has dried, apply Embossing Distress Ink to the tread mark stamp and stamp onto the now black canvas. Continue applying ink and stamping until the entire canvas is covered. After the canvas has been stamped, sprinkle Onyx Frost Embossing Powder overtop of the entire canvas. Tap off excess powder and emboss with heat tool.


After the tread marks are embossed, spritz the entire top of the canvas with Black Soot, Picket Fence, Pumice Stone and Perfect Pearls Mist. Allow at least 45 minutes for the canvas to dry.


After the spray has dried, I applied Embossing Distress Ink to the four corners. Once the ink is applied to the corners, sprinkle Hammered Metal Embossing Powder to the corners and then emboss with your heat tool.


After the corners are embossed, apply Mushroom and Gold Adirondack ink lightly over top of the embossed corners. Allow 10 minutes to thoroughly dry.


The next layer for the canvas is the faux metal embossed panel. To create this piece, cut a 4 1/4" x 5 1/2" piece of 100lb white cardstock and apply a Foil Tape sheet to the cardstock. Using the Riveted Metal Embossing folder, run it through your big shot. Once the foil is embossed, paint on black gesso over the entire embossed surface. Before the gesso completely dries, take some hand sanitizer on a piece of paper towel and remove the gesso from the foil. You will end up with some gesso on the lines of the embossed piece. Once the gesso completely dries, apply Mushroom Adirondack Alcohol Ink to the entire embossed image. Allow 10 minutes for the alcohol ink to fully dry.


The final piece that needed to cover was my barbed wire circle frame from Southern Ridge Trading Company and applied a layer of Black Soot Distress Ink overtop of the entire piece. Once the ink was applied, I covered the entire barbed wire circle with Hammered Metal Embossing Powder and tapped off the excess. After the extra embossing powder is removed, emboss with a heat tool.


After the barbed wire circle frame was embossed, I applied Mushroom and Gold Adirondack Alcohol Ink randomly on the frame. Allow 10 minutes for the alcohol ink to fully dry.


Some of the finishing touches on my grungy mixed media canvas was adding the picture in the middle of the frame. Along with adding three gears to the top left hand corner, the Industrial Edision lightbulb in the bottom right hand corner and then the Believe Buckle Connector word in the bottom middle of the canvas. To finish the believe word, I added linen ribbon that I tinted with vintage photo and then put the ribbon through the charm having it span the entire length of the canvas. 


Products used from Emerald Creek:

Other Products Used:
- Southern Ridge Trading Company: Barbed Wire Circle Frame - Large
- Ranger/Tim Holtz: Adirondack Alcohol Ink: Gold & Mushroom,  Distress Ink: Black Soot, Vintage Photo & Embossing Ink, and Distress Spray Stain: Picket Fence, Black Soot & Pumice Stone
- Ranger Ink: Foil Tape Sheets & Perfect Pearls Mists: Perfect Pearls
- Ranger/Dina Wakley: Paint Brush & Black Gesso
- Tim Holtz/Stampers Anonymous: Mixed Media 2 stamp
- Tim Holtz/Sizzix: Diamond Plate & Riveted Metal Set - Embossing Folders
- Tim Holtz/Ideaology: Found Relatives, Mini Gears & Linen Ribbon
- Prima Marketing: Wood Tray

Make sure that you go and check out the rest of the Emerald Creek Dares Design Team as they have all created fantastic pieces for this weeks challenge:


Thanks for stopping by and checking out my grungy mixed media canvas. Don't forget to enter your project into our Emerald Creek Dares Challenge for your chance to win a $25.00 gift certificate for the Emerald Creek Store!


Until Next Time!
-Katelyn