Wednesday, November 18, 2020

Beauty Junk Journal Page

 Happy Wednesday!

For today's post, I've created this Beauty Junk Journal Page perfect to add to your junk journal. To create the page, I've used stamps, dies and stencils from the Art Journal Specials Collection. You'll want to read below as I have a full tutorial on how to recreate my junk journal page at home. 


To start, you'll need to die cut the page from the Summer Journal Special out of a piece of kraft cardstock. Ink the edges of the page using Walnut Stain Distress Ink and a blending tool with foam.


Choose a piece of patterned paper out of the Worn Wood Paper Pack. Die cut the page from the Summer Journal Special out of the patterned paper. Cut the tabs off of each side of the page. Place the hexagon portion of the Make Your Mark Stencil on the left hand side of the right side of the page. Using a palette knife, put Texture Paste Opaque Matte through the stencil. Remove the stencil. Once the texture paste has dried, ink the edges of the page using Walnut Stain Distress Ink and a blending tool with foam.


Choose a piece of patterned paper out of the Worn Wood Paper Pack. Die cut the single bud from the Budding Florals die. Ink the edges of the bud using Walnut Stain Distress Ink and a blending tool with foam.


From the Decorative Insert, die cut the large hexagon out of a piece of kraft cardstock. Ink the edges of the hexagon using Walnut Stain Distress Ink and a blending tool with foam.


Die cut the street lamp out of a piece of black cardstock.


Die cut one of the Blooming Branches from the Blooming Branches Die out of a piece of book page. Choose another piece of patterned paper out of the Worn Wood Paper Pack. Die cut the other blooming branch out of the patterned paper piece.


Apply Emboss It Ink to the Beauty stamp from the Journal Words Stamp Set and stamp onto a piece of black cardstock. Sprinkle Glacier White Embossing Powder over the stamped word. Tap off the excess powder and emboss with a heat tool. Once the word has cooled, fussy cut it out.


Staple the hexagon to the left hand side of the right side of the page.


Adhere the two blooming branches as desired to the left hand side of the hexagon.


Staple the streetlamp and the bud 2 1/2" from the right of the page as desired. Trim the bud as needed. Foam square the beauty word to the right of the bud.


Place adhesive on the top and bottom of the patterned paper page and adhere to the kraft cardstock page.


To finish your page, slide it into your junk journal.


Here are a few closeup photos of the finished junk journal page.


Here is the finished Beauty Junk Journal Page.


Elizabeth Craft Designs Supplies Used:
Other Supplies Used:

- Tim Holtz for Ranger Ink: Distress Ink - Walnut Stain and Blending Tool with Foam
- Ranger Ink: Emboss It Ink and Texture Paste Opaque Matte
- Emerald Creek Craft Supplies: Glacier White Embossing Powder
- Misc: Mini Stapler, Black Cardstock, Kraft Cardstock and Book Page

I hope that my junk journal page has inspired you to recreate your own version at home.

- Katelyn


Tuesday, November 17, 2020

Merry Christmas Card

    Happy Tuesday!

I'm up on the Quietfire Design blog today, where I'm sharing my Merry Christmas Card. My card features a variety of A Way With Words Dies, Quietfire Design Stamps and Modern Gilding Powders. 


For a full tutorial on my card, you'll want to head over to Quietfire Design blog for all the details. 

- Katelyn


Sunday, November 15, 2020

Elizabeth Craft Designs November Group Post - Christmas Projects

Happy Sunday!

For November's Group Post it's all about Christmas Projects. For this month's group post, I'm sharing this pretty Rejoice Christmas Wreath which is the perfect for adding to your Christmas tree or decorating an area of your home. To create my wreath, I've used dies from Suzanne Cannon's A Way With Words Collection and Els van de Burgt Studio. Grab a cup of your favourite beverage and read below as I have a tutorial for you so that you can re-create my Rejoice Christmas Wreath at home. You'll also want to make sure to stop by the Elizabeth Craft Designs Blog to check out the rest of the projects.  


Die cut a 3" fitted circle out of a piece of White Soft Finish Cardstock. Place the 2 1/2" fitted circle in the middle of the 3" fitted circle and die cut the circle out. Remove the 2 1/2" circle from the 3" circle. You'll just need the 3" ring that is left.


The next four steps use the Create a Wreath Die. 

Die cut the bow die from a piece of red cardstock.


Die cut the berry stems five times out of a piece of copper foil.


Die cut the leaf branch eight times out of a piece of Olive Twist Soft Finish Cardstock.


Die cut the leaf branch ten times out of a piece of dark green cardstock.


From the Rejoice die, die cut the Rejoice word out of a piece of silver foil paper.


Adhere the leaf branches as desired around the 3" circle. 


With the leaf branches adhered, adhere the copper berry branches as desired in amongst the green leaves.


Adhere the red bow at the top of the wreath. Adhere the Rejoice word to the middle of the wreath as desired.


To finish the wreath, add a piece of twine at the top creating a loop.


Here are a few closeup photos of the finished wreath.


Here is the finished Rejoice Christmas Wreath.


Elizabeth Craft Designs Supplies Used:

- Create a Wreath

Other Supplies Used:

- Misc: Red Cardstock, Dark Green Cardstock, Silver Foil Paper, Copper Foil Paper and Twine

Thanks so much for joining me today and I hope that I have inspired you to recreate your own version of my Rejoice Christmas Wreath.

- Katelyn


Saturday, November 14, 2020

Happy Birthday Card

     Happy Saturday!

I'm back with another flower project. Today's project is a Happy Birthday Card which features a variety of dies from the Paper Flower Collection, Joset Designs and Els van de Burgt Studio. You'll want to read below as I have a full tutorial on how to recreate my card at home.


To start, choose a piece of paper out of the Worn Wood Paper Pack. Die cut a 4" Stitched Rectangle out of the patterned paper. Distress the edges of the rectangle. Ink the edges of the rectangle using Black Soot Distress Ink and a blending tool with foam.


Die cut a 3" Stitched Oval out of a piece of kraft cardstock. Die cut a 2 1/2" Stitched Oval out of White Soft Finish Cardstock. Distress the edges of both ovals. Ink the edges of both ovals using Black Soot Distress Ink and a blending tool with foam.


Die cut the Elegant Ornament out of a piece of copper foil. Cut the ornament into two pieces. 


From the Words 1 - Celebration die, die cut the words Happy Birthday out of black cardstock.


The next three steps use the Florals 1 die.

Die cut the large leaf three times out of Olive Twist Soft Finish Cardstock. Die cut the small leaf four times out of Olive Twist Soft Finish Cardstock. Ink the edges of all the leaves using Black Soot Distress Ink and a blending tool with foam.


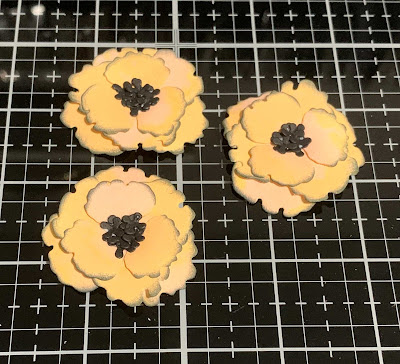
Die cut the large, medium and small flowers three times out of White Soft Finish Cardstock. Using a blending tool with foam, blend Dried Marigold Distress Oxide Ink over the entire surface of the nine flowers. Spritz the flowers. Once the flowers have dried, ink the edges of the flowers and leaves using Black Soot Distress Ink and a blending tool with foam.


Die cut the centres of the flowers three times out of black cardstock.


Adhere the 2 1/2" oval to the 3" oval. Foam square the 3" oval to the middle of the 4" square.


Adhere the elegant ornament pieces to the right hand side of the ovals.


Shape and adhere the poppies together.


Shape the leaves as desired. Adhere the leaves as desired on the right hand side of the ovals.


Foam square the three flowers over top of where the leaves meet on the oval.


Adhere the Happy Birthday words to the left of the flowers on the oval. To finish the card, cut a cardbase out of White Soft Finish Cardstock that measures 5 1/4" x 8", score at 4". Adhere the cardfront to the cardbase.


Here are a few closeup photos of the finished card.


Here is the finished Happy Birthday Card.


Elizabeth Craft Designs Supplies Used:


Other Supplies Used:

- Tim Holtz for Ranger Ink: Distress Ink - Black Soot, Distress Oxide Ink - Dried Marigold and Blending Tool with Foam
- Misc: Black Cardstock, Kraft Cardstock and Copper Foil

I hope that my card has inspired you to recreate your own version of my Happy Birthday Card.

- Katelyn