Tuesday, February 27, 2018

Happy Birthday Tag

I'm back on Southern Ridge Trading Company's blog sharing with you my Spring inspired Happy Birthday Tag today. This tag features a variety of the spring chipboard. I hope that my Happy Birthday Tag will inspire you to want to recreate it at home.


You'll want to stop by Southern Ridge Trading Company's Blog so that you can learn how I created my Happy Birthday Tag.

- Katelyn

Monday, February 26, 2018

Find Your Wild ATC's

I have one more project to share with you today.

I'm sharing my last project of the month over on Wild Whisper's blog today. For this weeks project, I've been playing with their More Adventures Collection to create a set of Find Your Wild ATC's.  


For all the details and a full tutorial on my Find Your Wild ATC's, you'll want to stop by the Wild Whisper blog. I will be back on the Wild Whisper blog in April sharing some more projects.

To see my Creative Scrapbooker post, head here

Thank for stopping by!
- Katelyn

Every Love Story

Happy Monday! I'm on Creative Scrapbooker Magazine's Blog today as a monthly blogger sharing my Every Love Story Home Decor Piece that features the Always & Forever Collection from Simples Stories. To complete my project, I've also used product from Southern Ridge Trading CompanyRanger Ink, and Scrapbook Adhesives by 3L


You'll want to make sure to stop by the Creative Scrapbooker Blog to read about  my Every Love Story Home Decor Piece.

- Katelyn

Sunday, February 25, 2018

Love is All you Need Card

 I was busy playing with the Flowers Lace Frame die designed by ModaScrap this weekend. I love how this card has turned out, adding the hint of gold embossing to the card finished it. Read below as I share with you how to recreate my Love is All you Need Card at home.


To start, cut a piece of patterned paper that measures 5 5/8" x 5 5/8" from the Portrait of a Lady Patterns and Solids. Ink the edges of the patterned paper using Vintage Photo Distress Ink and a blending tool with foam.


Cut another piece of patterned paper that measures 5 1/2" x 5 1/2" from the Portrait of a Lady Patterns and Solids. Ink the edges of the patterned paper using Vintage Photo Distress Ink and a blending tool with foam.


Using a scrap piece of the cream patterned paper from the Portrait of a Lady Patterns and Solids, die cut the 3/4" Stitched Fishtail Banner. Ink the edges of the banner using Vintage Photo Distress Ink and a blending tool with foam.


Cut a 6" piece of patterned paper from the Portrait of a Lady Patterns and Solids. Place the Flowers Lace Frame on the piece of patterned paper and run through your die cutting machine. Cut the Flowers Lace Frame down to 5 1/2" x 5 1/2". Ink the edges of the patterned paper using Vintage Photo Distress Ink and a blending tool with foam.


Cut a second piece patterned paper that measures 5 1/2" x 5 1/2" from the Portrait of a Lady Patterns and Solids. Place the Flower Lace Frame piece overtop of the patterned paper piece. Trace around the inside of the frame onto the 5 1/2" piece of patterned paper. Cut the inside out of the patterned paper. Ink the edges of the patterned paper using Vintage Photo Distress Ink and a blending tool with foam.


Die cut the label out of a piece of patterned paper from the Portrait of a Lady Patterns and Solids. Apply Emboss It Ink to the Love is all You need stamp and stamp in the center of the label. Sprinkle Doubloon Gold Embossing Powder over top of the word. Tap off the excess powder and emboss with a heat tool. Apply Emboss It Ink to the flower stamp and stamp in the bottom of the label. Sprinkle Doubloon Gold Embossing Powder over top of the flower. Tap off the excess powder and emboss with a heat tool. Repeat the previous three steps for the flower at the top of the label. Ink the edges of the label using Vintage Photo Distress Ink and a blending tool with foam.


Adhere the banner in the middle of the 5 1/2" patterned paper piece.


Adhere the Flower Lace Frame to the matching patterned paper piece that has the middle cut out.


Adhere the Flower Lace Frame piece overtop of the 5 1/2" piece that has the banner attached to it.


Foam square the label to the middle of the card front.


Foam square the Flower Lace Frame to the 5 5/8" piece of patterned paper. Cut a cardbase that measures 5 3/4" x 11 1/2", score at 5 3/4". Adhere the cardfront to the cardbase.


Here's your finished Love is All you Need Card.


Elizabeth Craft Designs Supplies Used:


Other Supplies Used:

- Emerald Creek Craft Supplies: Doubloon Gold Embossing Powder
- Ranger Ink: Emboss It Ink
- Tim Holtz for Ranger Ink: Vintage Photo Distress Ink and a blending tool with foam
- Graphic 45: Portrait of a Lady - 12x12 Patterns & Solids

- Katelyn


Thursday, February 22, 2018

Love

I'm up on Scrap Shotz's blog today sharing a scrapbook layout featuring the Prima Marketing - Amelia Rose Deluxe Kit. This paper collection is beautiful and paired well with one of the professional photos we had done on our Alaskan cruise.  I hope that my layout will inspire you to recreate it at home. 


You'll want to make sure to stop by Scrap Shotz's Blog so that you can see the rest of the details on my scrapbook layout. You'll also want to stop by the blog the rest of this month as the design team is sharing lots of inspiration with you. 

- Katelyn


Wednesday, February 21, 2018

Just For You

Happy Wednesday! I've been busy playing with the Laundry Party Stamp and Die Set designed by Krista Schneider for Elizabeth Craft Designs. This card is a bit more on the simple side for me, but I love how it's turned out. Read below as I share with you how to recreate my Just For You Card at home.


To start, die cut the 4" Dashing Rectangle die out of White Soft Finish Cardstock. Apply Jet Black Archival Ink to the Just For You stamp and stamp in the bottom right hand corner of the rectangle. Ink the edges of the rectangle using Black Soot Distress Ink and a blending tool with foam.


Die cut the 2 3/8" Stitched Oval out of a piece of patterned paper from the Relax in the Garden paper pack. Die cut the 2" Stitched Oval out of the backside of the fly sheet from the paper pack. Ink the edges of the stitched ovals using Black Soot Distress Ink and a blending tool with foam.


Apply Jet Black Archival Ink to the flower bunch stamp and stamp onto a piece of watercolour cardstock. Watercolour the flower bunch using the following Tombow Markers - N15, 743, 373, 772 and 296. With the flower bunch coloured, use the co-ordinating flower bunch die to cut the flower bunch out. Ink the edges of the flower bunch using Black Soot Distress Ink and a blending tool with foam.


Apply Jet Black Archival Ink to the bird stamp and stamp onto a piece of watercolour cardstock. Watercolour the bird using the following Tombow Markers - 772 and 373. With the bird coloured, use the co-ordinating bird die to cut the bird out. Ink the edges of the bird using Black Soot Distress Ink and a blending tool with foam.


Adhere the 2" stitched oval to the 2 3/8" stitched oval. Foam square the 2 3/8" stitched oval 1/2" from the top of the dashing rectangle piece.


Foam square the flower bunch to the middle of the stitched ovals. Foam square the bird overtop of the three dots after the sentiment. Cut a cardbase that measures 5 1/2" x 8 1/2", score at 4 1/4". Adhere the cardfront to the cardbase.


Here are a few closeups of the finished Just For You card.


Here's the finished Just For You Card.


Elizabeth Craft Designs Supplies Used:


Other Supplies Used:

- Tombow Markers: N15, 743, 373, 772, 296
- Ranger Ink: Jet Black Archival Ink
- Tim Holtz for Ranger Ink: Black Soot Distress Ink and a blending tool with foam

- Katelyn


Tuesday, February 20, 2018

Happy Easter - Designer Challenge

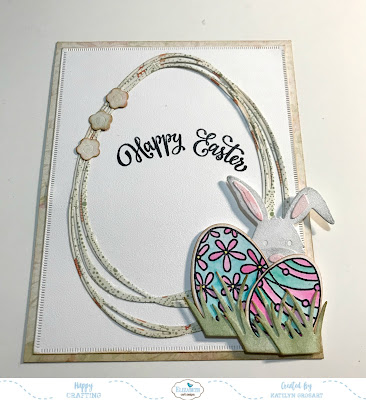
It's time for a new Designer Challenge on the Elizabeth Craft Designs Blog today.  For February it's all about Easter. With this month's challenge in mind, I set out to create a cute Easter Card that you could give to that special someone in your life. You'll want to make sure to read below as I have a tutorial for you so that you can re-create my Happy Easter Card at home. Make sure to read all the way down to the bottom of the post as I have some information on how to get in on a fabulous giveaway from Elizabeth Craft Designs.


To start, die cut three grass pieces from the Spring Basket Die Set out of White Soft Finish Cardstock. Blend Shabby Shutters Distress Ink over the entire surface of the grass pieces using a blending tool with foam. Use Vintage Photo Distress Ink and a blending tool with foam to ink the edges of each grass bush.


Die cut the bunny from the Bunny die out of White Soft Finish Cardstock. Using Hickory Smoke Distress Ink and a blending tool with foam, lightly go over the bunny and it's mouth. Using Spun Sugar Distress Ink and a blending tool with foam, lightly go over the ears and it's nose. Adhere the nose to the mouth and then adhere the mouth to the bunny. Adhere the two pink ear pieces to the ears.


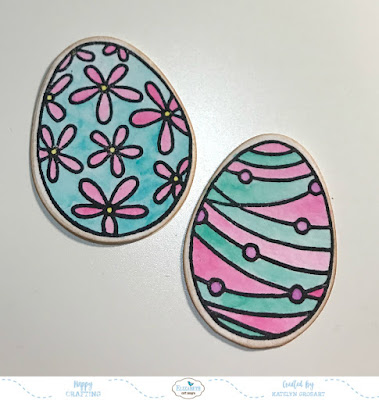
Choose two Easter eggs from the Colour My Easter Eggs. Apply Jet Black Archival Ink to each egg stamp and stamp onto a piece of watercolour cardstock. Colour the eggs using a watercolour brush and the following Tombow Markers - 373, 269, 743, 055 and 676. Once the eggs have been coloured, cut the eggs out using the Colour My Easter Eggs die set. Ink the edges of the eggs using Vintage Photo Distress Ink and a blending tool with foam.


Die cut the Entwined Egg twice out of patterned paper. Ink the edges of both entwined eggs using Vintage Photo Distress Ink and a blending tool with foam.


While the Entwined Egg die is still out, die cut the medium sized flower seven times out of patterned paper. Ink the edges of the flowers using Vintage Photo Distress Ink and a blending tool with foam.


From the Small Flower Set die, die cut the same flower out four times from White Soft Finish Cardstock. Blend Spun Sugar Distress Ink over the entire surface of two of the flowers. Blend Shabby Shutters Distress Ink over the entire surface of the other two flowers. 


The last piece to die cut is the 4 1/2" Dashing Rectangles out of White Soft Finish Cardstock. Ink the edges of the rectangle using Vintage Photo Distress Ink and a blending tool with foam.


Cut a piece of patterned paper that measures 4 3/4" x 6". Ink the edges of the patterned paper piece using Vintage Photo Distress Ink and a blending tool with foam.


Adhere the dashing rectangle piece to the patterned paper piece. Adhere the entwined eggs to the middle of the dashing rectangle piece. Make sure that you can see both entwined eggs.


In the bottom right hand side of the egg, adhere the two easter eggs, the bunny and the grass pieces.


Adhere three of the flowers on the top left hand side of the egg. Apply Jet Black Archival Ink to the Happy Easter sentiment and stamp in the middle of the egg.


Adhere the other four flowers in amongst the eggs, bunny and grass.


Adhere one large flower above the bunny and adhere the other large flower to the left of the easter eggs. To finish off the flowers, add Transp.Glitter/Gold Dots to the centres. To finish the card, cut a cardbase that measures 4 3/4" x 12", score at 6". Adhere the cardfront to the cardbase.


Here are a few close up photos of the Happy Easter Card. 


Here's the finished Happy Easter Card. 


*******************

For today's challenge Elizabeth Craft Designs are giving away a $20 Gift Card to use on our website to 3 winners

To enter simply leave a comment on the Elizabeth Craft Designs Challenge post and tell us "What Elizabeth Craft Designs dies or stamp sets would you use to create an Easter Card?

We will select 3 lucky winners in a random drawing 

The winners will be announced on Friday, March 2nd on the Elizabeth Craft Designs blog.


************************

Elizabeth Craft Designs Products Used:


Other Products Used:

- Tim Holtz for Ranger Ink: Distress Ink - Spun Sugar, Shabby Shutters & Vintage Photo & Blending Tool & Foam
- Ranger Ink: Jet Black Archival Ink
- Tombow Markers: 373, 269, 743, 055 & 676
- Authentique: Jubilee - Jubilee Two, Jubilee Five & Jubilee Six

- Katelyn


Monday, February 19, 2018

Explore - Traveler's Notebook

Happy Monday! I'm sharing a new project over on Wild Whisper's blog today. For this weeks project, I've been playing with their More Adventures Traveler's Notebook to create my Explore two page spread.  To create my two page spread, I've used the More Adventures Collection and added in some of the coordinating wood veneers. 


For all the details and a full tutorial on my Explore two page spread in my Traveler's Notebook, you'll want to stop by the Wild Whisper blog. Make sure to keep on checking out my blog as well as Wild Whisper's blog because myself and the rest of the design team will be sharing lots of projects featuring the More Adventures Collection as well the Classic Woodgrains Mini Collection. 

Thank for stopping by!
- Katelyn

Saturday, February 17, 2018

Master Detective Mini Album

Yesterday I was up on Graphic 45's blog sharing my Master Detective Mini Album.  In December, three Brand Ambassadors were challenge to create a project using three Graphic 45 products. The three products we had to use were the Mixed Media Album, any 12x12 Patterned Paper collection and the Washi Tape Set. In addition to the three products, we could also use Metal, Inks and Ribbon.  Below I'll share a few photos, a bit about my master detective mini album as well as some tips and tricks about my project. If you haven't stopped by Graphic 45's blog yet, you'll want to, as Kathy and Nico have also created fabulous projects using the same three products and I have some more photos on their blog of my Master Detective Mini Album.

Creating this mini album was an absolute blast and it will be perfect to give as a gift this Christmas. I hope that you'll enjoy some of the up close photos of the Master Detective Mini Album as well as a few tips and tricks.


Tip: There are lots of cardstock pages and vellum pages in the mixed media album, so use them for some of your photo mats.


To see more pictures of my Master Detective Mini Album, you'll want to head over to the Graphic 45 blog.

Graphic 45 Supplies Used:
- Master Detective 12x12 Patterned Paper Pad
- Washi Tape Set
- Black Mixed Media Album

Other Supplies Used:

- Tim Holtz for Ranger Ink: Black Soot Distress Ink & Blending Tool with Foam
- Edge Distressor, Paper Trimmer and Scissors
- Ruler
- Crop a Dile
- Sookwang Tape
- 3D Foam Squares

Thanks for stopping by and make sure to head over to the Graphic 45 blog  to check out the rest of the photos of my project as well as Kathy and Nico's projects!


-Katelyn