Happy Monday!
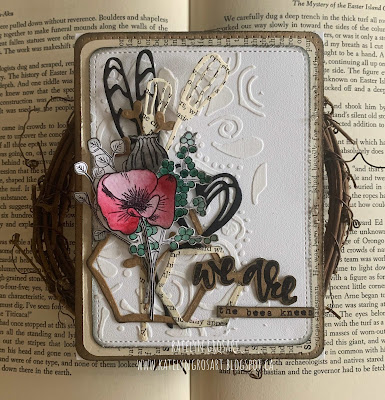
Today's post, I'm sharing this pretty We Are the Bees Knees Card. To create my card, I've used stamps, stencils and dies from the Art Journal Collection. You'll want to read below as I have a full tutorial on how to recreate my card at home.
To start, die cut a 4" Stitched Rounded Rectangle out of a piece of kraft cardstock. Die cut a 3 3/4" Fitted Rounded Rectangle out of a piece of book page. Distress the edges of both rectangles. Ink the edges of both rectangles using Black Soot Distress Ink and a blending tool with foam.
Die cut a 3 1/2" Stitched Rounded Rectangle out of a piece of White Soft Finish Cardstock. Choose one of the stencils from the Pattern Stencil Pack. Place the stencil on the left hand side of the rectangle. Using a palette knife and Texture Paste Opaque Matte through the stencil. Remove the stencil. Once the texture paste has dried, distress the edges of the rectangle. Ink the edges of the rectangle using Black Soot Distress Ink and a blending tool with foam.
From the Flower Power die, die cut the bud branch out of a piece of book page. Die cut the wing looking branch out of a piece of black cardstock.
From the Decorative Insert Die, die cut the heart branch and large hexagon out of kraft cardstock. Die cut the small hexagon out of a piece of book page. Die cut one of the hearts out of a piece of black cardstock. Ink the edges of the hexagons.
From the Words & Layers Stamp Set, you'll need the We Are and The Bees Knees stamps. Apply Jet Black Archival Ink to both the stamps and stamp onto a piece of kraft cardstock. Fussy cut around the We Are words. Cut the The Bees knees words into a strip. Ink the edges of both word sets using Black Soot Distress Ink and a blending tool with foam.
Choose two of the floral branches from the Flowy Florals Stamp Set. Apply Jet Black Archival Ink to both of the floral branches and stamp onto a piece of watercolour cardstock. Colour one of the floral branches in using a waterbrush and the Watercolour Palette. Fussy cut the floral branches out. Ink the edges of the floral branches using Black Soot Distress Ink and a blending tool with foam.
From the Poppy Dream Stamp, you'll need the bud and a single bloom. Apply Jet Black Archival Ink to both of the stamps and stamp onto a piece of watercolour cardstock. Colour the bud and single flower in using a waterbrush and the Watercolour Palette. Fussy cut the bud and flower out. Ink the edges of the flower and bud using Black Soot Distress Ink and a blending tool with foam.
Adhere the 3 1/2" rectangle to the 3 3/4" rectangle. Foam square the 3 3/4" rectangle to the 4" rectangle.
Adhere the bud branch and the wing branch to the left hand side of the 3 1/2" rectangle as desired. Adhere the heart branch in between the two branches.
Adhere the large hexagon to the bottom portion of the branches. Adhere the black and white flower branch to the left hand side of the branches. Adhere the bud image to the middle of the branches and heart branch.
Adhere the other stamped coloured flower branch to the right of the bud. Adhere the single flower to the middle of the flower branches and the bud. Adhere the heart in behind the stamped coloured flower branch.
Adhere the small hexagon to the bottom right of the large hexagon. Adhere the We Are and The Bees Knees sentiment to the bottom right side of the 3 1/2" rectangle as desired.
To finish the card, cut a cardbase out of White Soft Finish Cardstock that measures 5 1/4" x 8", score at 4". Adhere the cardfront to the cardbase.
Here are a few closeup photos of the finished card.
Here is the finished We Are the Bees Knees Card.
Elizabeth Craft Designs Supplies Used:

Other Supplies Used:
- Tim Holtz for Ranger Ink: Distress Ink - Black Soot and Blending Tool with Foam
- Ranger Ink: Jet Black Archival Ink and Texture Paste Opaque Matte
- Misc: Book Page, Kraft Cardstock and Black Cardstock
I hope that my card has inspired you to recreate your own version at home.
- Katelyn


No comments:
Post a Comment