Happy Friday!
Today's post, I'm sharing this layered Beauty, Create, Journal Tag Pocket for inside my junk journal. To create my tag pocket, I've used stamps and dies from the Art Journal Collection. You'll want to read below as I have a full tutorial on how to recreate my tag pocket at home.

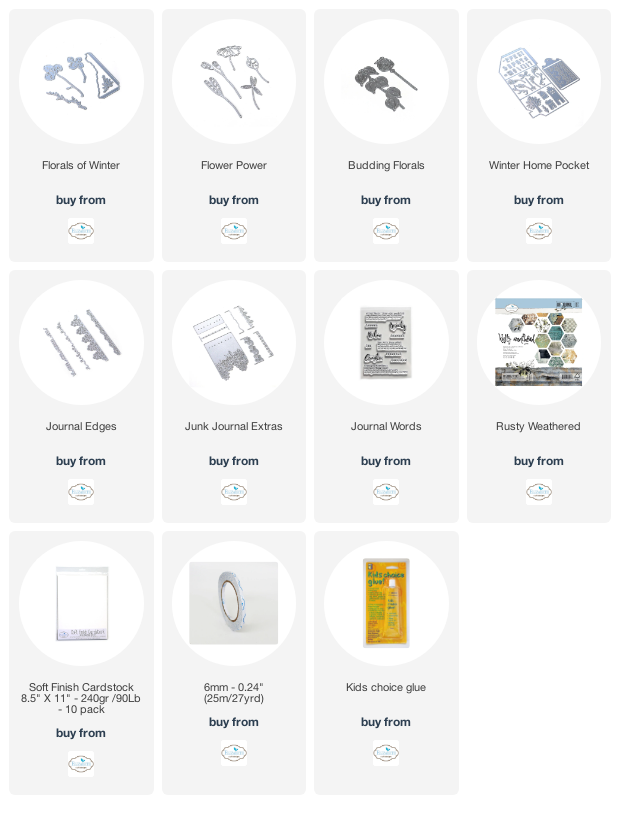
To start, choose a piece of patterned paper from the Rusty Weathered Paper Pack. From the Winter Home Pocket Die, die cut the tag pocket out of the patterned paper. Ink the edges of the tag pocket using Black Soot Distress Ink and a blending tool with foam.

From the same Winter Pocket Home Die, die cut one of the branches out of a piece of kraft cardstock and one of the other branches out of a coordinating patterned paper piece.

From the Journal Edges die, die cut the lacey border out of a piece of black cardstock. The border will measure 3/4" x 5 7/8".

From the Junk Journal Extras die, die cut the swirly border out of a piece of White Soft Finish Cardstock. The border is 3/4" wide.

From the Budding Florals die, die cut the cotton bulb out of a piece of kraft cardstock.

From the Flower Power Die, die cut one of the flowers out of a piece of black cardstock.

From the Florals of Winter die, die cut the long branch out of a piece of White Soft Finish Cardstock.

Apply Jet Black Archival Ink to the Beauty, Create and Journal words from the Journal Words and stamp all the words onto a piece of White Soft Finish Cardstock. Fussy cut the beauty and create word out. Cut the Journal word into a word strip. Ink the edges of all three words using Black Soot Distress Ink and a blending tool with foam.

Cut a piece of Floral Collage paper that measures 2 1/2" x 3 3/4".

Cut two pieces of ribbon. The first piece is a piece of cream lace that is 5 3/4" long. Cut a second piece of grey ribbon that is 6" long.

I wanted to add a couple of metal embellishments, so I grabbed a metal arrow and a index clip.

Adhere the floral collage paper 1" from the right and 1/4" from the bottom of the chimney side of the tag pocket.

Staple the two pieces of ribbon on the left hand side of the tag pocket where we just adhered the floral paper.

Add adhesive to the flaps and adhere the flaps to the middle of the tag pocket creating the pocket.

Adhere the white border 1 3/4" from the right and 3/4" from the bottom of the pocket. Adhere the black border 2 1/4" from the right of the pocket.

Adhere the white branch 1 7/8" from the right and all the way to the top of the pocket. Use foam squares to adhere the cotton bulb 3/4" from the top and 2 1/4" from the right of the pocket. Adhere the black flower to the right of the cotton bulb.

Adhere the other two branches as desired by the cotton bulb and the flower.

Adhere the metal arrow to the left of the cotton bulb as desired. Use adhesive and foam squares to adhere the Beauty, Create and Journal words to the right of the borders as desired. To finish the page, add a index clip to the right hand side of the pocket.

To adhere the pocket into the junk journal, I used a piece of Art Journal Washi Tape and put it on the back side of the pocket.


Here are a few closeup photos of the finished tag pocket insert.


Here is the finished Beauty, Create, Journal Tag Pocket Insert.

Elizabeth Craft Designs Supplies Used:
Other Supplies Used:
- Tim Holtz for Ranger Ink: Distress Ink - Black Soot and Blending Tool with Foam
- Ranger Ink: Jet Black Archival Ink
- Tim Holtz/Idea-ology: Index Clips, Adornments - Arrows and Collage Paper - Floral
- Engel Belle: Grey/Brown Ribbon
- Misc: Kraft Cardstock, Black Cardstock, Cream Lace and Mini Stapler
I hope that my tag pocket insert has inspired you to recreate your own version at home.
- Katelyn
No comments:
Post a Comment