Friday, June 29, 2018

Memories Wall Hanging

Happy Friday! I'm up on Southern Ridge Trading Company's blog sharing with you my Memories Wall Hanging. I hope that my wall hanging will inspire you to want to recreate it at home.


You'll want to stop by Southern Ridge Trading Company's Blog so that you can learn how to recreate my Memories Wall Hanging at home.

- Katelyn

Monday, June 25, 2018

Live for the Moments Wall Hanging

I'm up on Wild Whisper's blog today sharing my Live for the Moments Wall Hanging. To create my project for today, I used the Forever & Always and Small Patterns Collection.


For all the details and a full tutorial on my Live for the Moments Wall Hanging, you'll want to stop by the Wild Whisper blog. Make sure to keep on checking out the Wild Whisper's blog because the design team will be sharing lots of inspiration for you.

- Katelyn

I Have An Entire Forest Art Journal Page

Today, I'm up on Creative Scrapbooker Magazine's Blog as a monthly blogger sharing my I Have An Entire Forest Art Journal Page. My page features the Small Patterns and Forever & Always Collection from Wild Whisper Designs, a variety of stencils from Stampers Anonymous, a variety of mediums from Ranger Ink, and adhesive from Scrapbook Adhesives by 3L.


Make sure to stop by the Creative Scrapbooker Blog to learn how I created my I Have An Entire Forest Art Journal Page.

Thank for stopping by!
- Katelyn

Life Doesn't Have to be Perfect Card

Happy Monday! It's going to be a jammed packed day on my blog today as I have three projects to share with you.
To start the day, I'm back on Quietfire Design's blog today sharing my Life Doesn't Have to be Perfect Card that features a variety of stamps and dies.


For a full tutorial and a few more photos of my project, you'll want to head over to Quietfire's blog for all the details. 

- Katelyn

Tuesday, June 19, 2018

Hexagon Inspiration Part 2

I'm back with part 2 of the Hexagon Inspiration Designer Challenge over on Elizabeth Craft Designs. For part 2, I'm sharing my Happy Birthday card over on Quietfire Designs blog.  My Happy Birthday card features a variety of A Way With Words die along with both the Fitted and Stitched Hexagons.


For a full tutorial and a few more photos of my project, you'll want to head over to Quietfire's blog for all the details. 

- Katelyn

Hexagon Inspiration - Designer Challenge

It's time for a new Designer Challenge on the Elizabeth Craft Designs Blog today.  For June's challenge it's all about Hexagon Inspiration. The inspiration for my project came from ModaScrap's Under the Sea Paper Pack and the Stitched Hexagons. With the Stitched Hexagon die in hand, I set out to create this Life's a Beach Home Decor Project. Make sure to read below as I have a tutorial for you so that you can re-create my Life's a Beach Home Decor Piece at home. Make sure to read all the way down to the bottom of the post as there's some information on how to get in on the fabulous giveaway from Elizabeth Craft Designs.


From the Sand Castle die, die cut the sand castle out of White Soft Finish Cardstock. Apply Emboss It Ink to each of the sand castle pieces. Sprinkle Baked Texture - Dirty Sand Embossing Powder over each piece. Tap off the excess powder and emboss with a heat tool.


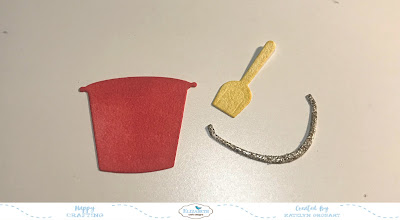
With the Sand Castle die still out, die cut the bucket and shovel out of White Soft Finish Cardstock. Blend Festive Berries Distress Ink with a blending tool and foam over the entire surface of the bucket. Blend Fossilized Amber Distress Ink with a blending tool and foam over the entire surface of the shovel. Apply Emboss It Ink to the handle of the bucket. Sprinkle Baked Texture - Dirty Sand Embossing Powder over the handle. Tap off excess powder and emboss with a heat tool. 


Die cut the 3/4" Stitched Fishtail Banner out of White Soft Finish Cardstock. Cut the banner down to 3". Apply Jet Black Archival Ink to the Life's a Beach sentiment and stamp onto the banner. Ink the edges of the banner using Vintage Photo Distress Ink and a blending tool with foam.


Die cut nineteen 1 1/8" Stitched Hexagons out of a variety of the Under the Sea Paper. Cut the hexagons down as needed. Ink the edges of all of the hexagons using Vintage Photo Distress Ink and a blending tool with foam.


Cut a piece of White Soft Finish Cardstock that measures 3 5/8" x 6 1/4". Cut a piece of cardboard that measures 3 7/8" x 6 1/2". Apply three coats of White Gesso to the cardboard piece. Ink the edges of both pieces using Vintage Photo Distress Ink and a blending tool with foam.


Adhere the White Soft Finish Cardstock piece to the cardboard piece.


Adhere the stitched hexagons as desired down the front of the White Soft Finish Cardstock piece.


Adhere the sand castle together. Foam square the sand castle to the middle of the stitched hexagons panel.


Adhere the stitched banner 3/4" from the bottom and right against the right hand side of the panel.


Adhere the handle to the bucket and the shovel to the top of the bucket. To finish off the banner, adhere the bucket with shovel to the right side of the sentiment on the banner.


And here's the finished Life's a Beach Piece.


*******************

For today's challenge Elizabeth Craft Designs are giving away a $20 Gift Card to use on our website to 3 winners

To enter simply leave a comment on the Elizabeth Craft Designs Facebook Giveaway Blog Post or the Elizabeth Craft Designs Challenge post and tell us What is your favorite way to use Elizabeth Craft Designs Stitched Hexagons or Fitted Hexagons dies? 


We will select 3 lucky winners in a random drawing 

The winners will be announced on Friday, June.22nd on the Elizabeth Craft Designs Blog and our Facebook page.


*****************

Elizabeth Craft Designs Products Used:

- ModaScrap: Under The Sea

Other Products Used:

- Tim Holtz for Ranger Ink: Distress Ink - Vintage Photo, Festive Berries & Fossilized Amber and Blending Tool with Foam
- Ranger Ink: Jet Black Archival Ink, Emboss It Ink and Gesso - White
- Emerald Creek Craft Supplies: Baked Texture Embossing Powder by Seth Apter - Dirty Sand

- Katelyn


Monday, June 18, 2018

Happy Birthday Gift Box & Card

Happy Monday! I'm up on Wild Whisper's blog today sharing my Happy Birthday Gift Box & Card. To create my project for today, I used the More Adventures Collection and some of the wood veneers.


For all the details and a full tutorial on my Happy Birthday Gift Box & Card, you'll want to stop by the Wild Whisper blog. Make sure to keep on checking out my blog as well as Wild Whisper's blog because myself and the rest of the design team will be sharing lots of projects featuring the Forever & Always Collection as well the Small Patterns Mini Collection. 

- Katelyn

Friday, June 15, 2018

Fly Away with Me Tag

Happy Friday! I'm up on Southern Ridge Trading Company's blog sharing with you my Fly Away with Me Tag. I hope that my tag will inspire you to want to recreate it at home.


You'll want to stop by Southern Ridge Trading Company's Blog so that you can learn how to recreate the embellishments for my Fly Away with Me Tag at home.

- Katelyn


Thursday, June 14, 2018

Cheers Notecard

I'm back on the Elizabeth Craft Designs blog today sharing my cute Cheers Notecard. To create my card I used some dies from Joset Designs and ModaScrap.


You'll want to make sure your way over to Elizabeth Crafts Designs Blog to read all about how I created my Cheers Notecard, so that you're able to recreate it for your home. 

- Katelyn

Monday, June 11, 2018

Love Never Fails Tag

Happy Monday! I'm back on Wild Whisper's blog today sharing my Love Never Fails Tag. To create my project for today, I used the Forever & Always Collection, the new Small Patterns Mini Collection and some sequins. 


For all the details and a full tutorial on my Love Never Fails Tag, you'll want to stop by the Wild Whisper blog. Make sure to keep on checking out my blog as well as Wild Whisper's blog because myself and the rest of the design team will be sharing lots of projects featuring the Forever & Always Collection as well the Small Patterns Mini Collection. 

- Katelyn

Friday, June 8, 2018

Destiny Tag

Happy Friday! I'm thrilled to finally share with you that I will be joining the Quietfire design team. Quietfire has a ton of beautiful stamps and dies that compliment my mixed media projects. For my first post I created this pretty "Destiny" tag perfect for any occasion.


For a full tutorial and a few more photos of my project, you'll want to head over to Quietfire's blog for all the details. 

- Katelyn

Thursday, June 7, 2018

Tropical Hello Tag

I'm excited to be up on the Elizabeth Craft Designs blog today sharing my Tropical Hello Tag. To create my tag I used some dies from Joset Designs and Els van de Burgt Studio.


You'll want to make sure your way over to Elizabeth Crafts Designs Blog to read all about how I created my Tropical Hello Tag, so that you're able to recreate it for your home. 

- Katelyn

Wednesday, June 6, 2018

Spring Flowers Card


Happy Wednesday! I'm excited to share with you my 60 second Spring Flowers Card that I created for Graphic 45's blog. Although it can be challenging to create a project within 60 second, Graphic 45's products are perfect for achieving these types of projects.  So, by using the Floral Shoppe Collection, and a ATC Black Policy Envelope, I was able to create this simple but quick and pretty card, easy for anyone to recreate at home and perfect for any occasion. I hope that you'll enjoy my video tutorial of my Spring Flowers Card as well as a few tips and tricks.


Tip: Use a ATC tag to add some extra interest in amongst the patterned papers.


Tip: To quickly decorate the front of a card, use pre-made flowers.


Video Tutorial:


Graphic 45 Supplies Used:

Other Supplies Used:
- Tombow USA: Permanent Adhesive
- Glue Dots: 3/8" Ultra Thin Dots
- Misc: Flowers

Thanks for stopping by and checking out my project! 
-Katelyn


Tuesday, June 5, 2018

A Way With Words Release Day - Thank You Card

It's a new release day over on the Elizabeth Craft Designs blog, featuring Suzanne Cannon's A Way With Words new dies and stamp release. 

For my project, I featured the new Rosebud Wreath & Elements die and the Thank You 2 die, to create this pretty Thank You card. 


To start, die cut all the Wreath from the Rosebud Wreath & Elements from White Soft Finish Cardstock. Ink the edges of the wreath using Black Soot Distress Ink.


From the same die, die cut the single rosebuds with matching overlay four times out of White Soft Finish Cardstock. Using a blending tool with foam, blend Picked Raspberry Distress Ink over each of the rosebud pieces.


Continuing with the same die, die cut the set of three rosebuds four times out of White Soft Finish Cardstock. Using a blending tool with foam, blend Spun Sugar Distress Ink over each of the rosebuds.


The last element you'll need to die cut from the Rosebud Wreath & Elements die is the leaf circle. Die cut the leaf circle out of White Soft Finish Cardstock. Using a blending tool with foam, blend Peeled Paint Distress Ink over the entire surface of the leaf circle.


Die cut the Thank You 2 die, out of White Soft Finish Cardstock. Using a blending tool with foam, blend Spun Sugar Distress Ink over the entire surface of the word.


Take out the 4 1/4" and 4 3/4" Stitched Circles. Die cut the 4 1/4" stitched circle out of one of the patterned papers. Die cut the 4 3/4" stitched circle out of another patterned paper. Ink the edges of the circles using Vintage Photo Distress Ink.


Choose two more coordinating patterned papers that match your circles. Cut one of the patterned papers to 5 1/4" x 5 1/4". Cut the other patterned paper to 5 1/2" x 5 1/2". Ink the edges of the patterned papers using Vintage Photo Distress Ink.


Adhere the 5 1/4" patterned paper piece to the 5 1/2" patterned paper piece. Adhere the 4 1/4" stitched circle to the 4 3/4" stitched circle. Foam square the 4 3/4" stitched circle to the middle of the 5 1/4" patterned paper piece.


Adhere the solid set of three rosebuds in behind the each of the rosebuds on the frame. Adhere the frame to the stitched circles.


Adhere the leaf circle to the middle of the 4 1/4" stitched circle. Adhere the Thank You sentiment to the middle of the leaf circle.


Adhere a single rosebud overlay to a single plain rosebud. Repeat this for the other three. Adhere two of the rosebuds together and repeat for the other two. Foam square one set of rosebuds to the top left hand side of the T. Foam square the other set of rosebuds to the bottom right hand side of the you. 


Cut a piece of White Soft Finish Cardstock that measures 5 1/4" x 11 1/2", score at 5 1/4". Adhere the card front to the card base.


You'll want to make sure to check out the rest of the projects the design team has created on the Elizabeth Craft Designs blog

Elizabeth Craft Designs Supplies Used:


Other Supplies Used:

- Tim Holtz for Ranger Ink: Distress Ink - Vintage Photo, Spun Sugar, Picked Raspberry, Black Soot & Peeled Paint and Blending Tool with Foam
- Carta Bella: Spring Market - 4x6 Journaling Cards, Rain Boots and Wreath Decor

- Katelyn


Monday, June 4, 2018

I Do. I Do. Wedding Card

Happy Monday! I'm up on Wild Whisper's blog today sharing my first post for the month.  For my post today, I've been playing with the Forever & Always Collection and have created this I Do. I Do. Wedding Card.


For all the details and a full tutorial on my I Do. I Do. Wedding Card, you'll want to stop by the Wild Whisper blog. Make sure to keep on checking out my blog as well as Wild Whisper's blog because myself and the rest of the design team will be sharing lots of projects featuring the Forever & Always Collection as well the Small Patterns Collection. 

Thank for stopping by!
- Katelyn